Showing posts with label papercrafts. Show all posts

Tuesday, November 27, 2018

5 Days of Christmas with My Creative Time...Day Two!

Hello & welcome to our "5" Days of Christmas"! This week we will be sharing w/you LOTS of last minute Christmas ideas, such as cards, tags, treat holders, gift card holders & what ever else comes to mind that will help YOU get your creative juices flowing for the holiday! There will be a giveaway each day & a winner will be announced each day! Example, winner of Monday will be announced on Tuesday, winner of Tuesday will be announced on Wednesday.....and so on! All you have to do is leave your comments on each of the design teams' blog for a chance to win a $15 Gift Card to the My Creative Time store!
ALSO, in addition to the $15 Gift Card that will be given away each day, Emma has a special prize that she will be giving away on Friday! It’s a few of her favorite things from 2018! I hope we ALL inspire you this week!
Today, we will be showcasing some quick and easy treat holders!! As you know, Emma carries a lot of cute and unique treat holder dies in her shop. I chose to use the Mini Gift Box Die. If you're looking for quick and easy, this one is it!! With only one pass through your die cutting machine, and technically no adhesive required, this come together fast!!

I kept these very simply, both were cut from plain, white cardstock. I die cut the treat box from patterned paper as well, and adhered it over one of the boxes.  


To jazz things up a bit, I used the Number Fun Dies and Add Ons Set to die cut the number 25.  After the number were adhered to the boxes, I decided it needed a heart as well which comes from the Hot Chocolate Season Stamp and Die set and is the perfect sized heart for almost anything!!


I love the cute boxes this die creates! I can actually imagine them hanging from a tree as well!

Thank you for visiting and remember...

***GIVEAWAY***
  Don’t forget to leave your comments on all of our blogs for a chance to win a $15 gift card to the My Creative Time store!

See you tomorrow!!!

Laurie


Monday, November 26, 2018

My Creative Time's 5 Days of Christmas...Day One!!

Hello & welcome to our "5 Days of Christmas"! This week we will be sharing with you LOTS of last minute Christmas ideas, such as cards, tags, treat holders, gift card holders & what ever else comes to mind that will help YOU get your creative juices flowing for the holidays! 
There will be a giveaway each day & a winner will be announced each day! Example, winner of Monday will be announced on Tuesday, winner of Tuesday will be announced on Wednesday.....and so on! All you have to do is leave your comments on each of the design teams blog for a chance to win a $15 Gift Card  to the My Creative Time store!
ALSO, in addition to the $15 Gift Card that will be given away each day, Emma has a special prize that she will be giving away on Friday! It’s a few of her favorite things from 2018! I hope we ALL inspire you this week!
Today is our 1st day of our 5 Days of Christmas! We all will be showcasing some quick & EASY tags!
Tag are one of my favourite things to make! And I had a lot of fun with this one!!

I used the scalloped tag from the Tag Dies Set to create this card. I die cut 2 and glued them together to give stability but also so the lovely stitching detail would be on both sides. I went for a vintage look by adding some burlap cardstock. I've had this stuff for years and just rediscovered it! I die cut the largest star from the 3 Star Stitched Die Set (which I've been using a lot lately) from the burlap as well as partially cut the tag die to have a bit of a topper on the tag.

For a bit of shine, I die cut the medium star from some gold cardstock and layered the two together. To bring the festive element in, I die cut a flower and leaves from the Stitched Pretty Flower and Leaves Dies and used Distress Inks to add colour.

The sentiment comes from the recently released Just A Little Something Stamp and Die Set. I used the same Distress Ink (Barn Door) to stamp it. Because Distress Ink doesn't stamp all that well, I used my Mini Misti so I could do multiple impressions. I also stamped the "to" and "from" on the reverse side of the tag.


Although, this wasn't super quick to make, it came together easily! And would look great on any gift!


***GIVEAWAY***  
 
Don’t forget to leave your comments on all of our blogs for a chance to win a $15 gift card to the My Creative Time store!

Thanks for stopping in today! See you back again tomorrow for more festive inspiration!!

Laurie


Friday, November 23, 2018

My Creative Time Black Friday Sale & Blog Hop!!

Today is the day we've all been waiting for, isn't it?!  Even though Black Friday is an American thing, us Canadians have this day marked on our calendars as well!!

While you are all stuffed with turkey leftovers, it’s time to shop! Besides our AWESOME sale, we are showcasing a couple of brand new dies. They are “Sleigh Die” along with the “Sleigh Bed”.


I decided to make a pink sleigh with gold foil accents (which are hard to photograph).  You can see how large this die is!!  To create the snowbanks I used a couple dies from the More Stitched Edges Die Set. The background was created with a stencil and Distress Ink.


I absolutely LOVE the bow that is included in this set!  For an added touch of green, I used the Stitched Leaves Die Set.


The sentiment comes from the recently released Christmas Wishes sentiment stamp set.

Now, when you add the Sleigh Die with the Sleigh Bed die, you get an incredible 3-D project perfect for giving treats, table decor or even hanging from the tree!! I quickly put this together to show you how it looks!


Isn't this awesome and so much fun?! Just think of the things you could use these dies for! I decorated my sleigh by making a flower with the Flower Petal Dies and the Stitched Leaves dies but you could use almost anything!


***BlOG HOP GIVEAWAY***  
Leave your comments on each stop of the hop ALONG with a way for us to contact you for a chance to win a $25 gift card to the MCT store GOOD LUCK!
***SALE***  
We are having a special “Buy More, Save More” sale! Use the following code that will apply to you at checkout:  


Thank you for stopping by and for all the love you leave me!!

Me! (you are here)


Happy Hopping and Shopping!!

Laurie


Thursday, October 18, 2018

My Creative Time 84th Edition Sneak Peek #3!!


Welcome back to the final day of Sneak Peeks for the 84th Edition Release for My Creative Time!! Today we are showing you what is probably my favourite from this release...the Reindeer Lollipop Holder Die!!

This is SOOOO CUTE!! With so many possibilities! I made a card using this adorable deer!


This is a large die set that comes with separate pieces for the antlers, nose, eyes and mouth.  This lets you decorate both sides of the Lollipop Holder.  I used cardstock along with Distress Inks to make my deer come alive!


I tucked her in the frame die from the Be Your Best Selfie Stamp and Die Set.  I realized that my Christmas themed stamps and dies from MCT are lacking so I didn't have an appropriate sentiment to put on the front of the card so I used one of the Stitched Message Bubble Dies to add that sweet little heart.


The finished size of this card is 4.25 X 4.25 inches.  The die provides two holes on the top of the head so you can tie your Lollipop Holder together. I added the white bow to hide these :)

I hope you enjoyed todays adorable sneak peek! Tomorrow is our Blog Hop to celebrate so I hope to see you then!!

***Sneak Peek giveaway!***
We will be giving away the sets we are showcasing each day to ONE lucky winner! For example, the set we are showcasing on Wednesday, Emma will announce the winner of that on Thursday & the sets we are showcasing on Thursday, Emma will announce that winner on Friday on my blog! ALL you have to do is leave a comment on each of our blogs! You are NOT required to comment on EVERY SINGLE blog, but the more you comment on, the more chances you have for winning! VERY IMPORTANT, PLEASE leave a way for us to contact you w/your comment just in case "YOU" are the lucky winner! For EXTRA entries, you can spread the word about this release on Facebook, tweet about it OR even instagram it! #mycreativetime! GOOD LUCK EVERYONE & let's start spreading the word!;)
Thank you so much for stopping by!! See you tomorrow!
Laurie


Wednesday, October 17, 2018

My Creative Time 84th Edition Release Sneak Peek #2!!


Welcome back to another sneaky peeky for the upcoming 84th Edition Release for My Creative Time!  Today we are showcasing the Santa Hat Lollipop Holder Die!  Emma comes up with the cutest ways to give treats, doesn't she??

But you probably know me well enough to know that I rarely use these lollipop holders as intended. That's because a) I never have lollies in my house and b) I love thinking outside the box when it comes to die cutting!


I used this die to create a cute gift giving tag! This was super simple. I basically just used one half of the die and stamped a sentiment on it, which comes from the Baked with Love Stamp and Die Set. Of course, I just had to use the Gift Card Gift Box Die that we featured yesterday!


I used the Grainy Wood Background Stamp to add that beautiful pattern to the gift box. This die set comes with separate dies for the pom-pom and the trim of the hat.  I used a textured white embossing powder on these pieces and I think it looks super cute!!


I hope you enjoyed today's sneak peek!! Make sure to come back tomorrow for our final reveal!!

***Sneak Peek giveaway!***
We will be giving away the sets we are showcasing each day to ONE lucky winner! For example, the set we are showcasing on Wednesday, Emma will announce the winner of that on Thursday & the sets we are showcasing on Thursday, Emma will announce that winner on Friday on the MCT blog! ALL you have to do is leave a comment on each of our blogs! You are NOT required to comment on EVERY SINGLE blog, but the more you comment on, the more chances you have for winning! VERY IMPORTANT, PLEASE leave a way for us to contact you w/your comment just in case "YOU" are the lucky winner! For EXTRA entries, you can spread the word about this release on Facebook, tweet about it OR even instagram it! #mycreativetime! GOOD LUCK EVERYONE & let's start spreading the word!;)
See you tomorrow!
Laurie


Tuesday, October 16, 2018

My Creative Time 84th Edition Release Sneak #1!


Hello and welcome to the first day of Sneak Peeks for the 84th Edition Release from My Creative Time!!  It's time to start getting into the holiday spirit and this release will definitely get your creative juices flowing!!

Today we are taking a look at the new Gift Card Gift Box Die!!  This is an incredible die that will make giving gift cards or tiny presents so fun!!


This two piece die provides all the cuts and score lines needed to create this cute box!  I paired it with the Made With Love Stamp and Die Set as well as the Small Stitched Scalloped Bow Die to make a fun little present.


I decided to put a pair of earrings in to show you that this is just the perfect gift box for small to medium sized jewellery!


I adore this little box so much and can't wait to use it this Christmas and all year round!!


***Sneak Peek giveaway!***
We will be giving away the sets we are showcasing each day to ONE lucky winner! For example, the set we are showcasing on Wednesday, Emma will announce the winner of that on Thursday & the sets we are showcasing on Thursday, Emma will announce that winner on Friday on the MCT blog! ALL you have to do is leave a comment on each of our blogs! You are NOT required to comment on EVERY SINGLE blog, but the more you comment on, the more chances you have for winning! VERY IMPORTANT, PLEASE leave a way for us to contact you w/your comment just in case "YOU" are the lucky winner! For EXTRA entries, you can spread the word about this release on Facebook, tweet about it OR even instagram it! #mycreativetime! GOOD LUCK EVERYONE & let's start spreading the word!;)
Thanks for stopping in today!!! I'll be back tomorrow for another amazing sneak!!
Laurie


Tuesday, July 10, 2018

Tag It Tuesday with My Creative Time!

Welcome back!! It's time for another edition of "Tag It Tuesday" for My Creative Time!  Emma has the most wonderful selection of tag dies...I'm not kidding!!

Today I used the Tag Die Layers Set. This set is made to co-ordinate perfectly with the Tag Dies Set but can be used on its own, like I did today!

I started with your basic A2 folded card base and selectively die cut the scalloped tag from the set.  This is easy. Simply place the tag on the front of the folded card base but make sure to place it so the top of the die is overhanging the cardstock...the folded end!!  This will result in the die cutting through both layers only where the die is sitting. Oh my, I fear this isn't making sense and I did not get a photo, I'm so sorry!  Here is what you'll end up with...


A folded tag, which is a great way to hide your sentiment!  I cut 5 of the "zig zag" die, which is also included in this die set, out of a pink and mint cardstock.  For the main image of this tag, I used the small party hat from the Party Hat Dies and used the same colours of cardstock for the decorations.


My sentiment comes from the Time to Celebrate Stamp Set and was heat embossed in silver. 


This stamp set is filled with clever and fun sentiments...


I tied a piece of twine around the top of the tag just for decoration.  And added a bit of sparkle detail with a Stardust Gelly Roll pen as well as a few sparkly enamel dots!


And that's the finished tag for today!!  I hope you enjoyed!

Thank you so much for stopping in today, I always appreciate your visits!!

Until next time...stay crafty!!

Laurie 


Sunday, July 1, 2018

Your Next Stamp Guest Designer!

Hi friends!!  I'm so happy to be guesting for Your Next Stamp for the month of July!!  This has been one of my favourite companies since I began this awesome hobby!! Not only because it's a Canadian company but the designs of the stamps and dies are so incredibly cute and unique!!

I made a card to celebrate using one of my favourite stamp sets and die sets!


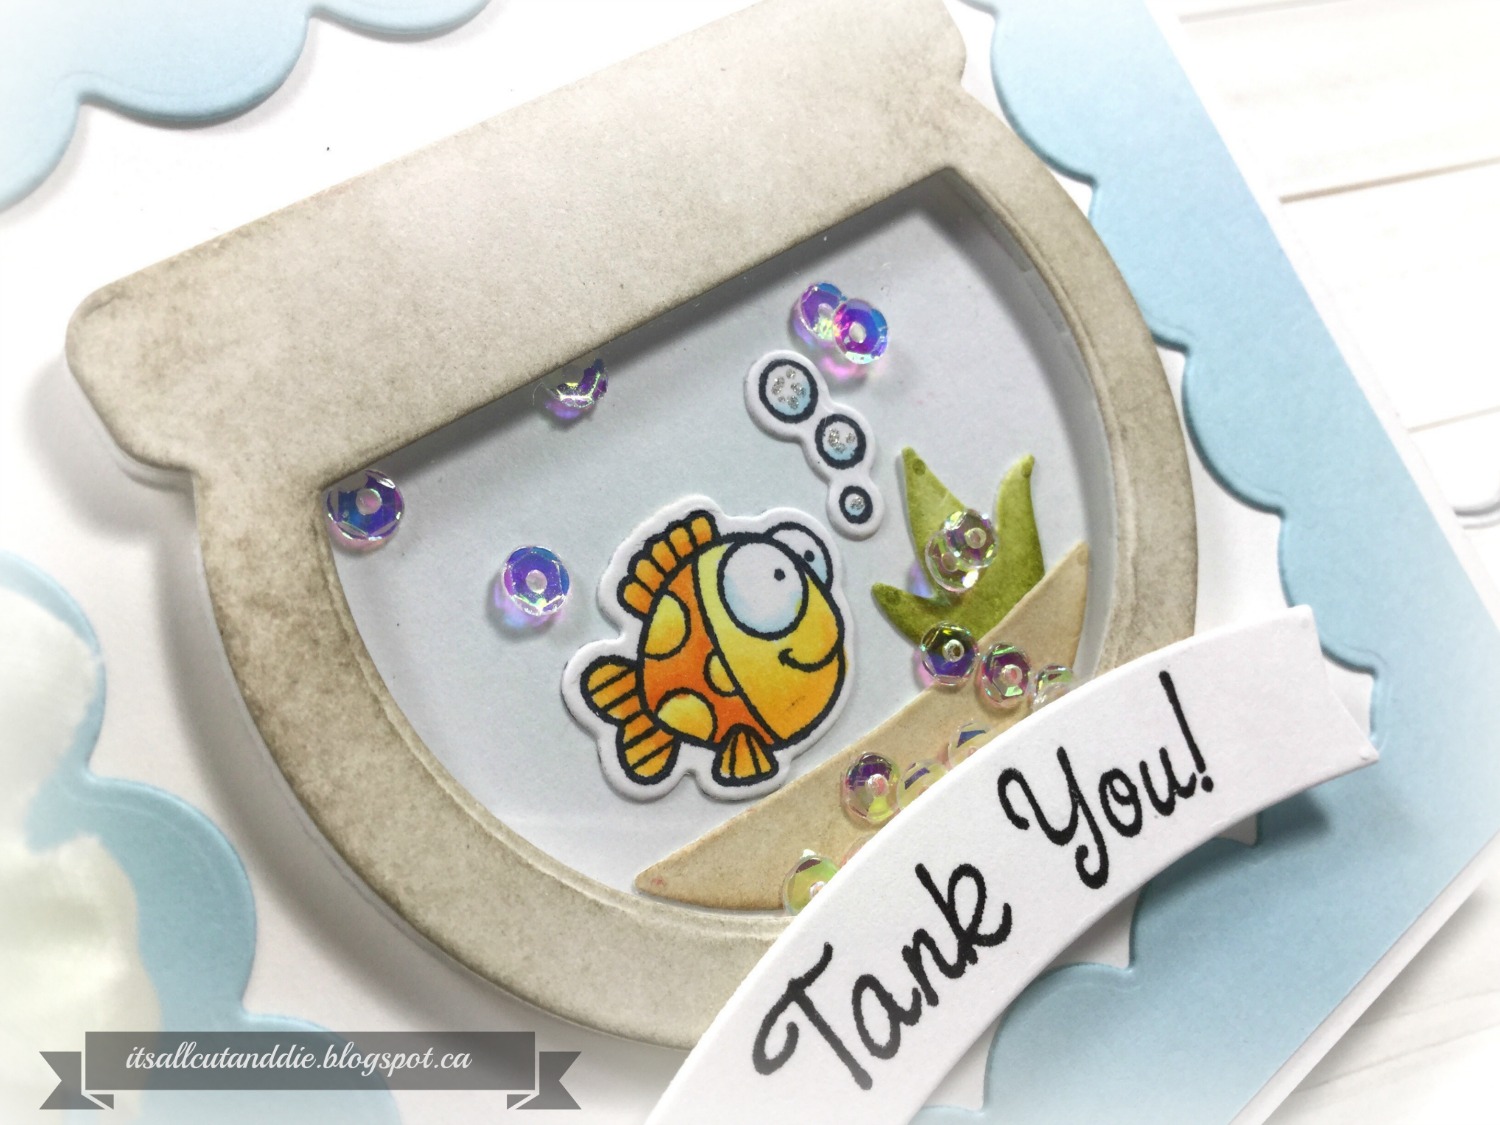
I don't make many shaker cards but this is a very special occasion and the Fish Bowl Shaker Die Set makes it so easy!!  I used the Aquarium Antics stamps and dies to create this cute "tank you" card.

One of my all time fave dies is the Reverse Scallop with Optional Stripes Die Set! This is one of the most unique dies and I hope someday there will be more released!!!


The sentiment was stamped on the banner die that is included in the Cool Tag One Die Set.


I had so much fun making this card!

 I hope you'll join me this month as I play along with all the challenges and also the JULY RELEASE for Your Next Stamp!!  

Thank you so much for stopping in today!! Much appreciated!

I'll be back real soon.  Until then...stay crafty!!

Laurie

Thursday, June 28, 2018

Anything Goes with My Creative Time!

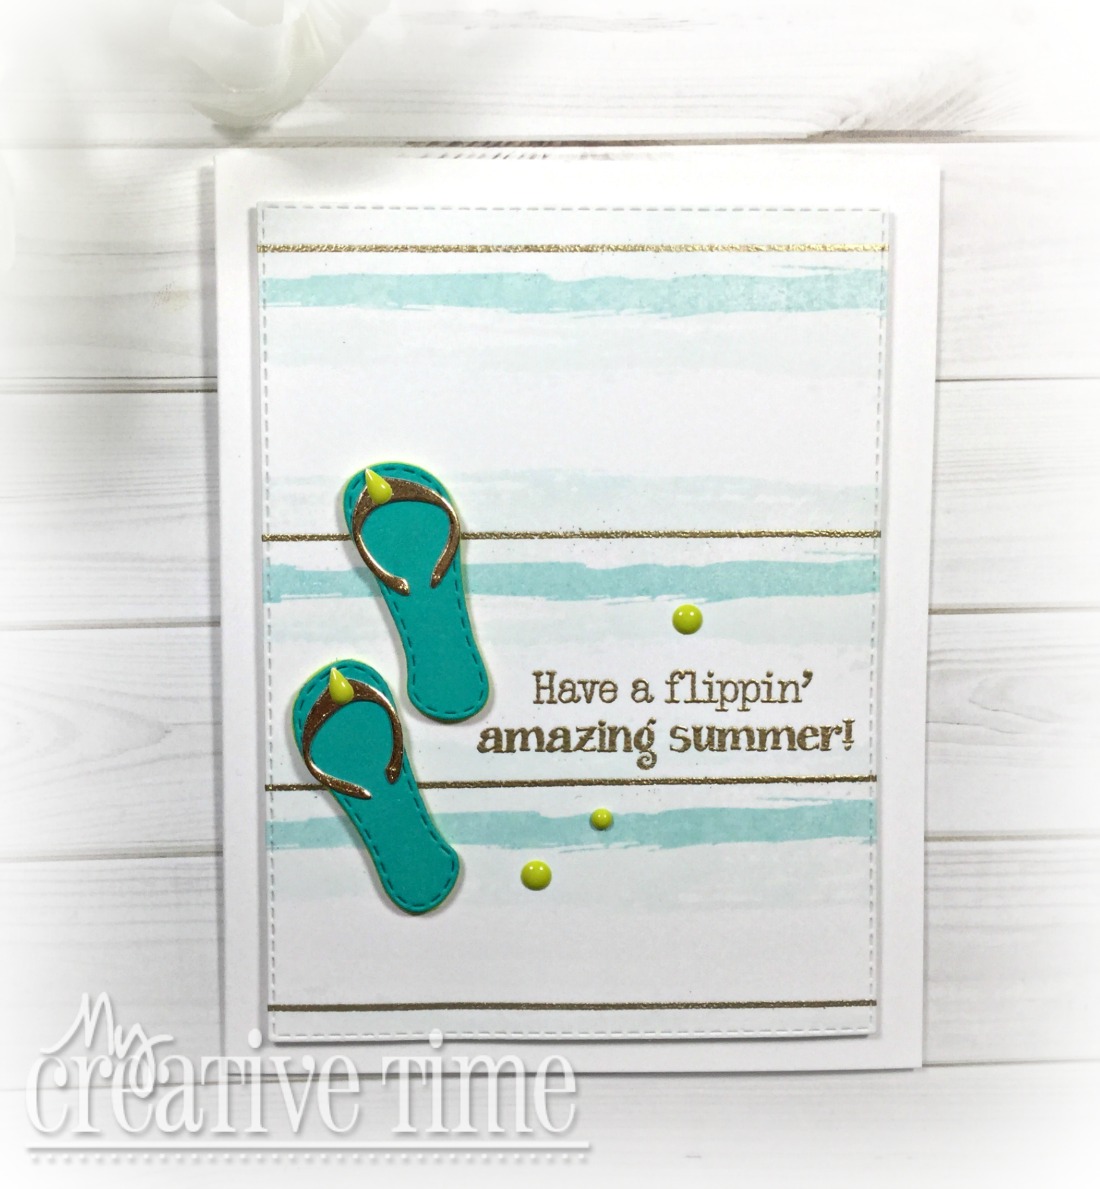
Hello my crafty friends and welcome back!!  It's "Anything Goes" today for My Creative Time and I've made a clean and simple summer themed card!

The weather here in Manitoba has been quite beautiful lately and it's full-on flip flop season! Although, as I'm writing this post, we are in the middle of a thunderstorm.  Which as long as it doesn't get too severe, it's all good because we need rain!!

Anyway, back to my card!! I started by stamping both the large and small stripe from the Build A Scripty Watercolour Background Stamp Set in a couple different shades of blue.  I actually stamped the skinnier stripe over the wider stripe.


The wider stripe is very light but you can kind of see it :).  To add a bit more pizazz to the card, I decided to do some gold heat embossing.  I used one of the stripe stamps from the Mad For Plaid Stamp and Die Set and tried to evenly space the stamping. I decided to heat emboss the sentiment as well. After all the stamping was done, I used the largest rectangle die from the More Stitched Rectangular Dies to cut the panel down.

Those cute little flip flops (or thongs as they used to be called in my day, hahaha) were made using the Sit Back and Relax Stamp and Die Set. I should also mention that the sentiment is from this set as well.


I used green fun foam to pop these flip flops up which also looks a lot like the soles!!  A few lime green enamel dots add a bit of jazz.


And that's my card for today!! I hope you enjoyed and that your summer has been "flipping' amazing" so far!!

Until next time...stay crafty!!!

Laurie


Friday, June 22, 2018

Oh Canada Blog Hop with Scrap N' Stamp Canada!!


Hello, eh??!! The SNS Seven is celebrating the upcoming Canada Day event!! This year we're celebrating 151 years since confederation. And it falls on a Sunday which means LONG WEEKEND!! Woo hoo!

You should have arrived from the fabulous Kia's blog! But don't worry if you've gotten lost, the entire line up will be listed below :)

Photoplay came out with the cutest stamps, dies, stickers, ephemera and patterned papers. It's called the O Canada collection and it's awesome! I had such a great time making cards with this stuff!

I made two cards for you today. One was fairly "involved", the other came together in less than 5 minutes which is record time for me!! Let's start with the more complicated one...


I coloured both of the iconic, Canadian images, the beaver and the moose with Copic markers and used the co-ordinating dies to cut them out. The background was created using scalloped edge dies from My Favourite Things and a cloud edge die from Lawn Fawn. 


I used regular Distress Inks to colour all the background dies. Including, Twisted Citron, Mowed Lawn, Pumice Stone, Crushed Olive and Tumbled glass. I left the background colours quite muted as I wanted the stars of the card to be the beaver and moose.


The simple "eh!" sentiment is enough and works perfectly! This card could be sent to anyone, Canadian or not, and it would surely put a smile on their face!!

Now, I have a confession. I have never had or used ephemera..ever!! So let me tell you that I was shocked when I opened that little package!  I couldn't believe all the cool stuff in there!!  For my "5 Minute Card", I used only ephemera and truth be told...I almost like it better!!  I used a frame, a sentiment banner and of course, that moose again and popped everything up with foam squares onto a white card base and voila!! A super cute card!!


Thank you for joining us today as we show you these super cute products from Photoplay celebrating Canada!!!

Your next stop on the hop is the super talented Nancy!!

You can find the entire blog hop line up down below!! Now, let's talk about prizes!!

There will be one $50.00 gift certificate up for grabs as well as a chance to win one of seven (7) ephemera packs.  All you have to do is leave a little love on each blog stop!!  Also, use the code  HOP10 to receive $10 off any order of $50 or more!!! Comments will be open for prize selection until June 28 and winners announced the following Friday on the Scrap N' Stamp blog. Good luck, happy shopping and thanks for the love!!

Have the most wonderful day and see you soon!!

Laurie

Monday, June 18, 2018

Maple Syrup Monday with Catherine Pooler Designs

Hello friends!!  Colleen from Maple Syrup Designs and I are taking another look at Catherine Pooler Designs stamps and dies...and inks!!

I used the recently released Wonderful Wildflowers stamp set for my project today.  This stamp set has co-ordinating dies but I didn't actually use those today. I started by stamping many of the images with Versamark Ink and heat embossed them with white heat embossing powder.

I used Rose Petals, Peppermint Scrub and Skylight inks to blend some colour onto each image. The white embossing resists the ink.  I used a combination of Green Tea and Eucalyptus ink for the leaves.


I fussy cut each image out. In the end, you'll notice that I did not use the small red flower. Each flower comes with three layers: the outline, a full stamp which fills in the outline and one detail layer. To give a bit of interest to the flowers, I stamped the detail layer in the same ink I used to blend the colour.


After I fussy cut each image, I jazzed up the white card front using a light grey ink, a stencil with small polka dots and an oval mask cut out of a piece of typing paper and an oval die.


I stamped the "wonderful" word from the set in both the Peppermint Scrub and Rose Petals ink to create a soft ombre look.  I ended up fussy cutting around the word so I could pop it up off the card.


I adhered all the images with a combination of foam adhesive and liquid glue.


I added a bit of Clear Sparkle Overlay pen to the darker parts of the flowers.  It reacted a bit with the ink, but the effect is pretty.


I finished the card off with a few Sparkling Clear Sequins.


Thank you for stopping by today and I hope you enjoyed today's card!!

Until next time....stay crafty!!

Laurie


Featured Post

A Simple Thanks Card

Well, well, well. Look who decided to show up...me! It's been an awful long time yet again. I seriously thought I'd be well out of t...