Showing posts with label Concord and 9th. Show all posts

Friday, April 3, 2020

Sending Paper Hugs Blog Hop with Scrap N Stamp Canada!

Welcome to our monthly blog hop for Scrap n' Stamp Canada. It's such a crazy time in our world right now and we thought it would be fun to make cards with the theme "paper hug". In this particular point in time, this is the safest hug we can give!


I've used a combination of stamps and dies from different companies. But really, the star of the show is the Tall Type Alphabet from Concord & 9th!! I love this die set. I know the price can be a little daunting but it really is worth every penny. From creating custom sentiments to personalization on your cards or scrapbook layouts, a good alpha bet die is great to have.  This one, in particular is a great size. Not too big,  not too small.


I started by die cutting the "paper hugs" out of white cardstock and set them aside. The big florals are the Stitched Flower Frame and Outside In Stitched Flower Die Sets. I cut all the pieces from scrap cardstock. 

After adhering the flower pieces to the outer edges of a white card base, I decided to add some pattern to the die cut letters. I used the Playful Patterns Stamp set, also from Concord & 9th, which co-ordinates with the Tall Type Alphabet Dies. I used the Tranquil Teal Gina K Ink from the 2018 Assortment Ink Cubes to add the pattern, which just happened to match the leaves perfectly!!


I cut the letters again but this time from craft foam. I wanted to add some dimension but couldn't imagine cutting foam squares that tiny or repeatedly cutting from scrap cardstock! I adhered the letters together and down on the card using Nuvo Deluxe Adhesive.

The sentiment looked good but not exactly "finished". I went through my stash of stamps and found a sentiment in the Love Bugs Stamp Set from MFT that said "sending a smile your way". I stamped it out in the same Tropical Teal ink then trimmed around and removed the "smile" portion.


I popped up the sub sentiments well. After looking at the card, I decided to add some light grey shading with a copic marker around the flowers to try to add some faux dimension (it's very hard to see).  I used a white gel pen to add some details to the flowers and leaves and also added some white pearl accents.

I hope you enjoyed my project for today and I encourage you to create and send a "Paper Hug" to someone special!

(**affiliate links used at no cost to you. If you order through any of the links, I receive a small commission which I'm very grateful for so, thank you!

PRIZE ALERT:

One lucky commenter will win a $50 gift certificate to the SNS shop! So, please leave a little love at each stop to increase your chances of winning!  Good luck! You have until April to leave a comment and the winner will be announced on the SNS Blog. Along with the chance to win the gift certificate, every order placed this weekend will receive the Paper Hugs stamp set fromPicket Fence Studio for FREE (while supplies last).

FACEBOOK CHALLENGE:

You can also participate in the challenge on our Facebook Page which you can find HERE. We also have a fun, new challenge up on this page!! It's called the 30 Days of Cardness Challenge and we're hoping you'll play along! Everyday this month, we'll give you cue words to help fire up your mojo!!

BLOG HOP LINEUP:

Kia

See you soon!

Laurie

Friday, March 6, 2020

"Stencil Us In' Blog Hop for Scrap N Stamp Canada

Welcome to another fun blog hop hosted by Scrap N Stamp Canada!  This month we're using stencils. Stencils are so versatile and also very affordable. I had a lot of fun with this one so let's get started!


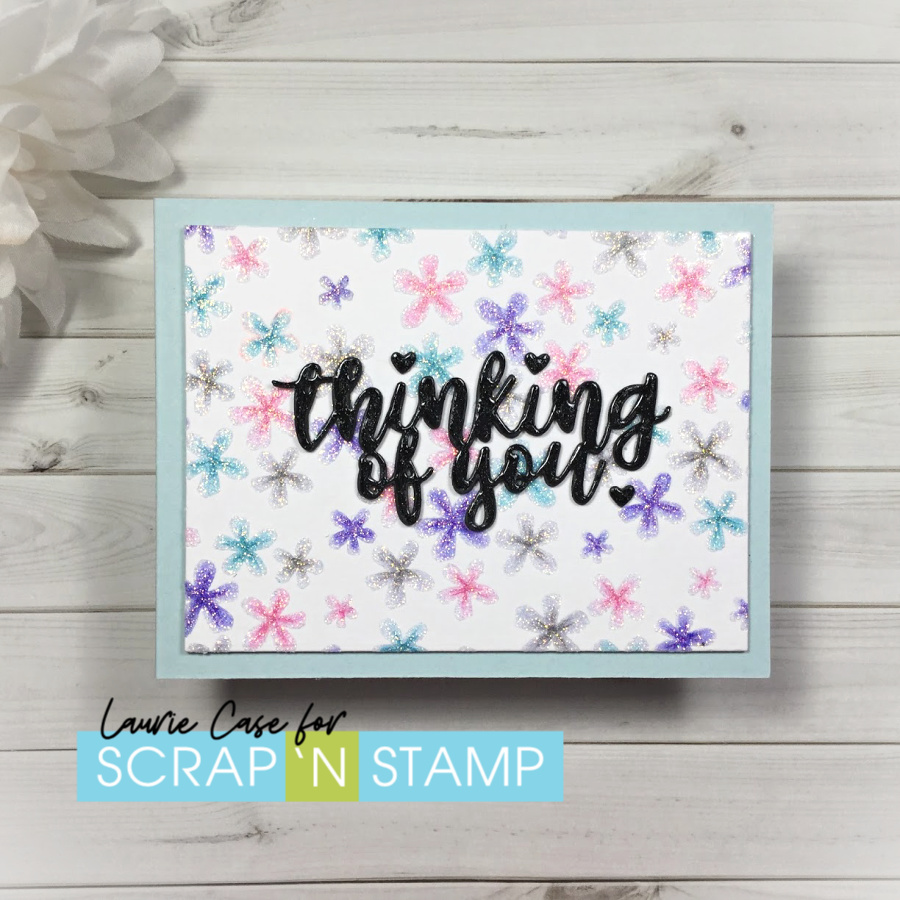
I used the Scattered Floral Stencil from Taylored Expressions for my card today. This is a very pretty stencil. I decided to do try out some watercoloring using a regular pencil and some Tombow Dual Brush Pens. After attaching the stencil to a piece of Strathmore Mixed Media paper, I lightly traced around each flower.


I removed the stencil and added a bit of the marker to the centre of each flower and blended it out with water. I made sure to keep the colour inside the pencil lines as the pencil would be trapped under the colour!!  After hitting it with my heat tool to make sure it was completely dry, I used an eraser to erase the traced lines. I wasn't super impressed, haha. It was just too bland. I took out my coloured pencils and chose a shade darker than the watercolour. I added some simple flicks and this gave it a lot more character!


Aaaand, I just could stop playing around with this background so I lined up the stencil again and added a layer of Nuvo Moonstone Glimmer Paste. Now this really jazzed things up! I set that aside to dry (which didn't take that long!) and worked on my sentiment.

I used the Fabulous Phrases Dies from Concord & 9th. I love this set!  I cut the "thinking of you" four times from black cardstock and adhered them all together to create a nice, think embellishment. Instead of dotting the "i's", I used the heart die that is included in this set. I added some Nuvo Glitter Gloss Pen as well as Nuvo Crystal Glaze to the sentiment.


I foam mounted the stencilled background onto a light blue cardbase. I'm pretty happy with the way this card turned out. Super sparkly and shiny!!!

If you'd like to see how this card actually came together, I have a VIDEO up on my YouTube Channel which you can find HERE!!

PRIZES:

There will be one $50 gift certificate to one lucky commenter. The winner will be announced on March 24, 2020 on the SNS Blog!! Also, all stencils will be 20% off!!

Thank you for hopping along with us!! I hope you found inspiration here today! Here's the complete hop lineup...enjoy!!!

Friday, July 5, 2019

Turnabout Blog Hop with Scrap 'N Stamp Canada!

Welcome back to another monthly blog hop for Scrap 'N Stamp Canada!  It's all about the Turnabout stamps from Concord & 9th. These stamps are a lot of fun to use but do require some precision.  But once you get the hang of things, the results are awesome!!


I chose to use the Stitched Turnabout stamp set for my projects today.  This is a great set because it has two separate portions. You can stamp the large outline, the inner portion or the whole thing together!  It's quite versatile. Plus, there are quite a few other images and large sentiments!

The first thing you need to know about these stamps, well this one in particular anyway, is that precision is key. If the stamp is not laid down correctly, the images will overlap or not line up. This will make the image look...not right.  Concord & 9th have included in the newer sets, an alignment guide which makes this step much easier!

The guide will tell you which side is up. Place the guide in your stamping tool (necessary for all turnabout sets!!) and lay the stamp on top, stamping surface down.  I found I had to stretch, tug and push to get the images to line up perfectly. I think because there is no centre portion to this stamp, it makes it wobbly.


Now, C&9th also offer a Turnabout Jig. I don't own one so I can't say for sure what it's made of but it basically gives you a surface to hold down your cardstock so it can be turned easily.  I myself, use a 6X6 inch piece of cardstock, lightly adhere my cardstock to it and bam, you got yourself a jig! BUT, you can also skip that whole process and stamp directly  onto a 6X6 piece of cardstock and trim it down after...which is what I did here!


I went for a tone tone look by stamping a dark brown ink onto kraft cardstock.  I used all 4 turns of the stamp but eliminated the middle portion.


On an ivory piece of cardstock, I lined up the centre portion of the stamp and used some light, pastel colours to stamp. With each rotation, I used a new ink colour. This is where these stamps really shine!!  

I used a circle die that matched perfectly with the centre portion and cut the ivory stamped section out.  I stamped "happy birthday" with the same brown ink as the background panel.


I foam mounted the sentiment circle onto the stamped background and adhered the entire thing to an A2 side fold card base.


While I was playing around with this set, I stamped out another of the inner portion and fussy cut around it. I didn't want to waste that piece, so I used it on a 3X3 inch card. 


With a some faux, white stitching and a few details added to the hearts and leaves, this would make a cute tag for a gift!  The "for you" sentiment is also included in the Stitched Turnabout Set!


GIVEAWAY AND DISCOUNT CODE!! 

Scrap 'N Stamp is generously giving away one $50 gift certificate to the SNS store! To have the chance to win, all you have to do is leave some love for all of us on the hop! The winner will be announced on the SNS Blog.  Also this month, all Concord & 9th products will be discounted 15% by entering the code CCD15.

CHALLENGE PAGE

Just a reminder that SNS has a Facebook Challenge Page. You also have the chance to win a prize there! All you have to do is upload a project with this months theme!! We love seeing what you create, so please share!!

BLOG HOP LINEUP:

Sandi

Thank you so much for joining us! We hope you are inspired to take out your Turnabout Stamps or even add to your stash...wink,wink!

See you next time!!

Laurie

Friday, April 5, 2019

"Background Check" Challenge and Blog Hop for Scrap 'N Stamp Canada

Welcome back, friends!!  Today is the start of another challenge for Scrap 'N Stamp Canada!  It's all about backgrounds!  The door is pretty wide open here...you can use a background stamp, use multiple images to create a background, ink blend, watercolour or use a stencil. The sky's the limit on this one!!


For my project, I decided to create my own stencil using a cover die AND trying out my new Life Changing Blending Brushes from Picket Fence Studio!! I was so excited to see that the SNS Store started to carry this line of stamps and dies!  The process took a bit of a turn about halfway through this card so let's take a look!!

I started by stamping, colouring and fussy cutting a few images from the Stuck On You Stamp set from Concord & 9th.


I decided to create my own stencil for the background of my card.  I used the Polka Heart Background Die from Lawn Fawn.  I die cut it out of printer/typing paper.


Initially, I thought I wanted a green heart background to co-ordinate with the cacti so I used a medium blending brush along with Twisted Citron, Crushed Olive and Peeled Paint Distress Inks. These brushes work awesome with stencils!!  I did try to do some direct ink blending without a stencil, and I just couldn't get the hang of it with these brushes. I also noticed quite a bit of wrist fatigue as well :(.  At this point, I would highly recommend these brushes for stencilling and small areas but personally, I'll continue to use the Ranger Ink Blending Tool for full backgrounds. 


You can see the nice blend these brushes create! And I was surprised at how well the ink cleaned off! I simply rubbed it onto a paper towel before each colour change.  And I did change the colour theme here!!  I just flipped over my home made stencil and used Worn Lipstick Disress Ink.


After I was done with the ink blending, I used a Wonky Stitched Rectangle Die to cut down the panel. I love the way it turned out!


Now it was just a matter of putting all the elements together!!  I used foam adhesive to adhere all my potted cacti onto the panel.


I should mention that I did a bit of paper pieces on the flower pots using some scraps of patterned paper in my stash.


I wanted to keep the card fairly CAS so I didn't add much else to it.


I love the soft blend these brushes gave and would definitely recommend them!

Just so happens, that for this weekend only, Scrap 'N Stamp is offering 20% off the Picket Pence Brushes when you use the CODE: BRUSH20!!

PRIZES:

There will be eight (8) grab bags along with one (1) $50 gift certificate to the SNS Store!  Now, those are some awesome prizes!!  All you have to do is leave some love at each stop of the hop for your chance to win!

CHALLENGE BLOG:

Remember, to enter your project on the SNS Challenge Page for another chance to win!!

BLOG HOP LINEUP:

Laurie (that's me!)

Thanks for hopping along with us today!!

Laurie


Saturday, July 21, 2018

Christmas in July Blog Hop with Scrap 'N Stamp Canada!!

Welcome, my crafty friends to the Christmas in July Blog Hop for Scrap 'N Stamp Canada!! You should have arrived from Tara at the SNS Blog. Don't worry if you get lost along the way, there will be the full line up at the end of this post!!


I know that it's very hard to think about Christmas right now, but Oh What Fun I had making a Christmas card!!  It was nice to have a break from stamping summer-y scenes!!

I used the Globe Greetings Stamp Set and co-ordinating Dies from Concord and 9th for my card today.  This is not a Christmas set but when paired with other products and using traditional Christmas colours, it works perfectly!!!

I chose kraft, red and lots of white embossing for my colour palette. I'm going through a bit of a "kraft phase" right now. Absolutely love the look of it!

I started by embossing the globe stand with gold embossing powder directly onto a kraft card panel.  I die cut the circle (included in the co-ordinating dies) out of white cardstock and then using white embossing powder and Versamark, I used the "land image" to stamp. I use a light blue ink to ink blend over the top of the stamping for the embossed resist look!


The Globe Greetings die set has flowers, leaves and a super cute banner. I used them all!! I already had all my red flowers stamped before I realized that the dies are solid so I ended up fussy cutting everything out. I foam mounted the banner and flowers to the globe and added the leaves with Nuvo Deluxe Adhesive. 


I die cut the MFT Word Die "Joy" out of white cardstock and used the same ink I used for the flowers to add some colour.  Before adhering that to the card panel, I did some selective stamping of one of the sentiment from the Globe Greetings set and again, used white embossing powder.  The original sentiment says "Welcome to the World". It's amazing what a little masking or stamp surgery can do with your supplies, isn't it?

After adhering the die cut sentiment, I used the same liquid glue to adhere the kraft panel onto a white cardbase.  


I added a lot of sparkle with a Clear Wink of Stella pen and loads of Nuvo Crystal Glaze .  I decided to add a few drops of Nuvo Drops in Gloss White to fill the empty areas of the card!

Mixing and matching stamps and dies and thinking a little outside the box is a great way to stretch your supplies!!

I hope you find lots of Holiday Inspiration on the hop today!! Up next is the super talented Amy!!

Here is the full hop line up:

Laurie (YOU ARE HERE)

PRIZES: Scrap 'N Stamp is giving away 7 Christmas Embellishment Packs, one for every stop in the hop!  All you have to do is leave a nice comment at each stop and you will be entered to win!! Winners will be announced on the SNS Blog on July28th..Good Luck!!

SALE ALERT!!!! Right now, if you spend $100, you will receive $25 off your order!! That's an incredible savings! Just use code CJ25. But hurry, this promotion ends July 25th!!

Thank you so much for stopping by today!!

Until next time, my friends, stay crafty!!

Laurie


Featured Post

A Simple Thanks Card

Well, well, well. Look who decided to show up...me! It's been an awful long time yet again. I seriously thought I'd be well out of t...