Sunday, February 28, 2016

Hello Sunshine!!

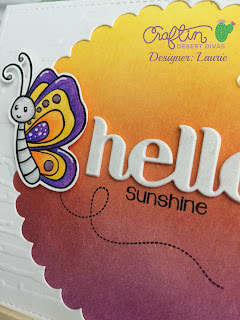
Hello Everyone!!  I'm here to share a bright, happy Hello card for Craftin Desert Divas.

I went through my scrap pile (we all have one!), and found a card panel that I had embossed using a woodgrain embossing folder.  I used the largest scalloped circle from the Stitched in Circles dies and cut out the centre of the panel.
On the card base itself I ink blended a pink, yellow and purple shade so it would show behind the die cut circle.


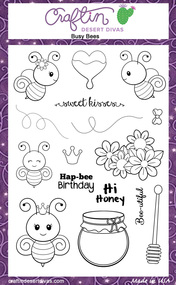
I stamped that sweet little butterfly with Memento Tuxedo Black and coloured her in with somewhat coordinating colours of my alcohol markers.  I cut the butterfly with the matching die and cut the "hello" word die from the Pocket Pieces Hello 3 times to give some dimension.  I added the Hello to the centre of the die cut circle, popped up the butterfly with some foam adhesive and stamped the flight trail(???) to make it look like she was flying. Finished it off by adding a few clear sequins!!

And here is the whole card...


Thank you for stopping by!!!


Sunday, February 21, 2016

Nature's Wonders - CDD Linky Party Week Two!


Hello friends! The theme for this Linky Party at Craftin Desert Divas is "Nature's Wonders"! We would love to see all of your projects that fit this theme! So go ahead and craft it and link it up on the Craftin Desert Diva's Blog.

Every other Monday will mark the beginning of a new semi-weekly Linky Party over 
at the CDD blog. We hope you will share your projects with us! And don't forget 
about  the prizes! Every Linky Party will have a winner and a Top 3! 
The more times you link up...the more chances you have to win!!

Our Sponsors for this Linky Party are:

One 4"x 6" stamp set
One Digi Stamp of choice

$25 Gift Card (Regular Priced Items)

Here is what I made..

I stamped the images with Versamark then clear embossed them.  I created masks using masking paper and applied them over the embossed images.  I used four Distress Ink colours for my dusk/dawn background.  I then coloured the tent and the fire with my Stabilo markers and water to blend the colour out.  I was going for more of a dark, shadowy effect.

Here is a close up.  I added some water splatters to the background along with some clear accents.  I stamped the sentiment in Versafine Black Onyx Ink.  And although it's hard to tell, I added some Clear Wink of Stella and Glossy Accents to the fire and to the heart on the tent.

Hope you enjoyed!!!

Here are all the CDD products I used:


Thanks for stopping by and I cannot wait to see what you create!!


Saturday, February 20, 2016

Fun & Cute February Challenge!

Happy Saturday, Everyone!!  I am sharing a card that I've entered into the monthly challenge over at Paper Smooches.  The challenge is Fun and Cute!!  Which is not really a challenge considering all PS products are both those things!!!


I started by cutting 2 panels of grey cardstock with a scalloped frame die.  I scored the back panel in between two of the scallops and adhered them together with Score Tape.


I then cut a panel with a journaling card die and embossed it with a polka dot embossing folder (which I have been obsessed with lately).
I decided to use the fun and cute Coffee and Tea Dies.  I quickly watercolored some areas on some watercolour paper and die cut the tea cups. 


I die cut the little tea bag die as well out of a scrap piece of distressed, crumpled paper, which I added some Tea Dye and Vintage Photo Distress Inks in hope of making it look like a used teabag.


As you can see, I die cut a tiny banner out of the red watercolour and placed the heart out of that die onto the teabag.  I also added a few details with a white gel pen and Glossy Accents to the cups.  I used the " Warm Wishes" from the Sentiment Sampler Stamp Set and heat embossed it in white onto a banner shape cut from the same grey cardstock.  I added some "steam" from Hot Concoctions and added a few red sequins.

Here is my finished card!!  


Hope you enjoyed!!!

Thanks for stopping by!

Laurie


Thursday, February 11, 2016

Craftin' Desert Divas Throwback Thursday!!

Hello everyone!! I'm here to share a project I made using an oldie but certainly a goodie stamp set from Craftin Desert Divas. This is one of my favourite sets.  It is one of those sets that can be used for many occasions.  And the fact that it has co-ordinating dies makes it that much better!!  So, are you curious to see which set I used???  Well, it's none other than....


I wanted to make a very bright, airy and versatile card.  This could be used as a "love" card or "encouragement" card.  I coloured the pencils using alcohol markers and added some sparkle to the eraser part.  I die cut them using the co-ordinating dies.
I also used the Fancy Frames Dies and the Pocket Pieces Hello Dies to create the layers...love those die sets!!

So here is my finished card!!  Hope you enjoyed taking a "look back" at this fabulous set!!


Here are all the CDD products I used:


Wishing you all a wonderful day!!


Monday, February 8, 2016

Craftin' Desert Divas Hearts Linky Party!!


Hello friends! The theme for this Linky Party at Craftin Desert Divas is "HEARTS"! We would love to see all of your projects that fit this theme! So go ahead and craft it and link it up on the Craftin Desert Diva's Blog.

Every other Monday will mark the beginning of a new semi-weekly Linky Party over 
at the CDD blog. We hope you will share your projects with us! And don't forget 
about  the prizes! Every Linky Party will have a winner and a Top 3! 
The more times you link up...the more chances you have to win!!

Our Sponsors for this Linky Party are:

One 4"x 6" stamp set
One Digi Stamp of choice

$25 Gift Card (Regular Priced Items)

Here is what I made..

I actually seen this idea with the threaded hearts on Pinterest..of course.  I started by tracing 3 sizes of hearts using a hearts die set.  I used a paper piercing tool and starting at the centre points of the heart, trying to keep the holes the same width apart.  I found that an ODD number of holes work best.  I threaded a needle with some embroidery floss and tied a knot in one end, this is actually not necessary, tape works well too.  Starting from the back and the centre, bottom hole, just work your way around the heart, going to the hole directly across from each other...does that make sense??  I used 3 strands of floss for the large heart and 2 strands for the smaller hearts.  Here is what the back looks like, a mess, but it doesn't matter..

I stamped the Sentiment from the Sending Love stamp set and perched that cute little bird from the mini set Chickie. The tiny black hearts are the positive pieces from the new Heart of Heart dies set.

Here is a close up:


Thanks so much for stopping by!!  Hope you enjoyed!!


Here are all the CDD products I used:


Featured Post

Patterned Paper and Coloured Cardstock

Hey friends and welcome! I wanted to share a fun shaped card with you using dies from Pretty Pink Posh and Scrapbook.com ! I've been a l...