Wednesday, January 30, 2019

3-D Wednesday with My Creative Time!!

Hello, hello!! Welcome back my crafty friends!  Today, I have a non-card project to share!  This was so much fun to make and the best part is, all your cardmaking supplies work for this!!

I made a very dimensional piece that was placed inside a picture frame. I don't think this would be classified as a shadow box as the die cut images are outside the frame. Please let me know if I'm wrong!!


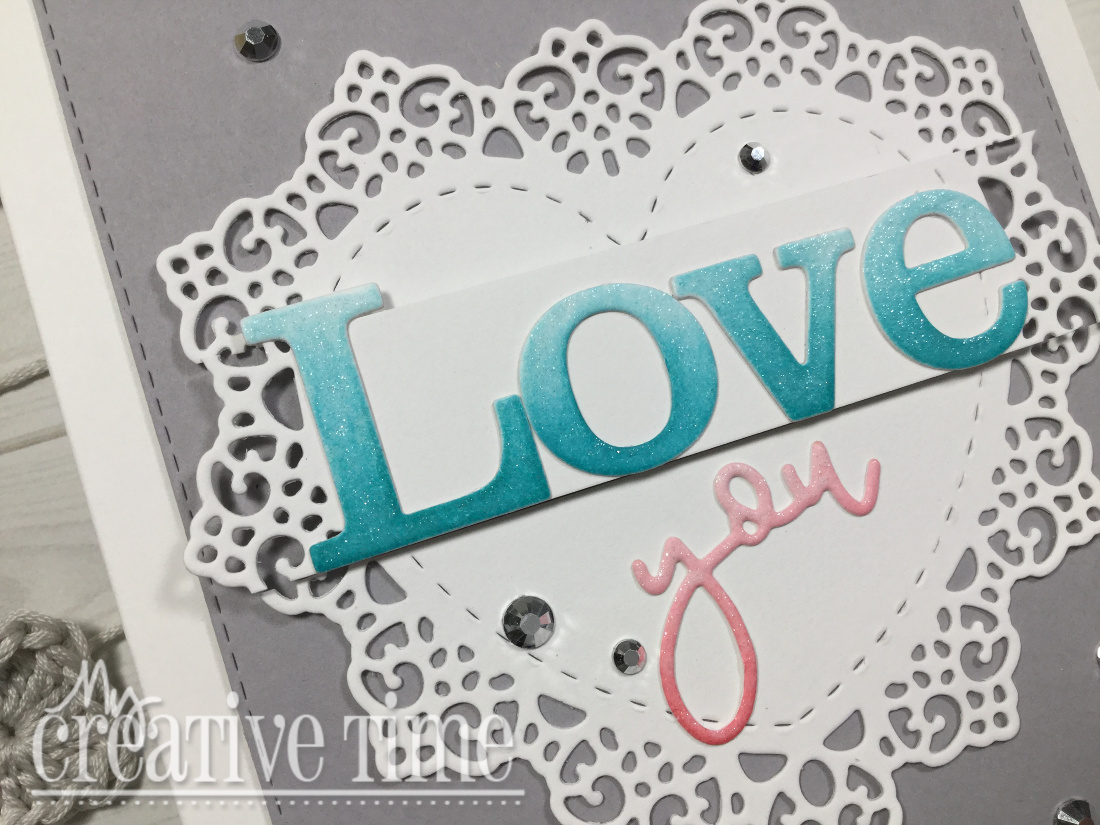
I had this inexpensive picture frame from Ikea in my stash. Now, I want a whole bunch more because I want to make more of these!!!  I started by die cutting the smallest heart from the new Heart Doily Dies out of a watercolour paper pack from Lawn Fawn.  I cut a piece of white cardstock down to 5X7 to fit the frame and what served as the base of the design.  I originally thought that I would just place the 6 hearts on the panel but after fumbling around with the placement, I noticed that I could fit a fairly substantial sentiment on there!!  So of course, out come the Lowercase Fun Dies!!


I used a light grey cardstock for the letters and added a touch of shading with a W1 Copic marker.  To make sure the letters were straight, I did mark a line with a pencil.  I used liquid glue to adhere those down. Now, this is where I actually placed the panel inside the frame as I wanted to make sure I aligned the hearts nicely!!


Before adhering the hearts, I curled the edges slightly to give a nice, rounded look.  I used a strip of foam adhesive down the centre of each heart so they remained curled.  I decided to break up the solidness of a few of the hearts by adding a tiny outline butterfly die cut. These come from the Mini Butterfly Dies.

I thought it needed a bit of sparkle, so I added some clear sequins.


I hope you enjoyed todays non-card project and hope you will give it a try!!

Thank you so much for dropping by today!!  See you soon!

Laurie


Thursday, January 24, 2019

Gift Card Giving with My Creative Time!

Hi, friends!!  Today is one of the new features for My Creative Time...gift card giving!!  Gift cards have become the #1 gift of choice but they can be a bit boring to give.  Sure, you can slide them into a store bought card (gasp!!!), or even better, a homemade card!  But if you want to step it up and make gift card giving fun and beautiful, then you must check out the array of dies from Emma's shop!!  Her designs make it fun and so easy to give the gift of gift cards!!

I used the Pretty Gift Card Holder Die for my project today. I used a light weight, white cardstock and added some heat embossing with the Build A Scripty Watercolour Background Stamp Set and Liquid Platinum Embossing Powder.


That beautiful label die is included in the set!  I used a light pink cardstock to cut it out and embossed that fun sentiment which is from the new Signed, Sealed and Delivered Stamp and Die Set.  To add a bit more elegance, I stamped the butterfly from the A Beautiful Day Stamp and Die set on the same pink cardstock and embossed it using the same platinum embossing powder.

If you follow along with me, you'll know that I never have candy or gift cards on hand :(, so I decided to create my own "stage" gift card, haha!


I love that the tabs are included in the cutting of this die.  The card fits nice and snug!!


I love making these holders!  They are just as fun to decorate as a card is!!

I hope you found a little inspiration here today!  Thank you so much for stopping in, I love when you visit!!

Until next time...stay crafty!!

Laurie


Wednesday, January 23, 2019

Create A Smile Stamps Challenge.."L is for..."

Welcome back, my friends!! Today is the start of another challenge over on the Create A Smile Stamps Blog!!  The theme is "L is for...", which could mean love, laugh, lost etc.  But because we are approaching the Valentines season, I went with a love themed card!


I actually tried a bit of a "technique" on this card! Well, experiment really.  First, I mixed some irridescent glitter and white embossing paste. I don't any glitter paste so I tried to make my own.  It worked fairly well but I wish I had used more glitter.


I applied the mixture through the Heart Rays Stencil onto watercolour paper.  The texture is awesome but like I said, I should have added more glitter!  I actually used my heat tool to dry the paste and had no issues with it bubbling up.  After it was dried, I added Mermaid Lagoon, Picked Raspberry and Dusty Concord Distress Inks to my surface and added a generous amount of water.  I used a paint brush to drop in the colours randomly.  I wasn't sure how the paste was going to react with the water but it held up surprisingly well!!  It did soften if there was a little too much water but it hardened up again fairly quickly!!


What was the most interesting was the fact that I could add a bit of water to each heart, dab with a paper towel, and a lot of the ink that was on top lifted...I was really quite amazed!!

I trimmed the stencilled piece down so it would fit into the second largest Scalloped Rectangle Dies
(I wanted the cute dot detail to show). I didn't really want to cover too much of the background, so I chose the tiny bird from the brand new From My Nest Stamp Set, used the same Distress Ink colours to colour and fussy cut him/her out!


For the sentiment, I used the Colour Your Heart Out Stamp Set along with the new Speech Bubble Cool Cuts.  These speech bubbles are a must have!  There are so many different sizes and they all face a different way so they're very versatile!!  I used foam tape to pop up the bird and bubbles and adhered the scalloped panel onto a 3.75 X 5 inch card base!  And that called it finished!!

I hope you'll play along with us!! I love visiting your blogs and feeds to see what you've created!!  And remember, you're playing for a €25 gift card to the Create A Smile Stamps Shop!!  Please visit the Challenge Blog for all the details!

Thank you so much for stopping by!! See you soon!

Laurie


Friday, January 18, 2019

My Creative Time 87th Edition Release Blog Hop and Sale!!!


Welcome to the My Creative Time 87th Edition Release Blog Hop!!  Are you ready for tons of inspiration using this new release?? This has to be one of my favourite releases to date and I had such a good time creating with it. And I know you will too!!  All products are now available to purchase in the My Creative Time Shoppe!!

I used the new You + Me Stamp and Die Set to create a shaker card for you today!!  I rarely make shaker cards but the dies in this set screamed for me to make one :)


I started by stamping a panel of white cardstock that was cut with the largest More Stitched Rectangular Dies with the Build a Scripty & Watercolour Background Stamp Set.  I used the largest of the dies in this new set to cut out the centre of this panel.

After the window was made, I figured out where to stamp the sentiment.  I masked off the "you"portion of the stamp and instead used the "you" from the You Dies Set 2 dies.  


I built the shaker and placed the stamped panel over the sentiment and clear, sparkly stars.  The pink frame was made using both dies in this set. I die cut the scalloped heart then used the smaller die to cut the centre.  The frame will fit perfectly onto the die cut opening of the shaker!!


This is a wonderful set of stamps and dies! The dies alone are awesome but add in that amazing set of sentiments and you've got yourself one INCREDIBLE set!!!

Thank you so much for visiting me today and all this week!!  Your comments are so appreciated!!

Here is the entire blog hop lineup:

Emma (My Creative Time)
Laurie (that's me!)

**Freebie**

Starting today, Friday, January 18th at 8:00am PST, we will be giving away this adorable Love Block Die.  This new die will be given to the first 25 shoppers!  If you are one of the first 25 shoppers, it will automatically added to your purchase at the time of packing/shipping. Once 25 shoppers have gone through, this die will be available for purchase. So, if it's available in the store, you are not one of the first 25 shoppers. No exceptions will be made.  This freebie is not part of the "bundle" and will be sold separately.

**Blog Hop Giveaway**

For our blog hop giveaway, Emma is giving away a $25 gift card to the My Creative Time Shoppe to ONE lucky winner!  All you have to do is leave a comment on each stop of the hop. You are not required to comment on every stop but the more you comment on, the more chances you have to win! Very Important: please leave a way for us to contact you with your comment just in case you are the winner!

**Sale Alert**

Don't Forget, our sale starts right now, HERE!! Use the code JAN2019 to receive a 15% discount off your entire purchase!! This sale applies to IN STOCK items only. This sale will end January 25, 2019 at midnight PST.


Thursday, January 17, 2019

Scrap 'N Stamp "Love is in the Air" Blog Hop

Hello, my friends!!  It's time for another one of our fabulous blog hops for Scrap 'N Stamp Canada!! The theme this time around is Love is in the Air!  The time has come for Valentine's cards but I think it's always good to have some general love themed cards in your stash!!


My card for you today is more of a general love themed card but could definitely be used for Valentines Day!!


Those cute critters, as well as the sentiment, come from the Furever Friends stamp set from My Favourite Things. This is an older set but is so adorable, I couldn't resist using it!!  I created a cloudy background using Broken China Distress Ink and the Cloud Stencil (also, MFT).  This ground portion was cut with a Stitched Hillside Borders Die and inked with Twisted Citron Distress Ink.


To incorporate more of a love theme, I used a heart die to cut the centre portion of the inked panel. This gave the card a lot more interest and dimension!  I first adhered the focal panel directly to a white card base.  I die cut the same heart die out of craft foam and pieced it into the opening.  I prefer using craft foam over foam tape for this as it gives a solid backing with no gaps.


I used Nuvo Deluxe Adhesive on the top portions of the bears and bits of the same craft foam for the feet to match the height of the heart.  I stamped the sentiment with Memento Tuxedo Black ink onto a white cardstock strip and glued that on top of the heart.


Definitely, a lot of "love" in this card but not limited to Valentines Day!!  

Thank you for joining us on this "lovely" hop. Here is the full Blop Hop lineup:

Laurie (that's me!)


**Giveaway**

We're giving away one $50 Gift Certificate and each designer will get to give away a Valentines gift pack (set of heart clear stamps, rub ons, red pen, and sparkly paper value $25). All you have to do is leave a comment on each stop of the hop for a chance to win!!

**Remember**

You have more chances to win if you enter the SNS Facebook Challenge page by creating a love-themed project and sharing it with us.  You can find all the details there :)

Until next time...stay crafty!!

Laurie


My Creative Time 87th Edition Sneak Peek Day Four!


Okay, friends!! Today, is the final day of sneak peeks for the My Creative Time upcoming release!  Everything we've been showing you this week will be available for purchase, tomorrow, at 8 am PST. (Also, don't forget we're having a blog hop to celebrate this release)

Today, we are showing you a new die set called Heart Doily Dies!  I am a mega fan of the Bunch of Stitched Doily Dies, as you may have noticed from a lot of my MCT creations!  So, this set makes me happy!!

I used the largest doily die in this set on my card today. I also used it a bit differently!


It's a little hard to tell, but I actually cut a section of the heart die which is where I placed the large "love"(which was cut using both the Uppercase and Lowercase Fun Dies).


I used the newer You Dies Set #1 for that super cute "you" die cut!!  I love the size of this die!!


And that's a wrap on the sneak peeks!! Aren't these new product AMAZING??!!

**Sneak Peek Giveaway**

We will be giving away the sets we are showcasing each day to ONE lucky winner!  For example, the set we are showcasing on Wednesday, Emma will announce the winner on her blog on Thursday and so on as the week goes on!!  All you have to do is leave a comment on each of our blogs! You are not required to comment on every single blog but the more you comment on, the more chances you have to win! VERY IMPORTANT...please leave a way for us to contact you with your comment, just in case YOU are the lucky winner! For extra entries, you can spread the word about this release on Facebook, Tweet about it or share on Instagram using the hashtag #mycreativetime. Good luck everyone and let's start spreading the word!

Please join us tomorrow for the 87th Edition Release Blog Hop where you'll find tons of inspiration!

See you tomorrow!!

Laurie


Wednesday, January 16, 2019

My Creative Time 87th Edition Release Sneak Peek Day 3!

Hello, hello!! We're halfway through the sneak peeks for the 87th Edition Release for My Creative Time!!  Are you getting excited for Friday, release day??!


 The next stamp and die set in this release is called Pretty Heart Roses.  And "pretty" does not even begin to describe this set!!


I watercolored these gorgeous, heart shaped roses and leaves using some inexpensive paints.  The way they are illustrated makes colouring so easy and I can't wait to use different mediums to add colour!


I heat embossed a couple of the stripes from the Build a Scripty & Watercolour Background Stamp Set with Silver Pearl Embossing powder. To match the gold embossing I used on the flowers, I heat embossed the sentiment on a small strip.

I feel there's a lot going on with this card, but it somehow works. What do you think??


**Sneak Peek Giveaway**

We will be giving away the sets we are showcasing each day to ONE lucky winner!  For example, the set we are showcasing on Wednesday, Emma will announce the winner on her blog on Thursday and so on as the week goes on!!  All you have to do is leave a comment on each of our blogs! You are not required to comment on every single blog but the more you comment on, the more chances you have to win! VERY IMPORTANT...please leave a way for us to contact you with your comment, just in case YOU are the lucky winner! For extra entries, you can spread the word about this release on Facebook, Tweet about it or share on Instagram using the hashtag #mycreativetime. Good luck everyone and let's start spreading the word!

I hope you enjoyed today sneak!!  Please come back tomorrow for one final sneak peek before our blog hop on Friday!!

Laurie

Tuesday, January 15, 2019

My Creative Time 87th Edition Release Sneak Peek Day Two!!

Are you ready for another peek at a fab new stamp and die set for the upcoming release from My Creative Time?? Well, get ready because you are going to LOVE IT!!


Today, we are taking a look at the new You + Me Stamp and Die Set.  This set includes a beautiful sentiment stamp set (perfect for all love themed cards) and two large heart dies.  I had a lot of fun mixing and matching this new set with some older products!

I created a scene set inside one of the heart dies.


I used the cute bunnies from the I'll Never Let You Go stamp and die set along with the Stitched Cartoon Cloud Dies and the Stitched Grass Die.  


I foam mounted the scene onto a grey panel that was cut with the 2nd largest die from the More Stitched Rectangular Dies which I placed on a white card base.


I thought this sentiment from the new You+Me stamp set worked perfectly for these two bunnies!!

And that's the sneak peek for today!!

**Sneak Peek Giveaway**

We will be giving away the sets we are showcasing each day to ONE lucky winner!  For example, the set we are showcasing on Wednesday, Emma will announce the winner on her blog on Thursday and so on as the week goes on!!  All you have to do is leave a comment on each of our blogs! You are not required to comment on every single blog but the more you comment on, the more chances you have to win! VERY IMPORTANT...please leave a way for us to contact you with your comment, just in case YOU are the lucky winner! For extra entries, you can spread the word about this release on Facebook, Tweet about it or share on Instagram using the hashtag #mycreativetime. Good luck everyone and let's start spreading the word!!

Thank you so much for stopping by!!  See you again tomorrow!!

Laurie


Monday, January 14, 2019

My Creative Time 87th Edition Release Sneak Peek Day One!!

Hello, my friends and welcome back!!  It's time for another FABULOUS release from My Creative Time!! Trust me when I say, you're going to love this release!  It is absolutely beautiful!!


Today, we are starting things off with the freebie for this release, which happens to be a die! This die will be given to the first 25 shoppers when the release goes live this Friday!!  The die is call the Love Block Die and is sooo cute!!


I made a square card featuring this adorable die as the sentiment.  I used the Stitched Daisy Dies along with the Stitched Leaves Dies to create a little floral arrangement.  I glued the flowers onto one of the Stitched Doily Dies then adhered the entire piece to a 4.25 X 4.25 inch card base.

I wanted the LOVE to really pop so I used a darker shade of ink to add colour and also die cut it once from craft foam as well!!  


The tiny heart at the top of the L die cut separately which is such a great feature!! I also love the chunkiness of the letters. Lots of room to stamp a sub-sentiment!!


I think this die would look great with smaller floral images or critters!!  Don't you just love it?!

**Sneak Peek Giveaway**

We will be giving away the sets we are showcasing each day to ONE lucky winner!  For example, the set we are showcasing on Wednesday, Emma will announce the winner on her blog on Thursday and so on as the week goes on!!  All you have to do is leave a comment on each of our blogs! You are not required to comment on every single blog but the more you comment on, the more chances you have to win! VERY IMPORTANT...please leave a way for us to contact you with your comment, just in case YOU are the lucky winner! For extra entries, you can spread the word about this release on Facebook, Tweet about it or share on Instagram using the hashtag #mycreativetime. Good luck everyone and let's start spreading the word!!

Thank you so much for stopping in!!  I'll be back with another peek tomorrow :)

Laurie


Wednesday, January 9, 2019

Create A Smile Stamps Challenge...Kraft!!

Hello my lovely friends and welcome back!!  Today I'm super excited to make the official announcement that I am on the Create A Smile Stamps Challenge Team, yay!!  I adore CAS stamps. They are fun, adorable and totally unique!!  I'm so honoured to be a part of this team with some incredible designers from all over the world!!

This is a bi-weekly challenge and for the first challenge of 2019, you are asked to use kraft! Kraft cardstock, embellishments, ink, you name it!!  As always, you'll be playing for a £25 gift card to the Create A Smile shop! For a full list of the challenge rules and to link your projects, please visit the Create A Smile Challenges Blog!!
I used a lot of kraft on my project today, including using my alcohol markers to colour the main image!  If you haven't tried your alcohol markers on kraft paper, I encourage you to do so!  I love the effect!


I used the sweet fox from the Cool Buddies Stamp Set. This is one of my all time CAS stamps sets!!  Because the image was stamped on the kraft paper, just a little bit of shading with my markers was necessary.  Now, I usually fussy cut my images leaving a border around the edge, but because I was popping him up onto a white "hill", I thought it would look better to cut right against the stamped line.  

Speaking of the hill, I used the Magical Frame Cool Cuts Die Set to frame my cute little fox. Because I used quite a bit of the kraft, I decided to break it up with some white accents like the faux stitching (white gel pen), a white mat behind the Cool Cuts die, the white hill and by using a white card base.


To add a bit of texture, I used a polka dot embossing folder on the large, kraft panel.  I actually did this before stamping my sentiment (please, don't do this) but by using my Mini Misti, I was able to stamp twice getting a fairly good result!  

I hope you enjoyed my take on this challenge!  I hope you will play along with us, we cannot wait to see what you make!!


Until next time...stay crafty!!

Laurie


Tuesday, January 8, 2019

Birthday Palooza with My Creative Time!!

Hello, my friends and welcome back!!  Today I'm sharing a clean and simple birthday card combining a couple of My Creative Time stamp and die sets.

I started by cutting a white panel using the largest More Stitched Rectangles Die and adhering it directly onto a white, top fold card base.  I've really been into florals lately (because I wish winter was over) so I chose the cute tulip image from the Healing Wishes Stamp and Die Set and the butterfly from the A Beautiful Day Stamp and Die Set and coloured them up with alcohol markers.


I used a couple of the Scalloped Stitched Circle Dies to create the focal point.  I think the black and white striped paper really draws the focal to the images!!


I struggled with how to place the sentiment but in the end, decided to curve it around the circle.  I'm not super happy as I think it looks a bit wonky but I wasn't about to start again :)  I foam mounted both the flowers and butterfly onto the white circle then used liquid glue to place it on the patterned, scalloped circle.

I popped up the entire focal image onto the card base, added a bit of sparkle and shine and called this card done!!  I was very tempted to add some sequins in the white space but reined myself in!!


Do enjoy white space on your cards? Is it hard for you to keep it that way?  I struggle but really love how this looks!

Thank you so much for dropping in today!!  I'll see you soon!!

Laurie


Friday, January 4, 2019

My Creative Time 48 Hour Flash Sale and Blog Hop!!

Good Morning and welcome to another "48 Hour Flash"! This sale is for 48 hours only that is going on RIGHT NOW and will end on January 6th, 2019 @ 7am PST!!
We are showing casing an AMAZING new stamp and die set. It is called Signed, Sealed and Delivered. This set is available now for purchase HERE!! Don't forget to use the code FLASH for 20% off your entire in-stock only purchase!!!

I will admit that I NEVER decorate my envelopes. The fanciest thing I've ever done was add washi to the flap :).  I think the reason for this is that I buy VERY inexpensive envelopes. And we all know how thin those things are!  They just don't take ink well at all.  I did do an envelope for you today because this set is made for it. Although, this would work beautifully with all your tag, gift card holder and treat dies...must try!!!!


I used the Hello You stamp set and repeated stamped the leafy image along the bottom of the card.  I scattered the flower images throughout.  I wasn't super happy with the stamping and that was due to the weight of the envelope...it was like stamping on typing paper :(.

The mailbox on the other hand, was stamped onto smooth white cardstock.  Isn't it adorable?  I used liquid glue to attach it but again, due to the quality of the paper, it warped the entire envelope.

This stamp set is full of cute sentiments and "handcrafted card inside" is one of my favourites.  I stamped this on the back flap.


Having a set like this makes me want to buy some good quality envelopes!!  But like I said before, this set can be used for so much more!!


Thank you for hopping along with us today and remember...

GIVEAWAY!!

Leave your comments for a chance to win a $25.00 Gift Card to the My Creative Time store!!  Don't forget to leave a way for us to contact you just in case you are the lucky winner!!!  Good Luck!!

Here is the full hop lineup:

Laurie (that's me!)


See you soon!!

Laurie


Wednesday, January 2, 2019

"Favour It" with My Creative Time!

Happy New Year my crafty friends!!!  I hope you all had a wonderful Christmas and wish you nothing but the best in 2019!  Wow, 2019. Where does the time go??

My Creative Time is gearing up for another fabulous year of crafty goodness and you'll notice a few changes in our blog posts! We've added some new themes including what I've made for you today and that's Party Favours!!

Emma has so many fun stamps and dies to create cute and beautiful favours!  When I think of party favours, I think of mass production. So I kept things pretty simple.

I had wedding favours in mind when making my projects today although these treat bags could be used for almost any occasion!  Lucky for me, I actually had some mini, kraft bags on hand that I found at Dollarama.  They are super cute and super sturdy!  All I had to do was pretty them up a bit.

For both bags, I used the Pretty Treat Topper Die Set. These mini bags come with a twine handle already attached. For this first bag, I cut the handle off so the Treat Topper Die could be used as is.


This die set comes with a pretty, stitched label die which I clear heat embossed a sentiment from the Just a Note Stamp and Die Set.  I used Faded Jeans and Chipped Sapphire Distress Inks to add some colour. To dress up the bag a bit more, I clear embossed one of the flowers from the new Amazing Stamp and Die Set.  This gave the bag a more elegant look. I love how this die has its own little hand..so cute!

My next bag uses the same mini bag and the same die set but in different colours. I also altered the die cut slightly.


I used patterned paper for the die cut this time. And for the sentiment, I used the new You Dies #2 which I coloured with alcohol markers. The Pretty Treat Topper fits perfectly over the handle of the bag. I didn't do any stamping on this bag but instead added a strip of the same patterned paper.

Both these treat bags were very quick and easy to make, perfect for mass production!


In case you were curious about the bags I used, here they are:


Thanks for stopping by today!!  Have a great first week of the year!!

Until next time, stay crafty!!

Laurie


Featured Post

Patterned Paper and Coloured Cardstock

Hey friends and welcome! I wanted to share a fun shaped card with you using dies from Pretty Pink Posh and Scrapbook.com ! I've been a l...