Wednesday, September 30, 2020

No Line Colouring with Create a Smile Stamps!

 Good morning and happy Wednesday! I'm back to share a card made using one of the newest stamp sets from Create a Smile Stamps! And I've also decided to do some no line colouring with my pencils!


This simple eucalyptus image is from the Breathe In, Breathe Out Stamp Set. This set has multiple images in different sizes. I used one of the smaller ones so as not to get overwhelmed while colouring.
I'm not an accomplished colourer. I don't really go for realism and my technique is my own. I do it purely for the fun of it. I just want good results that I'm happy with. This is the stress-free way!!


After colouring, I used the second largest die from the Stitched Circle Frames. This cuts the inner portion as well as the detailed frame. The coloured panel measures 3.75X3.75 inches. I adhered it to a 4X4 square card base. I glued the frame down, added a piece of fun foam (cut using the same die), then adhered the coloured portion on top!


The sentiment comes from the Small Sentiments Set. I resisted the urge to add any further embellishments, leaving it clean and simple.

Thanks for dropping by today! See you soon!

Laurie


Thursday, September 24, 2020

Altering Your Stamps and New Release!!

 Hello and welcome back! Today is an exciting day as it's time for a new release from Create A Smile Stamps!! This release is a mixture of cute and beautiful with images ranging from critters to stunning foliage.

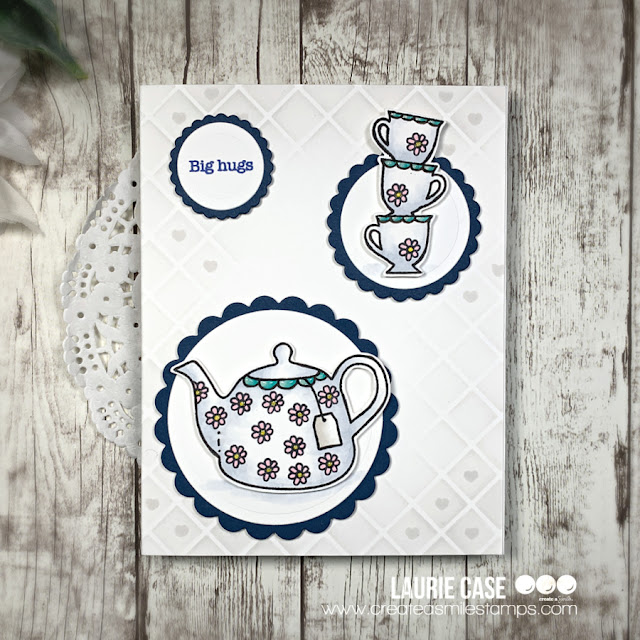
For my card today, I went with cute. I also altered the images a bit to create a whole new look with this stamp set which is called Tea Time.


I wanted to show you the stamp set first, then my card. You can see that each image has the cutest smiley face on it. For my project, I didn't want that.


Before stamping, I placed a small piece of tape over the face. This prevents the ink from touching this portion. Just remember to take the tape off before you stamp!! So instead of a smiling cup and tea kettle, I have space to add different details.


I first took a black pen and drew some scallops on the top of each cup and the teapot. To make my tea set flowery, I used a small stamp from the Best Bugs Stamp Set. The only bit of masking I had to do was on the spout. All I did was place a scrap piece of paper against the edge!  I did some simple masking again with the teacups to stack them on top of each other. Again, using just a scrap of paper to cover the top of each cup.

I die cut some white circles and some navy scalloped circles using dies from Lawn Fawn. I foam mounted each image onto the two larger circles and stamped the sentiment on the smallest. The sentiment comes from the From Afar (A8 size) Set.


Before adhering the circles to the card base, I used a light grey ink and the Diagonal Grid Stencil to add some interest. I found a tiny heart stamp and added few inside the squares.

To finish, I added some gold sparkle to the centres of the flowers and some Nuvo Crystal Glaze to the scallops on the tea set.

Thanks for stopping by and please check out the newest stamps from Create A Smile!!

Laurie


Thursday, September 17, 2020

Tags for your homemade goodies ft. Create a Smile Stamps!

 Hello!! Today I'm going to share a really cute way to dress up your homemade jams or jellies using a super cute stamp set from Create A Smile Stamps!


I used the Summer in a Jar Stamp Set for these tags. This is a sweet little set that has some really cute and rather large images!

I used the jar image along with a couple different berries. I used Copics to colour then fussy cut everything out.  The tag is a die from my stash which I dressed up a little using the Narrow Stripes Stencil and a light grey ink.


What's great about this set is that it comes with a bunch of sentiments that fit on the jar label!  I arranged the images on the tags with a combination of liquid glue and foam tape. And of course, added some black & white bakers twine!


I think these are so sweet and perfect for gift giving!

I hope you will check out this set and all the other amazing CAS stamps, dies and stencils!

Thanks for popping over today! See you soon!

Laurie


Friday, September 4, 2020

Scrap N Stamp Blog Hop: LIVE, LOVE, LAVINIA

 Welcome back to another fabulous monthly blog hop brought to you by Scrap N Stamp Canada! This month we are featuring stamps from Lavinia Stamps.


Lavinia Stamps is a new company for me. The images are very whimsical and quite beautiful. And they are perfect for art journaling so that's what I've created for you today!


I worked in my Travellers Notebook refill pages which you can find on Amazon. These are a fantastic way to start as they are inexpensive and the size is not too daunting! After covering the pages in Gesso, I picked out 3 Distress Oxide Inks: Speckled Egg, Pumice Stone and Fossilized Amber. I ADORE this colour combination!  I did some simple ink smooshing by using an acetate sheet.

I decided to try heat embossing on this page. I've never done it on a journal layout so wasn't sure how it would go. But it actually turned out not too bad! I used the Zen Leaf 2 stamp from Lavinia Stamps along with white embossing powder. I tried to stamp as randomly as possible.


To make the images pop a bit more, I added the same three ink colours inside some of the leaves as well as used a watersoluable pencil to create some shadows around each leaf.

Art journaling is all about adding layers and textures so I took the Mini Dots stamp (Lavinia) and some Black Archival Ink and did some random stamping. While I had that ink out, I used a Tim Holtz Stencil to add the circle patterns.


It was at this point that I wanted more black so I used a portion of the Mini Butterfly Collage Stencil with Black Embossing Paste to add not only more black but texture as well!

The sentiment comes from the Big Chat Sticker Book from Tim Holtz. I outlined each sticker with a white gel pen. To finish the page off, I used a black brush pen to draw a wonky border to frame it nicely. WAIT!! I thought I was finished at this point but I had one more stamp to use and that was the Flutterby Mini stamp.

I stamped it directly onto the page as well as a scrap of watercolour paper. I used Speckled Egg and Fossilized Amber inks to add a bit of colour to the wings. I fussy cut the wings only and added it to the stamped image on the page....now it's done!!


Thanks so much for stopping by and hopping along with us today! I hope we've inspired you to try out Lavinia Stamps if you're new to them!!

BLOG HOP LINEUP:

ME

PRIZES AND SALE

There are 3 prize packs from SNS up for grabs. Just leave a comment on each stop of the hop for a chance to win!  Also, Lavinia Stamp will be 20% off until Sunday, Sept 6th/2020 at 9pm PST.


Thursday, September 3, 2020

Dusting Off the Coloured Pencils ft. Create a Smile Stamps!

 Welcome back! I decided to dust of the pencil crayons and colour some gorgeous new images from Create A Smile Stamps!

Pencil crayons (that's what we call them here in Canada) is a tricky medium for me. I love the look but I'm not a fan of the amount of time it takes. I've watched probably hundreds of tutorials and they all say the same thing...light pressure and build up the colour. Well, I didn't do it that way. I laid it down heavy and in one layer. 


This floral images is from the Mallow Blossoms Set. You can really see here how thickly I applied the colour. I'm also going to point out that I thought the small, green piece was a leaf. In fact, it's a part of the blossom that I THOUGHT was a leaf. I'm clueless when it comes to flowers so please forgive me, haha!


To put this card together, I used the Petals Stencil on the card front with a light, pink ink. I used the second largest Scalloped Rectangle die to create a panel. I carried the stencilling to the inside of the circle. To create the kraft circle, I used one of the Postage Edge Circle Dies. I placed a smaller, plain circle die on the inside to create this ring.

I adhered the ring to the white panel and foam mounted the flowers. The sentiment (from the Mallow Blossoms) was stamped onto one of the Useful Banners Dies and was also popped up. I added a few sequins for a bit of sparkle.

Thanks for dropping in! See you soon!

Laurie


Featured Post

Patterned Paper and Coloured Cardstock

Hey friends and welcome! I wanted to share a fun shaped card with you using dies from Pretty Pink Posh and Scrapbook.com ! I've been a l...