Thursday, May 30, 2019

"Just Card" with My Creative Time!

Welcome back my friends!  Today I'm sharing a card using products from My Creative Time.  And I've decided to go back in time and use an older stamp and die set!  The set I chose is the Thanks for the Lift.  This set is in stock and ON SALE!!  It was one of the very first sets I purchased from Emma!


I created a shaped card base using the largest die in the Scalloped Stitched Oval Dies by dic cutting it twice, scoring one oval at the top and adhering the two together.  I inked up the second largest die in the same set with Broken China Distress Oxide Ink and added a few water splatters.  All the images were stamped onto Bristol Paper and watercolored with Distress Oxides as well.


To set the scene, I die cut both cloud borders from the Floating Cloud Dies out of the Bristol as well.  I ran the borders through with the same oval die as the inked panel to get the stitching across the bottom.

I bit of white gel pen details and Nuvo Crystal Glaze on the window of the plane was all I added for extras.


I hope you'll take a look through your stash to find some "forgotten" sets that need some love!

Thanks for stopping by! see you soon!

Laurie


Wednesday, May 29, 2019

Create A Smile Stamps Sketch Challenge

Welcome to another challenge for Create A Smile Stamps!  The challenge for the next two weeks is a sketch:


I'm becoming quite the fan of sketch challenges. It really gets the creative juices flowing!  I pretty much followed the sketch to a tee but you can easily change things up. Flip the sketch or use a different shape. Find your inspiration and see where it goes!


I used the largest flower from the Botanical Love Stamp Set for the focal point. I used Versamark Ink to stamp the bloom all over the centre panel which is 5.5 X 3.75 inches.  I cut the Magical Frame Die out of white cardstock and using Versafine Black Onyx Ink, I stamped the flower onto the centre part of the die.

I dusted off my pencil crayons (what we call coloured pencils, ha) and coloured up the flower.


I added the outer frame of the die onto the grey panel first (which I cut out of craft foam, as well) and place the coloured piece to the inside.  I stamped the "smile" in the Onyx Black ink as well and fussy cut around it.  I adhered exactly as the sketch suggests.


I adhered the focal panel onto a white card base, added a few white gems from Studio Katia and a bit of glitter pen to the flowers. And we can call this card, done!!

Please join us in this challenge HERE!  We love seeing what you create! You also have the chance to win a €25 gift certificate to the Create A Smile Stamps Store!!

Thank you for dropping by, see you soon!!

Laurie


Monday, May 27, 2019

Pinkfresh Studios "Anything Goes" Challenge!

Hey there!  Today, I've decided to participate in my first ever challenge for Pinkfresh Studio!!  I love their products but sadly, don't have many.  But I dug out what I do own and had a good play!

The challenge this month is "Anything Goes".  A great and easy theme for my first entry:)


I definitely chose those colours for my inspiration!  I stamped a whole bunch of images from the Dainty Botanicals Set and used the co-ordinating dies to cut them out. (FYI: as I'm writing this post, this set is ON SALE!!!)


After die cutting all those pretty leaves, I decided they needed a bit more detail. So, I took out my coloured pencils and added some tiny strokes to each petal or leaf.


I inked up the lower portion of a white card panel with Tumbled Glass Distress Ink and after many, many minutes, decided how to layer up and adhere all those images.  Most were adhered with liquid glue but the two at the very front are adhered with foam adhesive.


The sentiment comes from the Playful Animal Friends 2 stamp which looks to be discontinued on the PF site...sorry!!  I added a bit of white gel pen detail then foam mounted the white panel to a grey card base.  In the end, I'm pretty happy with how this card turned out!!

Playing with these goodies makes me realize I need more Pinkfresh in my craftroom!!

Thanks for stopping by!!

Laurie


Wednesday, May 22, 2019

I Need a Favour with My Creative Time

Hello and welcome back! Today is the day where we get to focus on some of the amazing dies Emma has created to help make party favours!

I used the recently released Stitched Mini Bag Die.  This comes together quickly but you can take some extra time to decorate it, depending on how many of these little guys you have to make!


I used the Baby Cake Die to decorate the front of this treat bag.  Along with a "thanks" sentiment stamped onto one of the Strip Sentiment Dies, I thought this would make a great "thank you for coming to my birthday party" favour!


Thank you for stopping by today!!  Have a great day!

Laurie


Friday, May 17, 2019

MCT 91st Release Blog Hop and Sale!

Welcome to the 91st Edition Release from My Creative Time!! I hope you've enjoyed all the lovely sneak peeks this week!  It's definately been a party this week but it's not over yet!  You'll find the complete blog hop lineup at the end of this post along with details on the Freebie Die and Giveaway!!


For my project today, I've created a wedding card using the new Cake Lollipop Holder and Add-Ons. I almost always do this with these lolli die sets, just because they're so versatile and because I never have lollipops on hand :)


This is a bright and sparkly card made with glitter and foil paper along with some silver heat embossing!  And not a colour combo that I'd ever think I'd use!


That cake is so adorable and so fun to decorate! The sentiment comes from the recently released Best Day Ever Stamp and Die Set.  I love the font on this set and that the dies cut out each word perfectly!
To add a little extra something to the cake, I used a small flower and some leaves from the Stitched Pretty Flowers and Leaves Die Set.  


BLOG HOP GIVEAWAY!!

For our blog hop giveaway, Emma is giving a $25 gift card to the My Creative Time Store to ONE lucky winner!  All you have to do is leave a comment on each of our blogs. You are not required to comment on every blog but the more you comment, the more chances you have of winning!! Very important:  Please leave a way for us to contact you (with your comment) just in case you are the winner!!

FREEBIE!!

Starting today, Friday April 19th, 2019 at 8am PST, we will be giving away these adorable new "Happy Birthday Die".  This new set will be given to the first 25 shoppers!  It will be automatically added to your package during packing/shipping. Once the 25 shoppers have gone through, this die set will be available for purchase!  So, if it's available in the store, you are not one of the first 25 shoppers.  No exceptions will be made.  the "freebie" is NOT part of the bundle and will be sold separately.

SALE ALERT!!

Don't forget!! Our sale starts right now at the My Creative Time Store!!  Use the code May2019 at checkout to receive 15% off your entire in-stock purchase!! The sale ends on Friday, May 24th 2019 at midnight PST!!

BLOG HOP LINEUP:

Laurie (me!)

See you soon!

Laurie


Thursday, May 16, 2019

My Creative Time 91st Edition Sneak Peek Day Four!

Welcome to our final day of sneak peeks!  Today, we're showing you the freebie die!  This die will be available to the first 25 shoppers!  This is called the Happy Birthday Die and will come in handy time and time again!


I just had to pair with the Stitched Mini Bag Die which we showcased yesterday!  It fits perfectly on the front!  


I kept it simple and used more masculine colours.  I can't wait to make a card with this die!!


I hope you enjoyed the week of sneaks!! Remember, tomorrow is blog hop day where there will be tons of inspiration and all products will be available!

Thanks so much for stopping by!

**Sneak Peek Giveaway**

We will be giving away the sets we are showcasing each day to ONE lucky winner!! For example, the sets we showcase on Wednesday, Emma will announce the winner of that on Thursday and the sets we showcase on Thursday will be announced on Friday on the MCT Blog!  All you have to do is leave some love on each of our blogs.  You are not required to comment on every blog, but the more you do comment on, the more chances you have of winning!!   VERY IMPORTANT: Please leave a way for us to contact you with your comment, just in case you are the lucky winner! For extra entries, you can spread the word about this release on Facebook, Twitter or Instagram using #mycreativetime!  Good luck!!


Wednesday, May 15, 2019

"Masking" Challenge...Create A Smile Stamps!

Welcome to another fun challenge for Create A Smile Stamps!  This one is ALWAYS a challenge to me and that's masking!  I'm a fairly lazy card maker so when it comes to masking, I rarely do it.  While I don't mind fussy cutting images, cutting masks always seems like such a chore!  However, every time I create a project with masking, I am amazed at how cool the look can be!

I made a masked background as well as a separate masked scene for my card.  I used the Scene Builders Stamp Set for the majority.  I started by stamping the house image onto a card panel, then using a mask cut from a full stick Post-It Note, covered the image and stamped it again, overlapping the two. I needed 3 masks in total to create the background.


On a separate piece of cardstock, I stamped out a scene using some of the trees and shrubs from the set. I started with the little shrub at the front of the house and worked from there. You always start with the foremost image!  It always takes me awhile to figure this out :)


I fussy cut around the scene leaving a small white border so it would stand out a little from the background.  I used shades of grey for the background panel and went all out with the colour on the separate scene.  I glued the coloured images directly over the FIRST house I stamped on the background panel!


The sentiment comes from the Small Sentiments Stamp Set which works perfectly with the Speech Bubble Cool Cuts.  I added some sparkle pen and Nuvo Crystal Glaze to all the round windows as well as the windows and door of the coloured house. I popped the speech bubble up with some foam adhesive and added a die cut heart as well as some stitiching detail to match the stamping!


I really hope you'll join us as we LOVE to see your creations!!  Remember, you have a chance of winning a €25 gift certificate to the Create A Smile Stamps Shop!! Please visit the CAS Challenge Page where you'll find more inspiration along with link up information!!!

Thanks for stopping by!! See you soon!!


My Creative Time 91st Edition Sneak Peek Day Three!!

Welcome to the third day of sneak peeks for this fabulous birthday themed release for My Creative Time! Today we're showing you the Stitched Mini Bag Die.

This is a cute little party favour bag that comes together in a snap!


With one pass through your die cutting machine (unfortunately, this die will not fit through a Cuttlebug) you get this fantastic little bag!  I decided to use vellum for my bag.

I embellished it with a potted plant from the Healing Wishes Stamp and Die Set which I gold heat embossed onto vellum.  I thought this would make a super cute way to give plant seeds!


I used a few strips of adhesive on the flaps but this bag will stay together nicely by just tying the top together!

And that was a quick look at today's awesome die!!  Thank you for stopping in and please come back tomorrow for our last sneak peek!!

**Sneak Peek Giveaway**

We will be giving away the sets we are showcasing each day to ONE lucky winner!! For example, the sets we showcase on Wednesday, Emma will announce the winner of that on Thursday and the sets we showcase on Thursday will be announced on Friday on the MCT Blog!  All you have to do is leave some love on each of our blogs.  You are not required to comment on every blog, but the more you do comment on, the more chances you have of winning!!   VERY IMPORTANT: Please leave a way for us to contact you with your comment, just in case you are the lucky winner! For extra entries, you can spread the word about this release on Facebook, Twitter or Instagram using #mycreativetime!  Good luck!!


Tuesday, May 14, 2019

91st My Creative Time Edition Release Sneak Day Two!

As I mentioned in yesterday's sneak, this release is all about birthdays! So, let's keep this party going with a look at another die set...This is the Cake Lollipop Holder and Add-Ons Set!  Another great addition to all the lollipop holder dies Emma has in her shop!


I used the set to create more of a party favour than a lollipop holder.  The add-ons make it so easy to create the perfect cake!


I found that two bags of sequins fit perfectly inside the assembled die. What a cut and fun little gift!!


You really could have a lot of fun creating different styles on cakes with this set, which I plan to do!!

Hope you enjoyed today's sneak! Please come back tomorrow for another little look at this fun release!


**Sneak Peek Giveaway**

We will be giving away the sets we are showcasing each day to ONE lucky winner!! For example, the sets we showcase on Wednesday, Emma will announce the winner of that on Thursday and the sets we showcase on Thursday will be announced on Friday on the MCT Blog!  All you have to do is leave some love on each of our blogs.  You are not required to comment on every blog, but the more you do comment on, the more chances you have of winning!!   VERY IMPORTANT: Please leave a way for us to contact you with your comment, just in case you are the lucky winner! For extra entries, you can spread the word about this release on Facebook, Twitter or Instagram using #mycreativetime!  Good luck!!


Laurie


Monday, May 13, 2019

MCT 91st Edition Sneak Peek Day One!

Welcome to the start of sneak peeks for the upcoming 91st Edition Release from My Creative Time!! This release is all about birthdays as this is Emma's birthday month!!

Today, we are taking a look at the new Cute Cupcake Tag Die!  This is the next instalment of this adorable line of tags which you won't want to be without!


This little tag comes together in no time and is a great way to use up scraps, which I did here.  


And the from flap is not only pretty, it's functional! It hides a sentiment perfectly!!


And that's a look at the first die set being released this month!  So cute, right??

**Sneak Peek Giveaway**

We will be giving away the sets we are showcasing each day to ONE lucky winner!! For example, the sets we showcase on Wednesday, Emma will announce the winner of that on Thursday and the sets we showcase on Thursday will be announced on Friday on the MCT Blog!  All you have to do is leave some love on each of our blogs.  You are not required to comment on every blog, but the more you do comment on, the more chances you have of winning!!   VERY IMPORTANT: Please leave a way for us to contact you with your comment, just in case you are the lucky winner! For extra entries, you can spread the word about this release on Facebook, Twitter or Instagram using #mycreativetime!  Good luck!!

Come back tomorrow for another sneaky peeky!!

Laurie


Wednesday, May 8, 2019

3-D Wednesday with My Creative Time!

Welcome to another 3D Wednesday!  Today is all about home decor and die cutting!  This is a fairly lengthy post as I wanted to show you how I did what I did!

Here's how this started:


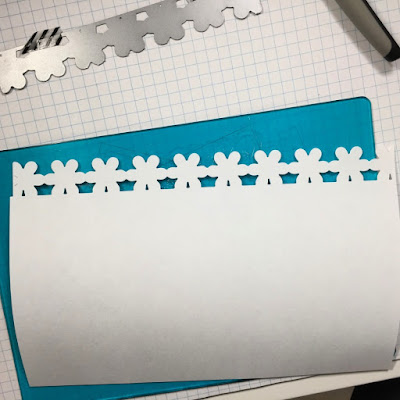
I've had these battery operated candles for a long time. Not pretty but thats what we're going to do today.  I made candle holders out of paper!!  I started by using a 5.5 X 8.5 inch piece of typing paper. I wanted to start this with cheap paper! I used the Flower Border Die on the long edge of the paper, this involves some partial die cutting, but we'll get to that later!


I loosely wrapped this piece around the largest candle and decided that a 1inch flap would would to close it.


So now it was time to work with real cardstock. For these candle holders, I used an 80lb weight, white cardstock cut at 5.5 X 8.5 inches.  


Line up the die as normal along the top of the 8.5 inch side. I left the very end plus one flower uncovered by the top cutting plate then ran it through.  I removed the die and lined up the die using one of the notches on the die..


Now place the cutting plate over so the end of the die is not covered. If this portion is covered, it will cut the border out completely.  It should look like this:


I did this three times to create all three holders.  To make the holders fit the different heights of the candles, I trimmed 1 inch off the bottom for the tallest candle, making it 8.5 X 4.5, the middle candle was 8.5 X 3.5 and the smallest ended up being 8.5 X 2.75 inches.

Now the fun part part!  To decorate, I used the Stitched Pretty Flower and Leaves Dies along with the Bunch of Stitched Doily Dies.  I went with a simple black and white theme.


I used the largest doily as a little mat and the other three as a backdrop for the flowers.


I think these turned out kind of cute.  Start to finish they took about an hour to make, that's including making a template!


Thanks for stopping by today!  I hope you enjoyed todays longer post and found a little inspiration!

See you soon!!

Laurie


Sunday, May 5, 2019

Paper Smooches Flower Challenge!!


Hello friends!!  It has been awhile since I've participated in any sort of challenge...not design team related.  Paper Smooches always has great challenges, and I used to participate in them often!  So, when I seen this month's challenge, "Flowers", I just had to play along!


I dug through my PS stash of stamps and dies and chose the Best Buds stamp set for all my flowers.  I picked the small florals in the stamp and using the Gina K Wreath Builder Template, created a 4X4 wreath.


I stamped everything in a alcohol marker safe, grey ink.  I thought I'd stray away from a bold, black ink.  I coloured all those adorable flowers with Copic markers.


My collection of Copics is fairly small, so I tend to use the same colours over and over in my projects. But I don't mind, I LOVE these colours!  I was flip flopping on what to do next and thought I'd place a cute critter in the centre of the wreath. So I used the bee and the bear images from the Courteous Cuties stamp set and used the co-ordinating dies to cut them out.  


And yes, I decided to cut the centre of my wreath out using the smallest of the Pinked Circle Dies. I found that with all that stamping, the critters got "lost". Plus, I didn't really want to cover too much of those pretty flowers!


After I die cut the circle out of the front panel, I lined everything up and cut it out of the front of the cardbase as well.  I stamped the sentiment (from Courteous Cuties) onto the positive die cut using white embossing powder and adhered it onto the inside of the card.  I added a ton of foam adhesive to the stamped panel and popped it on top.


Of course, I didn't let those critters go to waste!  I glued the bear on the inside of the card and he looks super cute there!!


I was going to add some sequins to the front, but went with a few white gel pen details instead.


I'm really happy with the way this card turned out. I'm not gonna lie, this one took me awhile :)


Thanks for stopping by today!! See you soon!

Laurie


Featured Post

Patterned Paper and Coloured Cardstock

Hey friends and welcome! I wanted to share a fun shaped card with you using dies from Pretty Pink Posh and Scrapbook.com ! I've been a l...