Friday, August 31, 2018

MCT 48 Hour Flash Sale and Blog Hop!!

Good morning and welcome to another 48 Hour Flash Sale!!  This sale is for 48 hours only and is going on RIGHT NOW and will end on Sunday, September 2nd at 7pm PST.  We are also showcasing an AMAZING new die for you today called the Ghost Lollipop Holder Die.  This die is available now for purchase!  You can find it HERE.  Don't forget to enter the code FLASH at checkout to receive 20% off your entire "in-stock" purchase!!

You should have arrived from the talented Miss Kendra!! If you get lost along the way, you can find the full list here!

Now let's take a look at what I've made with this super cute die!!


Of course, I had to turn this lollipop holder into a card!!!  Please forgive me!!  This ghost is just way too cute for words!  I added a purple, sparkly bow using the Fun Size Scalloped Stitched Bow Die,  added some blush to the cheeks and eyelashes using a marker!  Now, she's ready to go out haunting!!

The "boo" die is also included which is just totally perfect!


This card really didn't need any extra embellishments as I used a lot of glitter paper!

I hope this gave you another idea on how to stretch your dies!! 

Up next on the hop is the lovely Miss Ruthie!!

GIVEAWAY!!

Leave a comment on each stop of the hop for a chance to win a $25.00 gift card to the My Creative Time store!!  Don't forget to leave a way for us to contact you in the case YOU are the lucky winner!!
Good Luck and Happy Hopping!!

See you soon!

Laurie

Thursday, August 30, 2018

CAS-ual Fridays Challenge #207

Welcome back!! It's time for another challenge on the CAS-Fridays Challenge Blog!!  The theme for the next two weeks is...


Mint and Neutral!!  Oh, what fun!  I love the colour mint, every shade of it, so this was an easy and fun challenge for me!

I went for a very clean and simple look and choose Ivory as my neutral colour.  I created a dimensional background by cutting the gorgeous Casual Trees Fri-Dies multiple times out of ivory cardstock and adhering them directly to a 4 bar ivory card base (3.5 X 5 inch). This gives a very elegant look.


I die cut the Friend Fri-Dies from white cardstock and used Catherine Pooler inks in the colours, Mint To Be and Seafoam.  These inks are awesome and I highly recommend trying them!! I added Versamark Ink over the die cut and heat embossed it in clear. I did this twice to give a nice, raised, shiny look!


I adhered the word die onto a scalloped oval die from MFT to make it pop a little from the background. The tiny hearts come from the Fun-fetti Fri-Dies and were treated the same as the friend die.


I usually leave the inside of my cards blank. Especially if it's a generic friendship card.  You can customize it later for any occasion!!

Link up your project on the CAS-ual Fridays Challenge Blog. Ten (10) winning entries will be featured on the blog the Thursday before a new challenge starts. The overall winner will receive a $25 gift certificate for the CAS-Fridays shop! But if that winner featured CAS-Fridays products, the prize amount will double!! Remember, you are not required to use CAS-Friday products :)


Thank you for stopping by today! I hope you'll join the challenge! Have fun creating and good luck!

Laurie
     

Wednesday, August 29, 2018

MCT--Whatever Wednesday

Hello friends and welcome to "Whatever Wednesday" for My Creative Time!!  My card today features three of my all time favourite (so far) products from MCT.  And also a bit of no line watercolouring (eeek!).  This is something that is a little stressful for me to do but practice makes confidence right?

My first favourite stamp and die set is Just Because.  This set has some beautiful, outline floral images. These are perfect for any colouring medium but like I said, I chose the no-line watercolour!  I stamped one of the flowers with Antique Linen Distress Ink.  I double stamped it but I think I could have gotten away with just once as it was maybe a bit too dark. I should mention that I used Strathmore Mixed Media paper!!


I decided to use my Tombow Dual Brush Markers for the colouring.  I feel like I have much more control using these than your traditional watercolour pans.  


I use a combination of marker direct to paper and picking up colour off a slick surface.  Although, there is definite room for improvement, I'm pretty happy with the way it turned out.  When the colouring was done and dry, I used my second favourite product which is the XOXO Border Dies Set to cut around the flower and make a pretty panel.


My original plan was to heat emboss a sentiment directly over the flower.  But to be safe, I decided to stamp and die cut it first!  I didn't want to regret anything after I spent time watercolouring!!  The sentiment comes from my third favourite product, the Fun Notes Stamp and Die Set. This set is so awesome. I stamped the word "note" in Versamark and used Pale Rich Gold Embossing powder from WOW.  I used the co-ordinating die to cut it out.


I really liked the look of the die cut word so I just went with it.  I used the die again to cut a piece of craft foam so some dimension could be added.


The panel was adhered directly to the card base with tape runner adhesive.  The size of this card is 
5 X 3.5 inches.


I added a tiny gold, heat embossed heart which comes from the Hey There Cute-Tea Stamp and Die Set.  Before adhering the die cut "note", I stamped "just a"  in an ink that closely matches the grey card base.


I added just a touch of shimmer to the outer edges of the petals to try give them a bit more of a highlight.  


Thank you so much for stopping by today!!  

Until next time...stay crafty!

Laurie


Monday, August 27, 2018

Made In Minutes with My Creative Time

Hello, my crafty friends and welcome back to another "Made In Minutes"!!  I honestly need to start timing myself for these posts to prove how quickly some of these projects come together!

My Creative Time (Emma) is known for all their amazing packaging and treat holder dies, so I decided to use one for my project today.  Before starting on Emma's Design Team, I never made any sort of 3-D project or treat holder. I always found them too intimidating with all the measurements, cutting and scoring.  But all of these dies take all the stress right out of it!!

I used the Mini Gift Box Die.  This is a fairly new die to the shop and as I'm writing this post, it's currently out of stock so I do apologize!! But never fear, they will be back in stock shortly!!

I cut the die out of 80lb white cardstock. It cut, scored and folded beautifully!


There is a cut on each of the corner flaps. These create little tabs that simply fold into each other.


You don't actually need any adhesive for this little box to stay together. I did add a couple strips just so the side flaps would stay up, but again, not necessary.

I measured the area inside the stitched detail lines on all four sides to create some layers with patterned paper.


1.25 inch squares worked perfectly which I added to all sides of the box.

So cute!! As you can see, I cut a small circle using the Bunch of Fun Circle Dies and also used the Lower Case Fun Dies to cut out the letter "c" to personalize the box a bit more.


To give you an example of what can fit in these gift boxes, I placed a package of sequins along with a jar of Perfect Pearls.  There is definitely room left over!!


All that's left to do at this point is add my little monogram and tie it up with a piece of ribbon!!


This little box is so stinkin' cute!  


Just think of all the ways you can personalize this box or decorate it for every season!! Or how great would these be for birthday or wedding favours??!! 


Now I promise you that this was literally made in minutes. About 10 actually!  The hardest part was tying the silly ribbon!!

Thank you so much for stopping in today. I appreciate your visits!

Until next time...stay crafty!!

Laurie


Saturday, August 25, 2018

Shake Up Summer Blog Hop with Scrap 'N Stamp Canada!!

Hello and welcome back!  Are you ready to shake things up a bit?  Today Scrap 'N Stamp is having a blog hop featuring SHAKER CARDS!


I will admit that I do not make a lot shaker cards. Why? I'm really not sure. They are not that hard to make and are always so fun to give out.

Sit back, relax and enjoy all the incredible shaker cards made by my team mates! Please stay tuned until the end of this post for details on prizes, because what's a blog hop without prizes :)!

There are tons of products on the market that make constructing shaker cards super easy. These include dies with co-ordinating "pouches" for all your shaker bits and pieces. Tonic Studios make a bunch of different shaped sets including a circle, balloon, star and heart.  These sets come with the die AND 5 pouches and are really affordable. These products eliminate the use of acetate which can be a bit frustrating to use!

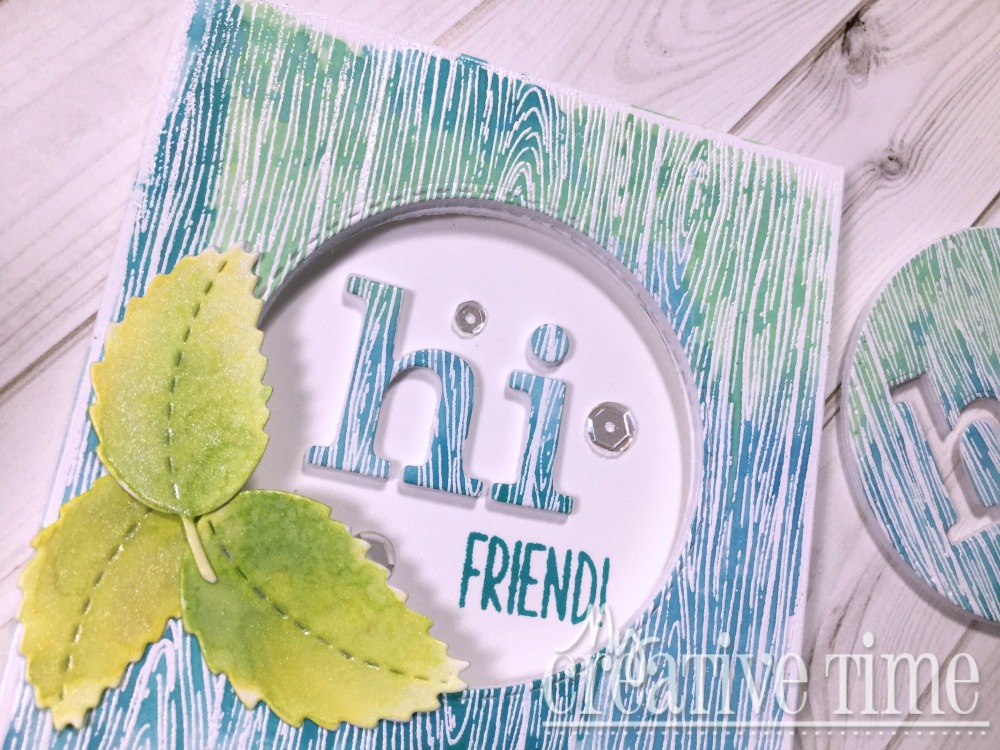
Now, after all that being said, I actually went "old school" and created my shaker using acetate (shakes head).  While these sets are fantastic, I wanted a bit more room for all my shaker bits and pieces.  I started by stamping and die cutting all the images from the More Rustic Wildflowers set from MFT.


I lined up all the stamps on my Misti by using the dies as a guide. Once everything was stamped, I was able to die cut everything with one pass!


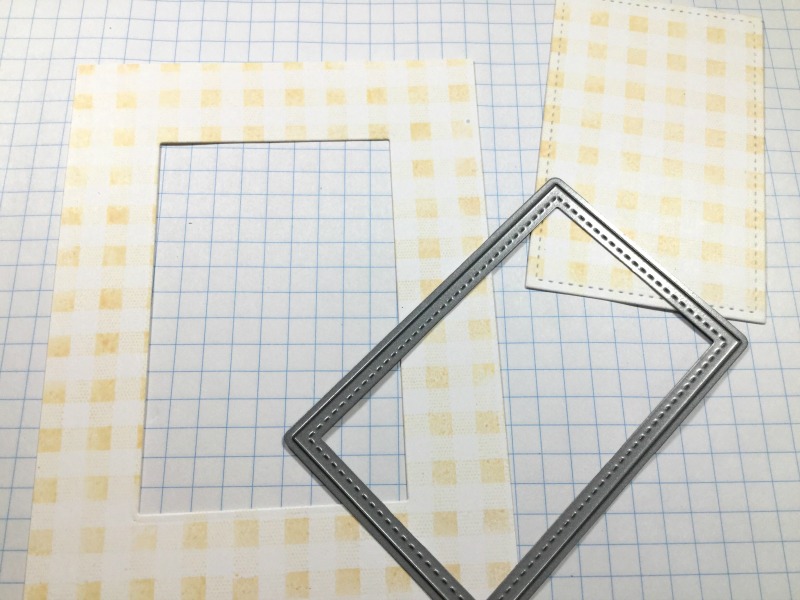
Next, I stamped a panel of white cardstock with an old Gingham Background Stamp but you could use any stamp or patterned paper for this.  To create the window for my shaker, I used one of the Stitched Rectangle Dies from Lawn Fawn.


To make the window a little prettier, I made a frame out of white cardstock using this same die as well as one die larger from the Fancy Scalloped Rectangle Dies from Lawn Fawn.


By nesting the two dies together and running them through your die cutting machine, you will end up with a frame that fits perfectly around the window!


I trimmed a piece of acetate and adhered it to the back side of this panel. Any plastic packaging will work for this.  To create the "well" for the bits and pieces, I placed a border of foam tape around the edges of the plastic.  I use this foam tape.


Before adding the sequins, I wanted to line up my sentiment stamp which will be on the card base itself.  I did a dry run on the placement of all my flowers and lined up the sentiment on my Misti.


The sentiment comes from the beautiful Choose Happy Stamp Set from Penny Black and I stamped in Versafine Clair Nocturne Ink.

Now it's time to add all the sparkle and shine. I used an old sequin mix plus some Nuvo Confetti Crystal Cloud Circles.  Here's a little tip:  after removing the lining from the foam tape, add another layer of acetate, this will make it heaps easier to line the shaker panel on your card base. You can flip it over and nothing will spill out!!!


I may have overdid it on the sequins as you have to give it quite a shake to see the full sentiment.


I placed my little floral arrangements is opposite corners using a combination of Nuvo Deluxe Adhesive and foam squares.


I'm really happy with the final outcome and had heaps of fun creating this card!!  Just wait until you see what the other designers came up with...you'll be blown away!!

Here's the full blog hop line up:

Laurie (YOU ARE HERE)

PRIZES!!!

Scrap 'N Stamp Canada is giving away ONE Tonic Die and Shaker Set to one lucky commenter on each stop of the hop. There will also be one set given away on the Scrap 'N Stamp Facebook Page! That's SEVEN in total!!  So please leave some love on each of our posts for a chance to win one of these amazing sets!  Winners will be announced on Saturday, September 1st on the SNS Blog!  Good Luck!!

SALE!!

All Shaker Windows are 20% off right now!!

Thank you so much for hanging in there with me. I know this post was a bit lengthy :)

See you soon and happy blog hopping!!

Laurie


Tuesday, August 21, 2018

Dimensional Window Card

Hi friends and welcome to another post featuring My Creative Time products!  I have very dimension window card to share with you. This is really easy to make and I hope my photos will help if you want to recreate this card.

I started by white heat embossing the Grainy Wood Background Stamp onto some Bristol paper. I decided to do a bit of loose watercolour but I didn't want the texture of a watercolour paper.


I chose three colours of Distress Oxide Inks: Broken China, Peacock Feathers and Cracked Pistachio. I did a wet on dry technique because the Bristol paper can only handle so much water. I basically just slapped some colour down with no rhyme or reason, haha!


I trimmed around the stamped image. The measurements are are just shy of 3.25inches and 5.25 inches. This will be the size of my finished card, as well!  Before cutting the "window" in this panel, I adhered some craft foam to the back. By doing this step first, you can be sure all the openings will line up. I chose one of the circle dies from the Bunch of Fun Circles Die Set.


It was no problem for my Big Shot to cut this. Next, it's time to cut the window in the card base itself.      I simply lined up the painted panel to the card base and traced around the cut out circle. REMEMBER: I cut the card base to fit the background panel!


Make sure your card base is open when you die cut this circle :)!  Now all you have to do is adhere the pretty front panel to the base!

For the sentiment, I used the Lower Case Fun Dies dies to spell out "hi". I cut these out of the positive we had left over from the watercolored panel. This already had craft foam on the back so that step is done!!


I glued the letters on the inside of the card so they were seen through the circle window. The dimension of everything looks awesome!!


The word "friend" comes from the Light the Candles Stamp and Die Set and was stamped in the Peacock Feathers Distress Oxide Ink.  Because my placement of the sentiment was slightly "off", I die cut all three leaves from the Stitched Leaves Dies and coloured them Crushed Olive and Mowed Lawn Distress Oxide Inks. I also added a spritz of shimmer spray to them (mixture of Perfect Pearls and water).


I LOVE all the dimension on this card!!


Another great part of this design is that I have the positive circle with the negative space of the letters for another card!!!  

Thank you so much for dropping by today, much appreciated!!

Stay Crafty and See You Soon!!!

Laurie


Friday, August 17, 2018

My Creative Time 82nd Edition Release Blog Hop!!!

Hello friends and welcome back!!! Today we are having a blog hop to celebrate the 82nd Release from My Creative Time!! You should have arrived from the amazing KENDRA but if not, the entire blog hop lineup will be down below!


Today is a day filled with Halloween inspiration. All the awesomeness is available for purchase NOW!!

For today's card, I used the new Pumpkin Face Die. This die is actually the FREEBIE this release and is a must have. I hope you are one of the first 50 shoppers to claim this die!!


I dug out my Kuretake Gansai Watercolour paints for this card. I haven't used them in ages and felt the need to give them some love. I used a blue, a purple, a pink and black to create a wash of colour. Then added some white paint splatters. 


The moon was created by using one of the Bunch of Fun Circles Dies and adding some yellows and oranges. I used the Pumpkin Face Die to cut out the face.  I also used the die on some black glitter cardstock and inlaid those pieces into the "moon".


I've recently become obsessed with the Stitched Cartoon Cloud Dies so just had to use them here!! I did add some shine to the clouds using a mixture of Perfect Pearls and water.  What didn't work out so well was adding Nuvo Crystal Glaze to the face.  It somehow got all weird and patchy on the glitter cardstock and took away the shine completely...so weird.


The super cute "EEK!" comes from the Witchie Witchie Stamp and Die Set.  In case you missed the first card I made with this awesome die, here it is...


This is such a versatile little die and I hope you are able to add it to your collection!!  Up next on the hop is the super talented RUTHIE!!

Here is the full hop lineup:

Emma (My Creative Time)
Laurie(you are here)

And don't forget...

***FREEBIE***
Starting on Friday, August 17, 2018 @ 8am PST we will be giving away this ADORABLE new “PUMPKIN FACE DIE”. This die will be given to the FIRST 50 shoppers! If you are one of the 1st 50 shoppers it will automatically be added to your package at the time of packing/shipping. Once 50 shoppers came through, this die will be available for purchase.
So, if it's for sale in the store, you are not one of the 50. No exceptions will be made. This freebie is not part of the "bundle" and will be sold separately.
And before I go, let's have a look at all the amazing products being released today!
Witchie Witchie

Open If You Dare

Witch Hat Topper Die

Coffin Treat Pocket Die


Enjoy the hop and happy Shopping ;)

See you soon!!

Laurie


Featured Post

Patterned Paper and Coloured Cardstock

Hey friends and welcome! I wanted to share a fun shaped card with you using dies from Pretty Pink Posh and Scrapbook.com ! I've been a l...