Thursday, June 28, 2018

Anything Goes with My Creative Time!

Hello my crafty friends and welcome back!!  It's "Anything Goes" today for My Creative Time and I've made a clean and simple summer themed card!

The weather here in Manitoba has been quite beautiful lately and it's full-on flip flop season! Although, as I'm writing this post, we are in the middle of a thunderstorm.  Which as long as it doesn't get too severe, it's all good because we need rain!!

Anyway, back to my card!! I started by stamping both the large and small stripe from the Build A Scripty Watercolour Background Stamp Set in a couple different shades of blue.  I actually stamped the skinnier stripe over the wider stripe.


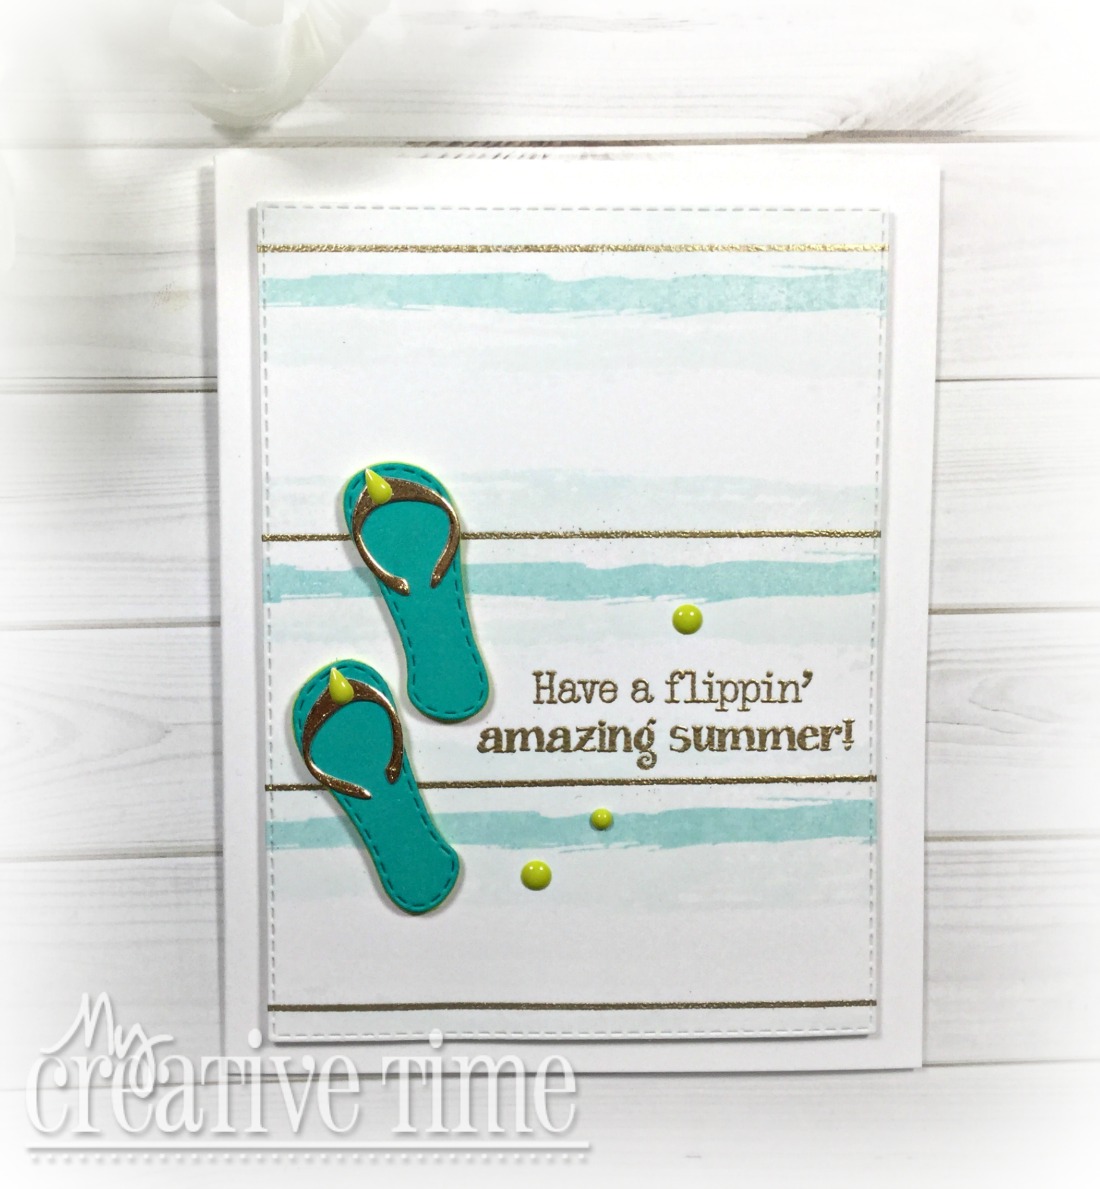
The wider stripe is very light but you can kind of see it :).  To add a bit more pizazz to the card, I decided to do some gold heat embossing.  I used one of the stripe stamps from the Mad For Plaid Stamp and Die Set and tried to evenly space the stamping. I decided to heat emboss the sentiment as well. After all the stamping was done, I used the largest rectangle die from the More Stitched Rectangular Dies to cut the panel down.

Those cute little flip flops (or thongs as they used to be called in my day, hahaha) were made using the Sit Back and Relax Stamp and Die Set. I should also mention that the sentiment is from this set as well.


I used green fun foam to pop these flip flops up which also looks a lot like the soles!!  A few lime green enamel dots add a bit of jazz.


And that's my card for today!! I hope you enjoyed and that your summer has been "flipping' amazing" so far!!

Until next time...stay crafty!!!

Laurie


Friday, June 22, 2018

Oh Canada Blog Hop with Scrap N' Stamp Canada!!


Hello, eh??!! The SNS Seven is celebrating the upcoming Canada Day event!! This year we're celebrating 151 years since confederation. And it falls on a Sunday which means LONG WEEKEND!! Woo hoo!

You should have arrived from the fabulous Kia's blog! But don't worry if you've gotten lost, the entire line up will be listed below :)

Photoplay came out with the cutest stamps, dies, stickers, ephemera and patterned papers. It's called the O Canada collection and it's awesome! I had such a great time making cards with this stuff!

I made two cards for you today. One was fairly "involved", the other came together in less than 5 minutes which is record time for me!! Let's start with the more complicated one...


I coloured both of the iconic, Canadian images, the beaver and the moose with Copic markers and used the co-ordinating dies to cut them out. The background was created using scalloped edge dies from My Favourite Things and a cloud edge die from Lawn Fawn. 


I used regular Distress Inks to colour all the background dies. Including, Twisted Citron, Mowed Lawn, Pumice Stone, Crushed Olive and Tumbled glass. I left the background colours quite muted as I wanted the stars of the card to be the beaver and moose.


The simple "eh!" sentiment is enough and works perfectly! This card could be sent to anyone, Canadian or not, and it would surely put a smile on their face!!

Now, I have a confession. I have never had or used ephemera..ever!! So let me tell you that I was shocked when I opened that little package!  I couldn't believe all the cool stuff in there!!  For my "5 Minute Card", I used only ephemera and truth be told...I almost like it better!!  I used a frame, a sentiment banner and of course, that moose again and popped everything up with foam squares onto a white card base and voila!! A super cute card!!


Thank you for joining us today as we show you these super cute products from Photoplay celebrating Canada!!!

Your next stop on the hop is the super talented Nancy!!

You can find the entire blog hop line up down below!! Now, let's talk about prizes!!

There will be one $50.00 gift certificate up for grabs as well as a chance to win one of seven (7) ephemera packs.  All you have to do is leave a little love on each blog stop!!  Also, use the code  HOP10 to receive $10 off any order of $50 or more!!! Comments will be open for prize selection until June 28 and winners announced the following Friday on the Scrap N' Stamp blog. Good luck, happy shopping and thanks for the love!!

Have the most wonderful day and see you soon!!

Laurie


Thursday, June 21, 2018

Oceans of Birthday Wishes with Craftin Desert Divas!

Hello friends and welcome back!! I'm back to share a fun Summer themed card with you!!  The past couple Craftin Desert Divas releases have had some absolutely amazing summer themed stamps and dies, so this card was so fun and quite easy to make!!

I started by picking the umbrella and the cute little mouse on her beach blanket from the Waving Hello stamp set and did a little masking to make them into one image.


I stamped the umbrella first, applied the mask and then stamped the mouse.


Always stamp what you want in the foreground first!!!  I coloured up this cutie with my alcohol markers.


For the background, I used the Bright Horizons Stencil along with Wild Honey, Scattered Straw and Tumbled Glass Distress Inks. 


This stencil is so beautiful and gives such a great result!


To complete my scene, I of course, used the Beach Scene Dies. This has to be one of my all time favourite and most used die sets!!  I cut the "beach" die out of white cardstock and used Tea Dye Distress Ink for some colour.  I cut the pretty scallop die from the Outdoor Landscapes Two Die set out of white cardstock as well and used Peacock Feathers Distress Ink on it.  I ended up cutting a piece of vellum with this same die.


I fussy cut the sweet little mouse and thought I needed one more element to this card...a bird!  So, I die cut the bird from the Scene Builder Dies and applied a light grey ink.


I decided to cut down my stencilled background as well as all the die cut pieces with the largest of the Fancy Frames Die set.  This gave everything a beautiful scalloped edge.


I simply layered each piece onto the scalloped card panel using tape runner adhesive.  I did use foam tape for the mouse.


The sentiment comes from the Mermaid Lagoon set and was stamped on a thin strip of cardstock which I angled at one end.


Of course, every card of mine has to have some sparkle and shine, so I added some clear sparkle to the pink areas and added Glossy Accents over top!!  And don't forget about the Shimmer Sequins!!


And that's my Summer Themed card for you today!!  I hope you enjoyed!!

Thank you so much for stopping by today!!  Until next time...stay crafty!

Laurie

Here is a full list of CDD Products used:


Wednesday, June 20, 2018

Inspire Me Wednesday with My Creative Time.

Hello and welcome back to another Inspire Me Wednesday with My Creative Time!  I made a quite clean and simple card with a bit of easy watercolouring and the inlaid die cutting technique all on shaped card base!  It may sound like a lot but it was super easy.

I started by stamping one of the flower images from the Healing Wishes Stamp and Die Set onto a piece of Strathmore Mixed Media paper.  I used Versafine Black Onyx Ink and heat embossed it with clear embossing powder.


This is a detailed stamp so by embossing the image, it helps prevent any colour from bleeding over the lines.  I used my Tombow Dual Brush Pens for all the colouring.

Once I was done with that, which took all of 5 minutes, I used one of the large ovals from the Scalloped Stitched Oval Dies and cut around the image.  I lined up the "friends" word die from the Friendships Are Forever Stamp and Die Set right over top of the floral image.


This cuts the positive, the actual word, and leaves a negative space. The negative space allows for the die cut word to be placed back in which gives us the inlaid die cutting technique!!!  When doing this technique, you can glue the positive piece back flat or raised. I prefer to raise the die cut up to make it stand out a bit more.

I die cut the word again with some craft foam then glued the paper die cut on top. Sometimes this can be tricky as the foam wants to distort slightly. I always adhere the paper die cut before removing the foam one...does this make sense??


For my card base, I used the largest of the dies from the Scalloped Stitched Oval dies. I cut two, scored one about 3/4 inch from the top, applied some Scar-Tape and adhered the two together.


I first adhered the white panel onto the base using tape runner and inlaid the "friends" using liquid glue.  NOTE: make sure you keep any bits and bobs that are part of the die! Like the centres of the "d" and "e". These will need to be placed back as well.


I put a whole lot of Glossy Accents on the vase as well as the berries, some sparkle pen to the "friends" and a spattering of clear sequins.


Thank you for stopping in today!! I appreciate your visit!

See you soon, friends!!

Laurie


Monday, June 18, 2018

Maple Syrup Monday with Catherine Pooler Designs

Hello friends!!  Colleen from Maple Syrup Designs and I are taking another look at Catherine Pooler Designs stamps and dies...and inks!!

I used the recently released Wonderful Wildflowers stamp set for my project today.  This stamp set has co-ordinating dies but I didn't actually use those today. I started by stamping many of the images with Versamark Ink and heat embossed them with white heat embossing powder.

I used Rose Petals, Peppermint Scrub and Skylight inks to blend some colour onto each image. The white embossing resists the ink.  I used a combination of Green Tea and Eucalyptus ink for the leaves.


I fussy cut each image out. In the end, you'll notice that I did not use the small red flower. Each flower comes with three layers: the outline, a full stamp which fills in the outline and one detail layer. To give a bit of interest to the flowers, I stamped the detail layer in the same ink I used to blend the colour.


After I fussy cut each image, I jazzed up the white card front using a light grey ink, a stencil with small polka dots and an oval mask cut out of a piece of typing paper and an oval die.


I stamped the "wonderful" word from the set in both the Peppermint Scrub and Rose Petals ink to create a soft ombre look.  I ended up fussy cutting around the word so I could pop it up off the card.


I adhered all the images with a combination of foam adhesive and liquid glue.


I added a bit of Clear Sparkle Overlay pen to the darker parts of the flowers.  It reacted a bit with the ink, but the effect is pretty.


I finished the card off with a few Sparkling Clear Sequins.


Thank you for stopping by today and I hope you enjoyed today's card!!

Until next time....stay crafty!!

Laurie


Saturday, June 16, 2018

Father's Day Card for Scrap N' Stamp!!

Well, hello there!!  Today is my first official DT post for Scrap N' Stamp Canada and what great timing as tomorrow is Father's Day!!

I mixed and matched a few different brands for this card.  I love how everything plays so well together!  I started with the Hero Arts Luggage Tag Alphabet Set to stamp out the word"dad".  This is a great alphabet set because the size of the letters are perfect for card front sizes. Not too big, not too small.


I used two different inks for a gradient effect. Memento Tuxedo Black and Memento London Fog Inks. I cut those letters out and set them aside.

I chose three images from the MFT Bitty Bears set that I thought my dad would appreciate.  The bear holding the heart, the fish and the little leaf.  And nothing could be more perfect than to use the Mini Picture Frames Dies from Lawn Fawn. This is one of the sweetest set of dies!!


I coloured the bears with Copic markers and used the co-ordinating dies to cut them out.  The frames cut two different sections, the inner shape and the scalloped frame portion.  I used Tumbled Glass and Crushed Olive Distress Inks to add a bit of colour to the inner portions.


I played around with the layout a little bit before deciding that I needed one more of the frames to "hold" the sentiment.


I did't want to add another layer to the front of this card but I felt it needed just a little extra something.  I will often add a hand drawn border around the card front to eliminate the extra layer and to add some interest. I used the Uni-ball Signo Gel Pen for this.


Now, all I had to do was put everything together!!  I used Nuvo Deluxe Adhesive for almost everything on the card except the "dad".  I cut up tiny pieces of foam adhesive squares to give a bit of a lift!!


And even though this card is for my dad, I couldn't resist adding a bit of Wink of Stella and Nuvo Crystal Glaze to the heart, the leaf and the fish!


I couldn't resist and added a few matte enamel dots as well!! 


I hope you got a kick out of today's card because I sure did making it!  I hope everyone has a great day tomorrow, celebrating your Dad!!

Until next time...stay crafty!!

Laurie

**I wanted to mention that all products linked to the Scrap N' Stamp Canada shop are affiliate links. This means if you happen to make a purchase through one of these links, I will make a small commission, at NO cost to you!! Thank you in advance if you happen to make a purchase**


Featured Post

Patterned Paper and Coloured Cardstock

Hey friends and welcome! I wanted to share a fun shaped card with you using dies from Pretty Pink Posh and Scrapbook.com ! I've been a l...