Thursday, February 28, 2019

Gift Card Giving with My Creative Time!

Welcome, my friends!!  It's all about ways to present a gift card!!  Gift cards are very popular but can be boring to give. My Creative Time has many die sets in the shop that make it easy to glam up those boring cards but today I decided to use some brand new products that maybe weren't intended to be used as such!

I used the new Basket Tag Die Set to create my GC holder.  This was super easy to do!! There are two parts to this die. One that cuts out the actual basket and one that cuts out a solid layer that you can adhere the basket to.  The actual basket die cuts out the front panel separately so you can foam mount it easily to create space to tuck other images/die cuts into.

It's easier to show you with this pic...


The portion that has the basket weave stamped on it (from the Basket Tag Sentiment Set) is cut separately from the die.  All I did was add a thin strip of foam tape on the bottom of the piece and after fitting my gift card, added a couple small pieces to the upper corners. This keeps the card in place yet it's very easy to slide in and out!  And speaking of gift cards, you probably know by now that I never have these on hand so I made my own.  And FYI, the 5th die from the centre of the Scalloped Stitched Rectangular Dies is the EXACT size of a credit card which means it's the exact size as a gift card!!!


Of course, I dressed up the card using the eggs that come with the Basket Tag Die Set, the Stitched Grass Die and an embossing folder!!

This was super fun to make and shows you another way to use this die set!!


As I was getting this post together, the Basket Tag Die Set is currently on backorder but you can sign up for a preorder!!

Thank you for stopping by!  See you soon!

Laurie


Saturday, February 23, 2019

Easter Card featuring Paper Nest Dolls!!

Hello friends!!  Today, I have the privilege of sharing a card made using an ADORABLE digital stamp from Paper Nest Dolls!  Christine, the owner, kindly sent me a few images to play with.  And because I love critters, I chose to work with the Will Work for Carrots image.


Digital stamps offer so much versatility! You can resize or layer up images to create some amazing scenes.  I chose to resize the image to fit a 4.25 X 4.25 inch card.  I coloured this sweet guy using some pastel shades of alcohol markers and fussy cut it out.  

The background was created using a cloud stencil and a grass stencil (made from a border die).  I went through my die stash and found some cute, stitched cloud dies.  I just had to pop everything up with foam adhesive and add some glitter pen and Crystal Glaze!!


I am in love with this image!!  The sentiment on the sign cracks me up and that little chick puts a smile on my face!


I want to encourage you to check out Christine's shop and images, you won't be disappointed!  Also, please check out the Paper Nest Dolls blog.  You will not believe the talent her design team has!!  My colouring skills pale in comparison to theirs!

I want to thank Christine for the opportunity to play with her digital stamps. I had so much fun creating this little card!

Thank you for stopping by today!  I'll be back soon!

Laurie


Friday, February 22, 2019

My Creative Time 88th Edition Release

Hello friends!! First off, I'm so sorry that I haven't participated in this week's sneak peeks!!  My happy mail took a bit longer to arrive this time which left no time to create:(.  But I'm happy to say that they are receiving some love now!!


For my project today, I'm featuring the brand new Peeking Bunny Die which happened to be the freebie this month!  It is listed in the shop now for purchase which means 25 of you were very lucky and got yours for free!!!


I created a little window scene by using a rectangle die to cut out a portion of a white piece of cardstock cut with the largest Stitched Postage Frame Dies.  I backed it with a piece of light blue patterned paper.  To create the "curtains" and the window ledge, I used the scalloped die from the new  Basket Tag Die Set. I layered three pieces, cut from patterned paper, to create a fuller look.

The bunny was cut from ivory cardstock and then lightly inked with a beige ink and a pink ink.


I love how the paws are cut separately to give the appearance of the bunny peeking over the ledge!  Before foam mounting the entire panel to a kraft card base, I masked a portion of a sentiment from the new Basket Tag Sentiments Stamp Set in a smokey grey ink.  And I apologize for not taking a photo of the inside of the card, but the sentiment continues which says "amazing"!


I finished off by adding a couple of Stitched Cartoon Cloud Dies (on sale!) and a small butterfly from the Mini Butterflies Die Set. A few touches of clear sparkle and this card was done!!  

BLOG HOP GIVEAWAY

For our blog hop giveaway, Emma is giving away one $25 gift card to the My Creative Time Store. All you have to do is leave a comment on each of our blogs! You are not required to comment on every stop but the more you comment on, the more chances you have at winning!! VERY IMPORTANT: Please leave a way for us to contact you in case you are the lucky winner!!

SALE ALERT!!

DON'T FORGET our sale starts now, HERE!!  Use code Feb2019 to receive 15% off your entire IN STOCK purchase!!  This sale will end Friday, March 1st at midnight PST!

Here's a look at what is being released today!!


HERE'S THE HOP LINEUP:

Me


Wednesday, February 20, 2019

Create A Smile "Sketch" Challenge!!

Welcome back!  Today we start a new challenge over at Create A Smile Stamps!!  It's a sketch challenge this time around which was truly a challenge for me!!


My brain was definitely challenged with this one but that's the point, right?? Get out of your comfort zone with layouts and just go for it!!  

I followed the sketch almost to a tee except for making mine a landscape card.


I've been on a bit of a kick with my Zig Clean Colour Real Brush Markers lately so that's what I chose as my colouring medium!  All these images as well as the sentiment are from the new Stamping Friends set!  This set is beyond cute and just perfect for us crafters!!


I fussy cut each image and placed them onto a circle die cut which I then layered onto a scalloped circle die cut.  For the arch or rounded bottom part of the sketch, I used the Blossom Stencil and Peacock Feather Distress Ink, which was a perfect match for the teal Zig marker!!

I added some shimmer to the teal areas on the images and rounded the top 2 corners of the card base. I struggled with NOT adding any clear sequins on this :)


I hope you'll play along with us for the next 2 weeks!! If you've never used Create A Smile Stamps, I highly encourage you to check them out. They are super high quality not to mention unique and so cute!!  They are available at Simon Says Stamp and Butterfly Reflections Ink (these are not affiliate links) but don't be afraid to order directly from them. International shipping is quick and cheap!!

Remember, there's an awesome prize to be won if you are the winner!!

Thanks for stopping in!!  See you soon!

Laurie


Friday, February 15, 2019

"Some Like It Hot" Blog Hop with Scrap N' Stamp!!

Welcome to our monthly blog hop and challenge!! The theme this month is "Some Like It Hot" with the idea of hot beverages in mind!!  There has been so much inspiration posted on the SNS Challenge Page already so I hope you'll check it out!!  There's prizes to be won and a special discount code posted there, as well!!


This was a fun card to make!! I, myself, LOVE coffee but have been known to indulge in a latte from time to time!  I combined a bunch of Lawn Fawn products on my card today, so let's take a look!!


The main focus of the card is the adorable mugs from the Thanks A Latte Stamp Set. But to jazz them up a bit, I did some simple masking and stamped the beautiful floral image from the Simply Celebrate Stamp Set. This gave the mugs such a great pattern!!  I used some of the lightest shades of my Tombow Dual Brush Pens for the colouring.  


I added some glitter to flowers, leaves and also the "whipped cream" on the smaller mug using the Clear Wink of Stella Pen. For the "froth" stamp on the coffee, I used a slow drying brown ink and added clear embossing powder. I love the shine and dimension it gives!!

After the images were coloured, I used the co-ordinating dies to cut them out.  I cut a circle out of Strathmore Mixed Media paper (the same paper I used for the mugs) with a circle die.  Using the same pink marker as I used for the large flowers, I did a bit of ink smooshing onto the circle.  I scribbled the marker onto a plastic sandwich bag, spritzed with water and pressed it onto the die cut. To add a bit more flair, I layered the smooshed circle onto a Fancy Scalloped Circle Stackables (the largest one)which was cut out of plain white cardstock.


Before adhering my focal piece, I decided to use an embossing folder on my kraft card base.  This is the Diagonal Stripe Embossing Folder from Taylored Expressions and it is awesome!!

The sentiment comes from the Thanks a Latte set and was stamped onto a banner.  Of course, I just had to add the smiling heart!! A few clear sequins and this card was done!!


I love the way this turned out and I hope you do too!  Even though this may be on the feminine side, I gave it to my husband yesterday :)

Here is the full blog hop list:

Me (you are here)

And don't forget about leaving us each some love for the chance to win a fabulous prize!!!! We will be giving away 9 prizes in total!!  There will be 8 "some like it hot" prize packs and 1 $50 gift certificate to the SNS store. Winners will be chosen at random. Good luck!!

Thank you so much for hopping along with us today!

See you soon...

Laurie


Tuesday, February 12, 2019

Birthday Palooza with My Creative Time!!

Hello, friends and welcome back!!  Today I'm sharing a quick and easy birthday card using products from My Creative Time.  Because these cards are likely the most needed, it's great when they come together quick!!


I used the recently released Celebration Tags Stamp and Die Set. This set is adorable and has got you covered for almost any occasion.  I die cut all my cupcake pieces out of scrap pieces of patterned paper because who doesn't have a load of that on hand?!


Because I struggle with leaving a lot of white space, I used a stencil to create the rays in the background.  Blueprint Sketch Distress Ink matched the blue hearts almost perfectly!  I used the same ink for the sentiment, using my Misti because Distress Inks are really not meant to stamp with so multiple impressions are needed.


I foam mounted all the die cuts, added some sparkle and Glossy Accents to the hearts and couldn't resist adding a few red sequins!  Looking at this card now, I'm getting some strong July 4th vibes...oh how I wish for July!!

That's all for today. I hope you enjoyed!

Thank you so much for dropping by. I love your visits!!!

Laurie


Wednesday, February 6, 2019

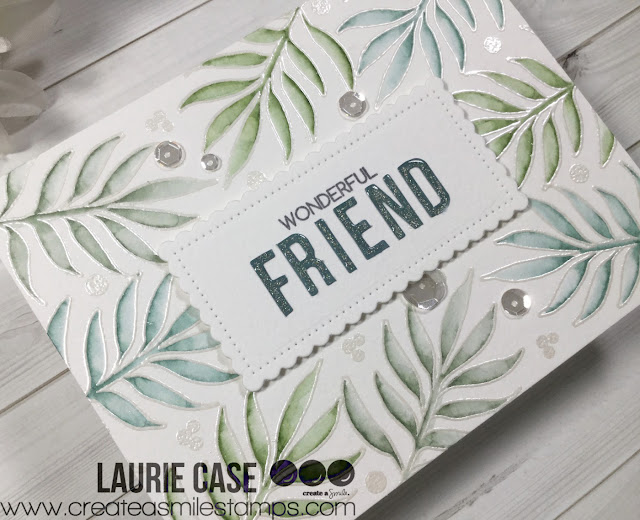
Create A Smile Challenge...Friendship!!

Hello and welcome back to another Create A Smile Stamps Challenge!!  This one is an easy one.  It's all about friendship. Friendship cards are a favourite of mine to make because you can use so many different styles of stamps. Critters, florals, graphic...anything goes!

For my card today, I combined an older CAS set along with a new release set.  I heat embossed one of the leaf images from the new Fine Ferns Stamp Set.  I used Silver Pearl embossing powder for this.  This is one of my most loved embossing powder!  Because I used watercolour paper, the images are a light shimmery colour without being stark white.


I used my Misti for the stamping as it's super easy to create a mirror image.  To colour, I chose 3 different greens from my set of Tombow Dual Brush Pens.  I swiped some colour inside each leaf and blended it out with water.


For the sentiment, I used the Alphabet Sticker Set in the colour of Deep Sea.  This was my first time using these stickers and I love them!!  I stuck them onto a piece of the same watercolour paper cut with a Cool Cuts Scalloped Rectangle Die.


The small "wonderful" word comes from the All About You Stamp Set. The stamp actually says "are wonderful", but I masked off the "are" before stamping.


I added some glitter and Nuvo Crystal Glaze to the letter stickers, adhered that panel with foam adhesive and added a few clear sequins.  The entire panel was glued onto a white card base.

I hope you enjoyed my project for today and I encourage you to play along!!  Create A Smile Stamps has wonderful products you are sure to love!!

All the details are on the Challenge Blog but here is what you're playing for:

Thank you for stopping by today!!  See you soon!!

Laurie


Monday, February 4, 2019

Made In Minutes with My Creative Time!!

Well, it's Monday...blah.  Let's try to cure those Monday blues with a card that literally took minutes to make. I made this super, clean and simple card using one of my favourite sets from My Creative Time.

The Home Sweet Home Stamp and Die Set was one of the first sets I ever purchased from Emma and continues to be one of my most used.  This set is on sale right now, so it's a great time to pick it up...just sayin' :)


I did some very simple ink blending onto a panel cut with one of the smaller Scalloped Stitched Rectangular Dies.  I used Peeled Paint and Salty Ocean Distress Inks.  I coloured up that adorable mushroom with my alcohol markers and added a few details with a white gel pen, a glitter pen and some Nuvo Crystal Glaze.


The sentiment comes from the same set and was stamped on a speech bubble which is from the Stitched Round Speech Bubbles Die Set.  I used foam adhesive to adhere the mushroom and sentiment as well as on the focal panel.


And I left it at that!!  It's hard for me to leave this much white space but I didn't want to add anymore time to the process!!

Thank you for stopping by! I appreciate your visits :)

Until next time...stay crafty!!

Laurie


Friday, February 1, 2019

My Creative Time 48 Hour Flash Sale and Blog Hop!

Hello and welcome back to another 48 Hour Flash Sale for My Creative Time!! This sale is for 48 hours only and is going on right now until Sunday, February 3rd, 2019 at 7:00am PST!  Today, we are showcasing a super cute, brand new stamp and die set called Celebration Tags! This set is available for purchase HERE. Don't forget to enter code FLASH at checkout for 20% off your entire in-stock purchase!!

You should have arrived from the super talented Miss Kendra's blog! The full blog hop list will be down below!


This set is intended to make tags for almost any occasion but is so versatile that it can be easily used for cardmaking.  I love that the tag itself does not cut the ribbon hole.  Because of this feature, you can use those dies for a large label, as I did on my card today!!


I am amazed at how many dies are in this set!  That cupcake is adorable!  


I used Distress Ink to add colour to my die cuts but there is so much more you can do with these!!  I think watercolour or using patterned paper would look awesome!


I can see myself using this set again and again. Mixing and matching with so many of Emma's products!!

I hope you all get a chance to shop today and are full of inspiration from this blog hop!! Up next is the lovely Miss Ruthie!!

GIVEAWAY:

Leave a comment for a chance to win a $25 gift card to the My Creative Time Store! Don't forget to leave a way for us to contact you just in case you are the lucky winner!! Good luck!!


Here is the full blog hop lineup:

Laurie (me!!)


Featured Post

Patterned Paper and Coloured Cardstock

Hey friends and welcome! I wanted to share a fun shaped card with you using dies from Pretty Pink Posh and Scrapbook.com ! I've been a l...