Friday, August 23, 2019

Paper Sweeties Birthday Blog Hop!!!

Hello, friends! Welcome to a very special blog hop where Pink & Main is teaming up with Paper Sweeties to celebrate their 7th Birthday!!


I don't make many shaker cards but when I saw the awesome little package of Cupcake Sprinkles, I knew this was my only option, haha!! 


To create the shaker window, I used the second largest Cloudy Frames Dies and die cut it in the centre of a white panel cut with the largest die in the Stitched Rectangles Set 2 dies. After gluing the acetate to the back side of the panel, I adhered the frame portion on top.  I did add 2 layers of foam tape behind the window as these sequins are a bit thick.

I used the beautiful "congrats" sweet cuts from Paper Sweeties, which I coloured with alcohol markers to give an ombre effect.  I used a few images from the Bee Happy Stamp Set from Pink & Main. I coloured them with alcohol markers, as well, and used the co-ordinating dies to cut them out.


Before putting my shaker element onto the card base, I stamped a sub sentiment from the brand new Going Places Stamp Set from P&M. I think this sentiment is awesome! This card can be given for pretty much any occasion where a congrats are in order!

I foam mounted all the bees, glued the congrats die cut down and added the shaker to a white A2 card base.  A few touches of glitter pen and this card is done!


Thank you for hopping along with us today! Now, what's up for grabs??!!

Pink & Main is giving away 1 (one) $25 Surprise Pack! And the Paper Sweeties is offering a 25% discount TODAY on their online shop!  To be eligible to win, you must leave some love on each stop of the hop!! The winner of the surprise package will be announced on the P&M Blog on Wednesday, August 28th!


Please check out the Paper Sweeties Design Team projects HERE!!

My Creative Time 94th Edition Release Blog Hop and Sale!!

Yay!!! It's blog hop day for the newest release from My Creative Time!! You've likely arrived from Miss Kendra's blog who, I have no doubt, blew you away!!


Yesterday, we showed you the new Skull Treat Box Die Set and I told you I was going to show you another way to use it!  Emma's treat box dies are cleverly designed as you aren't committed to only making treat boxes with them.  Today, I took that die set and made a card!


Because this die set actually does creep me out a bit (haha), I thought by adding some touches of pink it would be a little less creepy. What do you think?!

I used the witches hat die from the Halloween Fun Stamp and Die Set to dress up my skull a bit more! And of course a pink, glittery eye patch and gold tooth!!!  To create a bit of interest on the background, I used the Zig Zag Background Die...love this die!!


I popped that cutie up with foam adhesive and added the sentiment. The sentiment also comes from the Halloween Fun Stamps and Dies and was stamped onto the FREEBIE Halloween Fun Tags!


I think that sentiment is hilarious and fits this girly skull perfectly!!  That's my project for today. I really hope you enjoyed the week of peeks and of course, this blog hop!!

Thanks so much for joining me this week. I've had a ton of fun creating with these new products and think you will too!!

The next stop on the hop is the super talented: Miss Ruthie!!

Here is the entire blog hop line up:

Laurie (me)


BLOG HOP GIVEAWAY!!

For our blog hop giveaway, Emma is giving a $25 gift card to the My Creative Time Store to ONE lucky winner!  All you have to do is leave a comment on each of our blogs. You are not required to comment on every blog but the more you comment, the more chances you have of winning!! Very important:  Please leave a way for us to contact you (with your comment) just in case you are the winner!!

FREEBIE!!

Starting today, Friday June 21st, 2019 at 8am PST, we will be giving away these adorable new "Halloween Fun Tag Dies".  This new set will be given to the first 25 shoppers!  It will be automatically added to your package during packing/shipping. Once the 25 shoppers have gone through, this die set will be available for purchase!  So, if it's available in the store, you are not one of the first 25 shoppers.  No exceptions will be made.  the "freebie" is NOT part of the bundle and will be sold separately.

SALE ALERT!!

Don't forget!! Our sale starts right now at the My Creative Time Store!!  Use the code Aug2019 at checkout to receive 15% off your entire in-stock purchase!! The sale ends on Friday, August 30th 2019 at midnight PST!!

Thursday, August 22, 2019

My Creative Time 94th Edition Release Sneak Peek Four!!

Today is the last day of sneak peek for the upcoming release from My Creative Time! I hope you've been enjoying all the teasers!


Today's sneak is extra creepy.  We're showing you the new Skull Treat Box!!  This treat box comes together like the previously released Strawberry Treat Box, which is quick to put together and makes a big impact!


This die set comes with all the pieces needed to make the super scary treat box.  I decided to jazz mine up a bit with a sparkly, gold tooth!


But seriously, how fun is this??  Please come back tomorrow where I'll show you another way to use this die set! Tomorrow is also release day where we celebrate with a blog hop, so you won't want to miss that!!

Thanks so much for taking the time to have a look! See you tomorrow!!


**Sneak Peek Giveaway**

We will be giving away the sets we are showcasing each day to ONE lucky winner!! For example, the sets we showcase on Wednesday, Emma will announce the winner of that on Thursday and the sets we showcase on Thursday will be announced on Friday on the MCT Blog!  All you have to do is leave some love on each of our blogs.  You are not required to comment on every blog, but the more you do comment on, the more chances you have of winning!!   VERY IMPORTANT: Please leave a way for us to contact you with your comment, just in case you are the lucky winner! For extra entries, you can spread the word about this release on Facebook, Twitter or Instagram using #mycreativetime!  Good luck!!


Wednesday, August 21, 2019

Mood Board Challenge with Create a Smile Stamps

Hi everyone and welcome back! It's that time where we introduce you to a new challenge over at Create A Smile Stamps! This two week challenge is a...Mood Board!


The inspiration for my project came from the lower right image along with the colours.


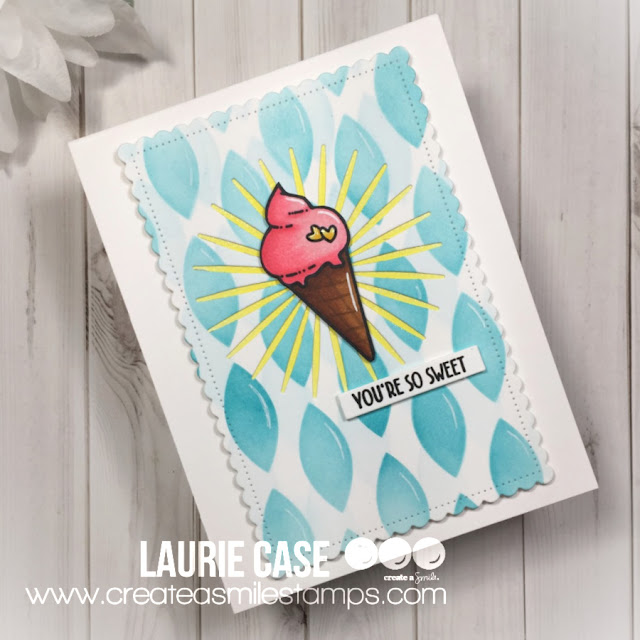
I used the Petals Stencil along with Peacock Feathers and Tumbled Glass Distress Inks to create the background. It may be hard to tell but there is two layers of ink. I inked Tumbled Glass first, shifted the stencil slightly then used the Peacock Feathers Ink. I then cut the panel down using the 2nd largest Scalloped Rectangle Die.

I coloured up that adorable ice cream cone from the A Little Treat Stamp Set and fussy cut it out. To bring in a bit more yellow, I die cut the centre of the ink blended panel with the Focal Die. I quickly added some yellow ink to a scrap piece of paper to layer behind.

I foam mounted the ice cream onto the die cut panel, foam mounted the panel to a white card base and added the sentiment, which is also from the A Little Treat set.


I hope you'll join us!! Remember there's a €25 gift certificate up for grabs!!

Thanks for stopping by!

Laurie


Sneak Peek Day Three for My Creative Time!!


So, today I'm bringing you something a little different! Well, not really different, more like getting more bang for your buck when it comes to seasonal dies!

This die set is my favourite item from this release. The Spooky Tree Tag Die is, in fact, spooky! But I wanted to show you a way to use this for more than Halloween cards.


I used this die to make a Christmas card!! Whaaat??!! This set comes with the tree image itself as well as a background portion.  By inking up the background in a soft, blue colour and cutting the tree out of sparkly, white cardstock, you get an instant winter feel!  

I layered the tree die several times to get some dimension and before adhering it down to the blue base, I added tiny dots with a white gel pen to create "snow".  I went through my stash of dies, and found a small star which I die cut using the same white glitter paper.


I adhered it onto a panel that was embossed with a SU embossing folder.  I stamped a sentiment from the Christmas Wishes Stamp Set and fussy cut around the word "joy" and adhered that to the bottom of the tree.  I love how this card turned out!!

Thank you so much for stopping by! I hope you found some inspiration here today!  See you again, tomorrow!!

**Sneak Peek Giveaway**

We will be giving away the sets we are showcasing each day to ONE lucky winner!! For example, the sets we showcase on Wednesday, Emma will announce the winner of that on Thursday and the sets we showcase on Thursday will be announced on Friday on the MCT Blog!  All you have to do is leave some love on each of our blogs.  You are not required to comment on every blog, but the more you do comment on, the more chances you have of winning!!   VERY IMPORTANT: Please leave a way for us to contact you with your comment, just in case you are the lucky winner! For extra entries, you can spread the word about this release on Facebook, Twitter or Instagram using #mycreativetime!  Good luck!!

Tuesday, August 20, 2019

My Creative Time 94th Edition Sneak Day Two!


Are you ready for another peek into this month's release from My Creative Time??! Today we're showcasing the FREEBIE dies!  These dies are free to the first 25 shoppers so you'll want to shop early!!

This set of dies co-ordinates with the Halloween Fun stamps and dies we showed you yesterday.  These little labels are made to fit the sentiments from the set. And have a really cool stitched edge and shape!


I decided to make a shaker card today using both ghost dies from the Halloween Fun dies.  I think it's super cute how it looks like the ghost in the middle is holding a sign!! Isn't the shape of these little dies awesome?


And remember that speckled stamp I mentioned yesterday? I used that again today to add just a little something to the background!!

Are you getting excited for this release yet?  Thanks so much for dropping in! Please visit again tomorrow for another amazing sneak peek!!

**Sneak Peek Giveaway**

We will be giving away the sets we are showcasing each day to ONE lucky winner!! For example, the sets we showcase on Wednesday, Emma will announce the winner of that on Thursday and the sets we showcase on Thursday will be announced on Friday on the MCT Blog!  All you have to do is leave some love on each of our blogs.  You are not required to comment on every blog, but the more you do comment on, the more chances you have of winning!!   VERY IMPORTANT: Please leave a way for us to contact you with your comment, just in case you are the lucky winner! For extra entries, you can spread the word about this release on Facebook, Twitter or Instagram using #mycreativetime!  Good luck!!


Monday, August 19, 2019

My Creative 94th Edition Sneak Peek Day One!!

Hello my friends and welcome back to a week full of spookiness featuring products from the upcoming release from My Creative Time!!  This month's release will get you ready for Halloween season!


Today, we're having a look at the new Halloween Fun Stamp and Die Set!  This set is full of creepy, cute sentiments as well as a ton of dies to dress up your Halloween cards or treat bags!


I used one of the ghosts and the witches hat die to decorate the front of my card.  The background was really easy! I used Mixed Media paper and the inks blend like butter! I used Black Soot, Chipped Sapphire and Dusty Concord Distress Inks.

The sentiment is so cute, which I heat embossed in silver. The stamp set also has a speckled image (don't know how else to decsribe it) which is super fun and comes in handy to add texture!!


And that's your sneak peek for today!! Hope you enjoyed!! See you back here tomorrow for another awesome peek!

**Sneak Peek Giveaway**

We will be giving away the sets we are showcasing each day to ONE lucky winner!! For example, the sets we showcase on Wednesday, Emma will announce the winner of that on Thursday and the sets we showcase on Thursday will be announced on Friday on the MCT Blog!  All you have to do is leave some love on each of our blogs.  You are not required to comment on every blog, but the more you do comment on, the more chances you have of winning!!   VERY IMPORTANT: Please leave a way for us to contact you with your comment, just in case you are the lucky winner! For extra entries, you can spread the word about this release on Facebook, Twitter or Instagram using #mycreativetime!  Good luck!!

Tuesday, August 13, 2019

Wild About You with Pink & Main!!

Hello, friends! Welcome back! While the Pink&Main Blog is getting an exciting new look, I'm sharing my latest creation here!


I used the fun, new set called Toucan Do It stamp set and co-ordinating dies for this card along with some fun ink blending.

I started by die cutting a white panel of cardstock using the largest of the Stitched Rectangles Set 2.  I used Peacock Feathers Distress Ink to add some base colour. I focused on the bottom left portion. I then placed the Puffy Hearts Stencil over top and used the same ink, with a harder pressure. This creates such a beautiful look!


I stamped that adorable alligator with Memento Tuxedo Black Ink and used my Copic markers to colour it in.  I cut the image out with the co-ordinating die.


I adhered the heart panel onto a white card base and used foam adhesive to adhere the alligator.  I stamped the sentiment in Versafine Onyx Black ink.  I decided to leave it as it was and not add any sort of embellishment...which is hard for me, haha! I really wanted that background to shine!


Thank you for stopping by today!! I hope you have some time to check out some of these new (and older) products in the Pink & Main Shop!!


Wednesday, August 7, 2019

Create A Smile Sketch Challenge!

Hello, hello!! Today, is the start of another fun challenge over on the Create A Smile Stamps Challenge Blog! We have a very cool sketch for you to work with this time around!


Remember, you don't have to follow this sketch exactly! Just go with where your creativity takes you!  I, myself, followed it almost to a tee :)


I started by stamping, colouring and fussy cutting a few images from the uber cute Best Bugs Stamp Set.   I created the partial oval scene panel by partial die cutting a rectangular piece of cardstock with a circle die. But, Create A Smile has a sweet die set that creates this shape perfectly! Check out the Stacked Pierced Ovals!


Before I adhered the scene to the card base, I used the Diagonal Grid Stencil along with Spun Sugar Distress Ink to add a bit texture.  Of course, a few white gel pen details add so much!


The sentiment is from the Best Bugs stamp set. I stamped the sentiment on a white cardstock strip. I decided to layer that onto a banner die that I inked with the same pink ink. This acted like the little flag portion of the sketch!

Thank you for dropping in today! I hope you'll play along with us! Up for grabs is a €25 gift certificate to the CAS online store!!

Please visit the Challenge Blog for more details and to link up your creation!!

See you soon!

Laurie


Friday, August 2, 2019

Pop 'N Hop with Scrap 'N Stamp!!!

Welcome back to our monthly blog hop for Scrap 'N Stamp Canada!  We are playing with a cool new product that's available in the shop right now!!


The design team have all made pop up box cards today made using kits from The Paper Cut. This line of products lets you create fun, interactive cards without investing in pricey dies! These kits include all pre-cut cardstock, in all the pieces you need!  Some of the kits available are the Pop Up Box, Triple Mini Window Card, Swingin' Z-Fold Card, Stair Step Card, Graduation Cap Card and even a Slider Card! I should also mention that some of these kits come in different sizes and colours!

I personally don't own any box card die sets.  I don't make many interactive cards such as these, so investing the money just doesn't make sense.  BUT, with that being said, if you've been on the fence on buying any of these die sets, I would suggest playing with one of The Paper Cut kits. This will give you some sort of an idea on how often you would be creating these specialty cards!

Anyway, enough chit chat! Let's have a look at what I made for you today!


I used the Square Pop Up Box Card kit in white.  Assembling the box was as easy as adding two strips of Scor-Tape to tabs. The part that took the longest was trimming out all the patterned paper to adhere to the flaps.  I used an older Lawn Fawn paper pack for that!  I have to admit the dimension of the little scene is pretty awesome!


I used the adorable Happy Village Set (unfortunately, out of stock at the moment) and its co-ordinating dies. I love this set and get a lot of use out of it! I coloured everything up with my alcohol markers.


I used an extra house for the front flap of the card along with a sentiment from the Wavy Sayings Stamp set which was stamped onto one of the Simple Wavy Banner Dies.


This flattens completely and fits into a 6X6 square envelope.  You would add your sentiment on the back of this card.  I want to apologize for these photos. Like I said, I rarely make such dimensional cards so I'm used to flat lay photography :)

I hope you enjoyed my project for this hop!! You'll find the full blog hop list below!


GIVEAWAY!!

One lucky commenter will receive a $50 gift certificate to the SNS online store!! The winner will be announced on August 15, 2019 on the Scrap N' Stamp Blog. So, leave a little love on each stop to increase your chances of winning!!

FACEBOOK CHALLENGE

Today, also starts a new challenge on the SNS Facebook Page and the theme is 3-D cards or cards that POP!! We hope to see your creations!!

Thank you for hopping along with us today! Remember to leave a comment by August 14th!!

Featured Post

Patterned Paper and Coloured Cardstock

Hey friends and welcome! I wanted to share a fun shaped card with you using dies from Pretty Pink Posh and Scrapbook.com ! I've been a l...