Saturday, August 20, 2016

Finding my Mojo with Honey Bee Stamps

Hello everyone and welcome back!!

These past couple of weeks I have been struggling with my creative mojo.  I'm not sure where it went but I'm determined to find it!!  I just can't seem to please myself with any of my creations. Whether it's colouring or layouts, it's been kind of tough.

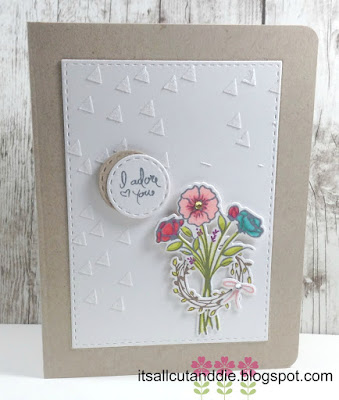
So, I pulled out a new stamp/die set from Honey Bee Stamps.  I used the Not Too Shabby stamp and die bundle, which happens to be on sale this month!!  It's a super sweet set.


REWIND:  I should mention that I started with a different stamp.  I thought I would use the To You With Love set from Clearly Besotted.  I started to colour the image with my Derwent ColourSoft Pencils...I just wasn't feeling it...


BACK TO THE PRESENT:  I started by creating a background panel with white cardstock cut with Simon Says Stamp Stitched Rectangles.  Then I took out some white embossing paste.  I thought the lid would be stuck on since I haven't used it in a VERY LONG TIME!!  I used a small triangle stencil to add a bit of dimension to one side of the panel.  To spruce it up a bit, I sprinkled some fine iridescent glitter over the paste while it was still wet.


I stamped and die cut the bouquet image and coloured it with alcohol markers. I also stamped, coloured and die cut the small wreath and bow image.  I placed everything in the bottom right corner of my white, embossed panel.


And in true Laurie fashion, I didn't think about the sentiment.  This set has very small sentiment so that worked in my favour.  I die cut a circle that would fit the sentiment, but it just blended into the background.  So I die cut another one out of kraft cardstock and layered them together to make it stand out a bit better.


Here is the final result:


A fairly clean and simple design and I'm happy with the way it turned out.  Hopefully, I can keep this going, hahaha!

Thank you so much for stopping by today, its SO appreciated :)

Hugs,

Laurie


Friday, August 12, 2016

Exciting News!!

Hi everyone!!  I just wanted to quickly pop in to tell you that I've filmed my FIRST YOU TUBE VIDEO!!!  OMG!!!
I have wanted to try this for so long.  I've been super intimidated. Didn't think I had the right equipment or technologically advanced enough :)

Well, on the technical side, there is a lot to learn!! My first video is basically not edited at all. What I filmed is what I published...with the addition of a little music and some titles.  I have no idea how to slice, cut, fast forward etc etc.  But I will learn, hopefully.

I will warn you, there are no techniques here. No stamping, colouring or die cutting. What may you ask will I be doing??? Fussy cutting of course. And babbling...  By the way, I had no idea I sounded like that!!!  So strange to listen to my voice.

Anyway, here's a link if you're so inclined to have a look!!

MY FIRST VIDEO

Thank you in advance for watching!!

Laurie

Monday, August 1, 2016

Wplus9 Lacey Layers Card

Hello everyone!!  I'm here to show you another card I created during the 30 Day Coloring Challenge hosted by Kathy Racoosin from The Daily Marker.  I have to admit I have missed, I think, two days.  Better than the last challenge, though!!

Today's inspiration/idea came from Julia from Just One More Card. I have never tried this technique before and I have decided, I absolutely love it!!  It's colouring on kraft cardstock using alcohol based markers.

I picked up some fairly inexpensive alcohol markers at Michaels.
Pretty Colors
Bullet nib and Extra fine tip


The stamp set I chose was  Lacey Layers from WPlus9.  I love Dawn's products so much!!  Anyway, on to the coloring!  I first found a scrap of kraft cardstock, which happened to be Neenah Desert Storm 80lb.  I stamped a few images and started to experiment with a few colors.
The die cut will come into play in a bit!

I decided on the green and pink and the orange and turquoise.  I then stamped by panel and started colouring.  I alternated the colors on each layer.

After I finished the panel, and of course not planning where the sentiment would be, that's when I die cut the above layer out.  I hadn't done any inlaid die cutting in awhile so I thought this would be a cool way for the sentiment to be noticeable on the card.


I stamped the "perfect" word greeting from the That Is All stamp set and cut it out with the co-ordinating die.  I also positioned the die in the already cut layer and ran that through my Big Shot.


I then, simply flipped the image over and adhered the two pieces together with Scotch Tape.


I foam mounted the sentiment on top of my panel, then stamped the "I think you're" onto a scrap of white cardstock, which I didn't like so ended up using more kraft.  I added some sparkle using my Crafter's Companion Glitter pens to the centres of each lacey layer and to the "perfect".

And here is the finished card!!!


I hope you enjoyed! And I hope whoever is involved in this colouring challenge is loving it like I am!!

Thanks so much for stopping by!!

Laurie


Featured Post

A Simple Thanks Card

Well, well, well. Look who decided to show up...me! It's been an awful long time yet again. I seriously thought I'd be well out of t...