Monday, September 7, 2015

Ellen Hutson Mix It Up & Card Share

Hi all!!  Sorry it's been awhile.  My crafty mojo has been on hiatus, but it may have returned.  I wanted to share my card entry for the current Ellen Hutson Mix it Up Challenge.  This challenge involves using products from Impression Obsession.

I literally have three products from IO..two background stamps and a tiny bow die...this was indeed a challenge!
I actually made three cards using these products.  There is something I love about each one but none of them "blew me away".  But I had to pick one to enter...and this is it!!

I used the Wish Big stamp set from Ellen Hutson and the Zebra background stamp from Impression Obsession.
Here are a couple of my other tries:

I used Mondo Magnolia (Ellen Hutson) stamps/dies and the Beauty Text background stamp (IO) for the top card and Bohemian Garden and again, the Beauty Text background for the bottom card.

Hope you enjoyed!!

Stay Crafty xx

Sunday, August 16, 2015

Pinterest Inspired Card..All About Black, White and Lemons!!

Hi Everyone!!  I was on Pinterest (of course) and one of my favourite things to scope out are patterns and colors.  I got an order from Simon Says Stamp the other day and in it was the stamp set Berry Good from Avery Elle...I was eyeing up this set for awhile and finally caved.  So, I thought what better colors to pair together than black, white and yellow!!!  This is the inspiration I found:
I don't have black and white striped or black and white polka dot paper so I made my own.  I used the  Extra Large Dots Stencil from Simon Says Stamp with VersaMark ink on black cardstock and white embossing powder for the polka dot paper.  I used the Wide Stripes Background stamp (also, Simon Says Stamp) and Versafine Onyx Black ink on white cardstock for the striped paper.

I had to fill in some areas of the black stripes with my Memento marker...
I stamped my Lemon images with VersaMark ink and white embossing powder on white watercolour cardstock.
I chose some yellow and green colors of my Zig Clean Color Real Brush markers to color the lemons.
I used a stitched rectangle die (from MFT Blueprints 15) to cut down the polka dot paper and a stitched circle die (also MFT) to cut out a portion of the striped paper.
I stamped the sentiment "pucker up"...messing up the first time.  I put my card together and thought that the polka dot print was too "in your face" so I muted it with a piece of vellum.  I adhered everything together and added some yellow and clear sequins.
I also added some Crystal Stickles to the tops of the lemons...needed some sparkle!  Here is the finished card!


Thanks so much for stopping by!  Stay crafty, my friends  xxx


Sunday, August 9, 2015

Ellen Hutson Mix it Up with Clearly Besotted

Hi everyone!!  I'm back with a little, bitty card made for the Ellen Hutson Mix it Up Challenge  I'm just gonna say that this is probably my favorite challenge.  I love that you're encouraged to combine different stamp companies products.  Sometimes I feel like its a sin to use these products together in public lol!!  So, when a challenge like this comes along, I get excited!!


I don't have a lot of Clearly Besotted products but out of the few sets I have, I chose the Fancy Feathers set.  As for Essentials by Ellen products, I chose the Wish Big stamp set with co-ordinating dies.

First, I should mention that I decided to make this a blog post AFTER I started the card so the beginning photos are minimal...oops!!
I started with a piece of watercolour cardstock and three Distress Inks:  Broken China, Pumice Stone and Mustard Seed. I stamped one of the feather images on a diagonal.

Next I stamped the little birdie image from Wish Big in Versamark Onyx Black also on the watercolour cardstock.  I tried to color the bird first using the Distress Inks, then my Zig Clean Color Brush pens...without success.
So, paper piecing it was!!  I also, cut the stamped piece with a Stitched Rectangle die from Lawn Fawn.
My card base is grey so I die cut a word bubble out of the same cardstock as well and the watercolour cardstock and stamped the sentiment..Shake Your Tail Feather.
As I did a dry-run putting the card together, it seemed kinda dull so I added a piece of twine around the lower portion, added some white pearls (I'm really diggin' pearls lately) and popped everything up  with foam adhesive.  Here is the final result...


Hope you enjoyed!!  Stay Crafty my Friends...xx


Saturday, August 1, 2015

Your Next Stamp Challenge #19.

Hello everyone!! Just a quick share of the card I'm entering into Your Next Stamp Sketch and Color Challenge #19.
I was feeling really good about this card. I was really excited to get it entered so my patience level dropped while putting the finishing touches on it.  So this happened...

When putting a layer of Glossy Accents to the goggles, the ink ran...I couldn't even wait to let it dry! Or use a heat tool, for that matter!! Oh well, he has nice yellow eyebrows now 😜.

Here is a photo of the sketch challenge:


And here is my take on it:

I used the Snorkel Fishy Fun stamp and co-ordinating die from Your Next Stamp along with a few sea shells from Lawn Fawn!

Hope you enjoyed!
Stay Crafty!

Sunday, July 26, 2015

New card Share

Hi everyone!! Just thought I'd drop in to show a couple of cards I've made.  Received quite a few new stamps and dies over the past little bit...too many really :)
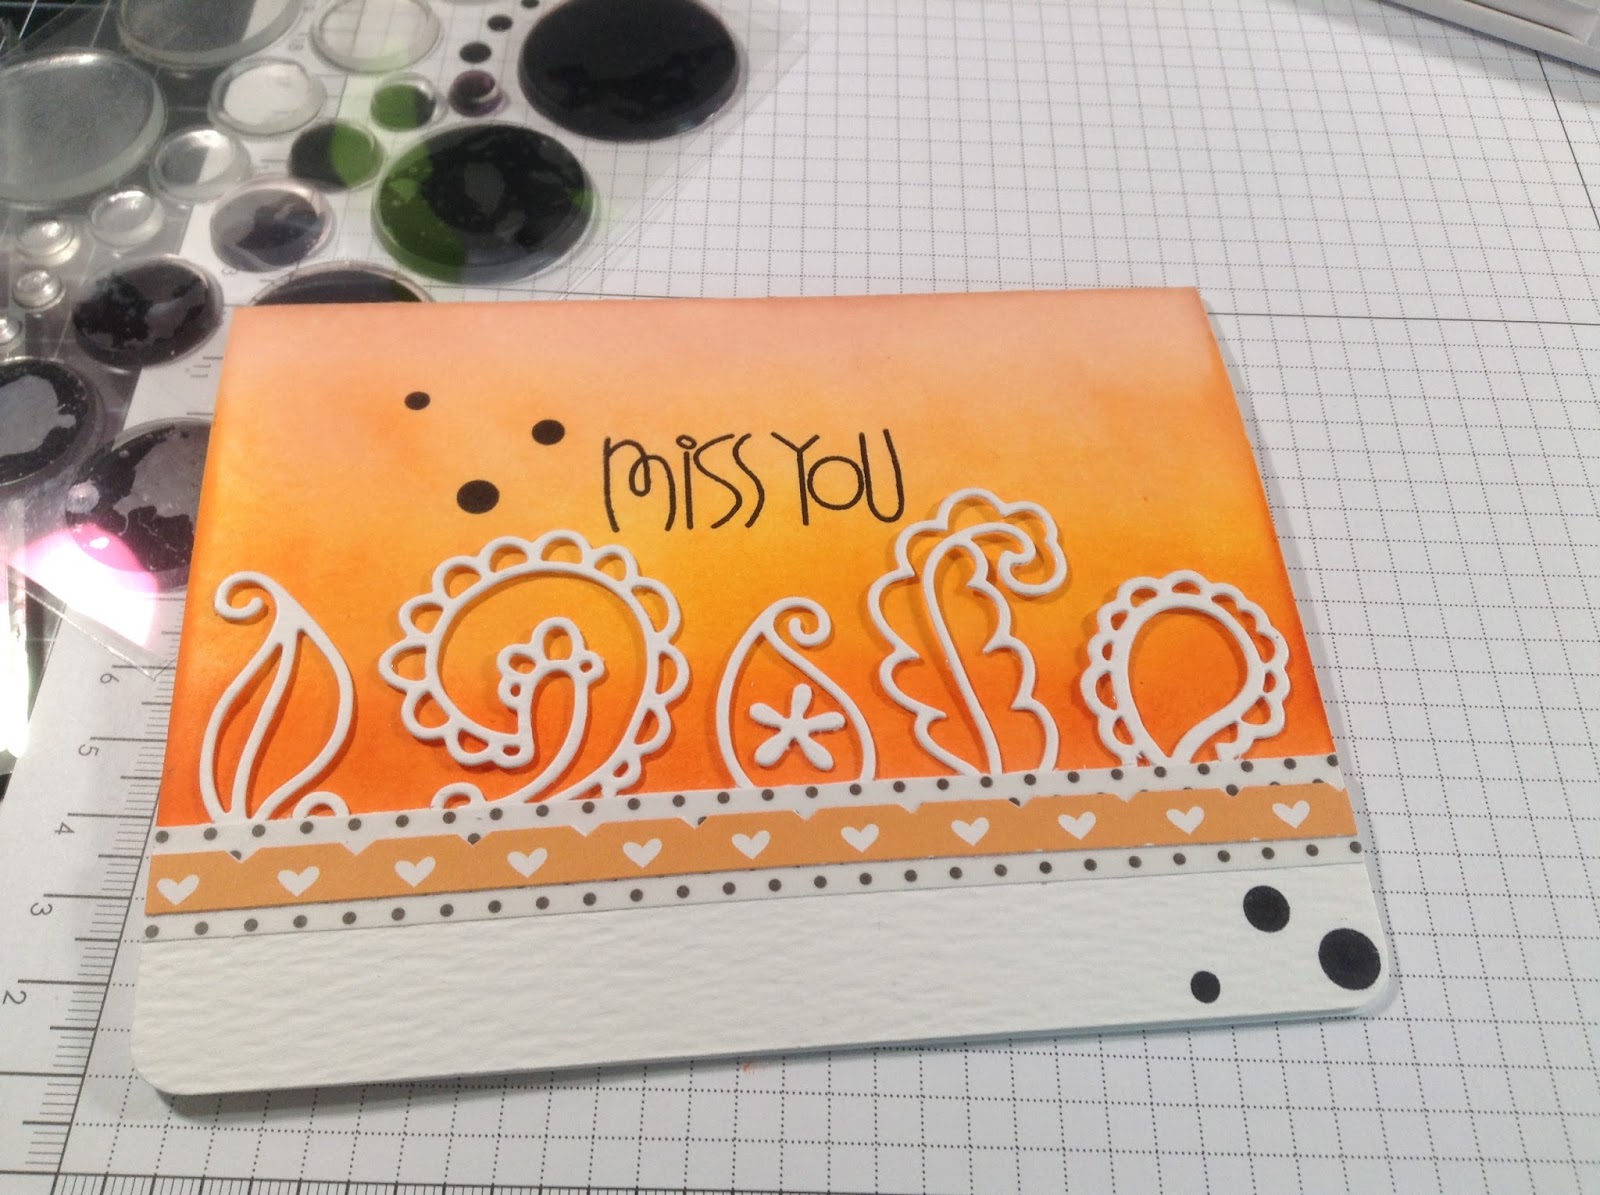
I really wanted to use the new Paper Smooches Paisley dies, they are fab!!  I also need to improve my ink blending skills, love the look and I rarely do it.  I have an incredibly heavy hand and that IS NOT what you want to have while blending!
So I started by partial die cutting the paisley images onto watercolour cardstock (I initially thought I would watercolor this piece).
I changed my mind and decided to ink blend the background instead.  I picked out four shades of Distress Ink:  
Ripe Persimmon, Spiced Marmalade, Dried Marigold and Tattered Rose

I started from the bottom of my card base with the darkest color and worked my way up to the lightest.

 Now this is where things got tedious..applying itty-bitty Glue Dots to these die cuts. I wanted some dimension and I thought this would be easier than cutting foam tape.
Now this is where things started to unravel a bit.  I put a strip of washi on the base of the die cuts (the edge was a bit ragged).  Well, I didn't really like that so I found an orange piece of patterned paper from Avery Elle's Brights collection and cut a thin strip.

Well, I didn't get the hearts entered and I didn't like that either.  So I trimmed that little section away, which created kind of a neat look....don't get too excited.

So this is how it used to look!  I liked it!!  Then I wrecked it.  I chose the "miss you" sentiment from Paper Smooches Sentiment Sampler.

Now I didn't want to use enamel dots or sequins.  I should have because they are removable.  So, instead I chose the Lots of Dots stamp set from Simon Says Stamp (love this set!)  I stamped the top three by the sentiment first...good.  Then thought the bottom right looked too bare.  Stamped three there as well.  Aaaand, not a fan.  Looking it at it now, I really don't mind it but at the time I just didn't like it.  


 So, I ended up adding a strip of black cardstock to the bottom and finishing it off with some stitching lines...which got very crooked!!!  So, thats the finished card.  I like it but I think I should have left well enough alone.  What do you think?

And I thought I would share the card I entered into the Simon Says Stamp current Flickr Challenge (#24)...Favorite Technique.  Did a bit of ink blending (again) and this time some Double partial die cutting.  I used the All Seasons Tree die, Stitched Squares dies and the "be" die with coordination sentiment set.

Hope you enjoyed!!
Stay Crafty!!


Sunday, July 12, 2015

Ellen Hutson Mix-It-Up Challenge with Paper Smooches

Today I'm sharing a card I made for the Ellen Hutson Mix It Up Challenge with Paper Smooches.  I had so much fun with this card!!  I was so very tempted to make a floral card until I went through my Paper Smooches stamps.  I came across "Boob Tubes", which I've had for awhile but haven't used.  I paired it up with the "Wish Big" stamp set from Ellen Hutson. This is what I came up with:


The sentiments, balloon and party hat fit perfectly into those tiny tvs!!  I stamped the "wish big" sentiment is VersaMark ink to create the background, filled in the hearts with a white gel pen and of course, added Glossy Accents to the tv screens!!


Stamps Used:  Wish Big (Essentials by Ellen)
Boob Tubes (Paper Smooches)
Hope you enjoyed!!

Laurie


Monday, July 6, 2015

Lawnscaping Challenge #109

Hello everyone!!  Today I'm participating in the Lawnscaping Challenge #109.  It's all about the Sparkle and the Shine!!


It's also sponsored by Ellen Hutson.  Which if I made add, I've fallen completely head over heels in love with the Essentials by Ellen line of products!!  

Before I get to the card, there is something you must know about me...I am terrible at sequin placement.  I mean terrible.  Whenever I try it ends up looking either silly or way over done. 
( The problem may be that I don't have different sizes of sequins because I'm not bad at adding enamel dots and rhinestones?)  So coming up with a sparkly, shiny card was a challenge for me!

I used Lawn Fawn's Heres the Scoop stamp set with the co-ordinating dies, Cole's ABC's dies and the Stitched Puffy Cloud border dies to create this card.
Now in order to actually have sparkle and shine on this project I used Wink of Stella Clear Glitter Brush on the ice creams as well as a dollop of Glossy Accents on each.  I used Crystal Stickles on the hearts and Sakura Glitter pen and the Clear Glaze pen on the letters...also used some on the dots of the patterned paper!!  Here's a close up:
So, there it is. A sparkly, shiny card with NO sequins and NO rhinestones!!

I had a lot of fun with this!!
Hope you enjoyed!!

Until next time...stay crafty!!

Laurie


Featured Post

A Simple Thanks Card

Well, well, well. Look who decided to show up...me! It's been an awful long time yet again. I seriously thought I'd be well out of t...