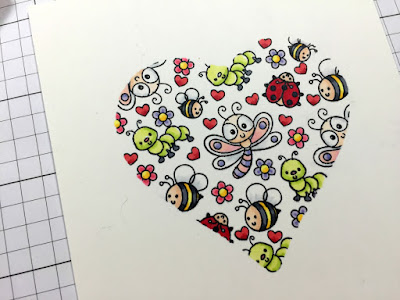
In almost every stamp set, there comes a variety of tiny images that are there to help you create scenes or backgrounds. I call them "filler" images. Just like the way extra sprigs, leaves and baby's breath fill out and complete a bouquet of flowers, these tiny stamps act much the same way.
I started by creating a simple mask using the middle heart from the Nested Hearts Die Set and a piece of 4.25 X 5.5 inch copy paper. I wanted the mask to be the same size as my card front to make lining things up easier!
I adhered the mask to the white panel using a dot adhesive and removing some of the stick with my fingers. I don't have any removable tape so this worked well!
I went through all my CDD stamps and choose some of the small images with the same theme. In this case, bugs!
The Ladybug Garden and Garden Bugs sets were perfect! I started by stamping the largest of the images I had chosen in the centre of the heart. I wanted to make sure I had enough room for this image and also for it to be the focal point.
When stamping inside a mask, you want to be sure that some of the images are stamped "outside". This is maintain the shape you are going for. I ended up needing a couple of more images to fill in more of the heart. I found the cutest flowers in the Twinkle Toes stamp set and a tiny heart in the Magical Unicorn set. These finished the stamping off perfectly!! Next, I removed the mask.
I coloured all these cuties with my alcohol markers.
To emphasize the heart shape a little more, I decided to add colour around and behind the images with a light grey markers.
I trimmed this panel using the medium rectangle die from the Fancy Frames Dies. I actually didn't get it centred so to fix this I added some twine along the right side of the panel.
The sentiment is from the Ladybug Garden set and stamped on a banner from the Flag Banner Die Set. I adhered this panel to a piece of beige/pink cardstock cut from the largest die from Fancy Frames.
To finish off, I added a few Shimmer Sequins, some glitter pen and Glossy Accents!
I hope you enjoyed my project today and maybe found a little inspiration! I encourage you to take a look at your stamp sets and get some use out of these itty bitty images!
Thank you for stopping by!! You'll find a list of all products used below!!


Brilliant lesson learnt thank you. As a newer person to card making I do love to see all the posts and video's from all you brilliant designers but the trouble is finding information on the starter idea's, the easier bits to get started with instead of jumping off at the deep end. This post is just the kind of thing I look for, thank you x
ReplyDeleteThank you so much, Andrea!! I'm glad I was able to help in some way!! Please let me know if there is anything you would like to see!!
DeleteYou are so good using up those little stamps. They are always the ones that get left unused in my stash. It's a good reminder that they can come in very very handy and can make great cards too! xx
ReplyDeleteOh, Ruth. You are so kind. Thank you for visiting and your never ending support! XOXO
Delete