Showing posts with label Craftin Desert Divas. Show all posts

Thursday, June 21, 2018

Oceans of Birthday Wishes with Craftin Desert Divas!

Hello friends and welcome back!! I'm back to share a fun Summer themed card with you!!  The past couple Craftin Desert Divas releases have had some absolutely amazing summer themed stamps and dies, so this card was so fun and quite easy to make!!

I started by picking the umbrella and the cute little mouse on her beach blanket from the Waving Hello stamp set and did a little masking to make them into one image.


I stamped the umbrella first, applied the mask and then stamped the mouse.


Always stamp what you want in the foreground first!!!  I coloured up this cutie with my alcohol markers.


For the background, I used the Bright Horizons Stencil along with Wild Honey, Scattered Straw and Tumbled Glass Distress Inks. 


This stencil is so beautiful and gives such a great result!


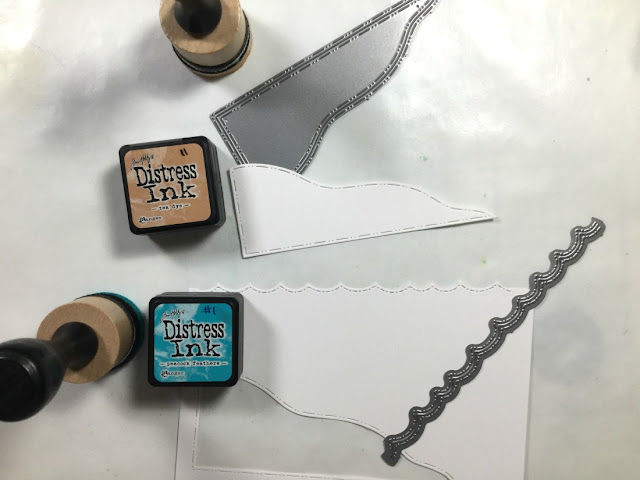
To complete my scene, I of course, used the Beach Scene Dies. This has to be one of my all time favourite and most used die sets!!  I cut the "beach" die out of white cardstock and used Tea Dye Distress Ink for some colour.  I cut the pretty scallop die from the Outdoor Landscapes Two Die set out of white cardstock as well and used Peacock Feathers Distress Ink on it.  I ended up cutting a piece of vellum with this same die.


I fussy cut the sweet little mouse and thought I needed one more element to this card...a bird!  So, I die cut the bird from the Scene Builder Dies and applied a light grey ink.


I decided to cut down my stencilled background as well as all the die cut pieces with the largest of the Fancy Frames Die set.  This gave everything a beautiful scalloped edge.


I simply layered each piece onto the scalloped card panel using tape runner adhesive.  I did use foam tape for the mouse.


The sentiment comes from the Mermaid Lagoon set and was stamped on a thin strip of cardstock which I angled at one end.


Of course, every card of mine has to have some sparkle and shine, so I added some clear sparkle to the pink areas and added Glossy Accents over top!!  And don't forget about the Shimmer Sequins!!


And that's my Summer Themed card for you today!!  I hope you enjoyed!!

Thank you so much for stopping by today!!  Until next time...stay crafty!

Laurie

Here is a full list of CDD Products used:


Saturday, June 2, 2018

Creating a Monochromatic Card with Craftin Desert Divas!

Hello and welcome!! I'm here to share how to create a monochromatic card.  This means using only one colour in different shades or hues to create a beautiful and clean effect.

My colour choice was pink because I knew I was going to use the Hello Beautiful Stamp Set.  I started by picking a light pink shade of cardstock and used the largest die in the Fancy Frames Die Set to cut out a panel.  I will be using the same shade for the card base.


I stamped the large floral image from the set with Versamark Ink onto the die cut panel and heat embossed it with white embossing powder.


I used the Misti to get perfect placement of the stamping. Line the stamp up in one corner, then rotate the paper 180 degrees to get the mirror image in the opposite corner!!

I chose two different pink pencils to do some super simple shading on the images.  This does not have to be perfect. It is simply to add a bit of dimension to a flat image.  I used a very similar shade to the cardstock on the flowers and used a darker pink for the leaves.


I heat embossed the "thank you" sentiment which is also in the Hello Beautiful set in white.


It wasn't quite prominent for me so I did the same thing as with the flowers. I simply coloured around it with one of the pencils!!


This made the sentiment stand out quite a bit more!!  All that was left to do was adhere everything together.  I cut a small white mat for the scalloped panel as I thought it blended a bit too much with the card base.


I foam mounted the focal panel to the card base with a piece of fun foam because every card I make HAS to have something popped up!!


To keep the look "clean", I added some Simply White Nuvo Crystal Drops as embellishments.


And that's my finished Monochromatic card!! I hope you enjoyed this clean, simple yet very pretty one coloured card!!

Thanks for stopping by today, I'll see you soon!!!


Thursday, May 17, 2018

Craftin Desert Divas "Flashback"!

Hello CDD fans and welcome back!! I'm here today to share a card made using "older" stamps and dies from Craftin Desert Divas!  It's always nice to go through your stash and find a set that's a bit older but still totally awesome.  Speaking of "totally", I used the Greeting Word Die Set which happens to have this word in it!!  I have never come across this in any other company. And the font is fabulous!

This set was released a couple of years ago and I love it! I haven't used it in awhile but this was the perfect time.  For the images, I used the Tickled Pink stamp set. Again, this set was released awhile ago but is still fun and trendy. Who doesn't love a beach bound flamingo??


I stamped, coloured and fussy cut my images out, then planned the scene I was going to create.  I die cut a circle from the Stitched in Circles Die Set and did a bit of messy ink blending with Mermaid Lagoon Distress Ink.  I wasn't concerned with getting a smooth blend as the "patchiness" gives the look of clouds.


As you can see, I changed my mind.  I decided to ink blend directly on a panel cut from the Fancy Frames Die Set.  I used the negative space from the circle die cut as a quick and easy mask.

Now, this is where I cheated a bit.  I could not resist using the brand new Beach Scene Dies on this scene!!  I die cut the "sand" and umbrella and used Distress Inks to give them colour.


Before adhering everything to the die cut panel, I did some masking of the sentiment with washi tape to break it up into two separate stamps.


I adhered everything to a kraft card base with a combination of liquid glue and foam adhesive.


Of course I stamped "fabulous" a little crooked but I went with it!  


A little Wink of Stella and Glossy Accents add a bit of sparkle and shine to different areas of the images.


I hope you enjoyed this "look back" at some of the older products that are available in the shop!!

Here's a list of all CDD products used:


Saturday, May 5, 2018

Spotlight Die Cutting/Stamping Technique with Craftin Desert Divas!

Hello friends and welcome back!! I'm here to share a super fun and easy technique that really takes your cards up a notch!  The spotlight technique has been around for a long time, with many variations. Today, we're focusing on the clean, simple and quick variation! Plus, you can get two cards done at once..bonus!!!

I highly recommend using some sort of stamp positioning tool for this. Whether it be the Misti, which is what I used or a Stamp-a-ma-Jig. This requires multiple stamping in the exact place.  However, if you are confident in looking through your clear block and lining things up, go for it!!


I started by die cutting two pieces of white cardstock with the smaller of the scalloped rectangle dies from the Fancy Frames Die Set. One piece was 110lb cardstock (which I use for card bases) and the other was the cardstock I use for Copic colouring.

I placed the heavy weight cardstock into my Misti as well as the beautiful, large sentiment from the new Hello Beautiful stamp set. I stamped this twice with Versafine Onyx Black ink to get a really bold impression. Important, do not remove the stamp! It needs to stay in the exact same place!!


Out of the lighter weight cardstock, I die cut a heart from the Mini Shaker Clips Die set from the middle.


Before stamping I coloured the heart in with a few shades of pink Copic markers.


I apologize as I lost the photo that shows the next step :(.  I simply inked up the stamp again, and because the stamp is in the same place on the Misti door it will be in the EXACT place as the first panel!  


By removing the coloured, and now stamped heart and placing it over top of the first stamped panel, the sentiment on both pieces line up and create a "spotlighted" section!!  I used foam adhesive to adhere the heart to give some dimension and make it pop a little more!


For embellishments, I used those cute little heart dies that are also a part of the Mini Shaker Clips set and coloured them with the same markers as the large heart.


I also hand drew a border around the edge of the cardbase because I have a hard time with "white space", haha!


You can see the wonderful, subtle dimension you get by popping up the centre heart!!

Now let's have a look at the second card!  I still had the panel that the heart was cut from and I still had the stamp in the Misti.


I die cut a piece of pink cardstock with the same die and placed it in the corner of the Misti. I inked and stamped the sentiment.


I wasn't too concerned with getting a crisp image on the outer portions of the stamp as I knew they would be covered.  All that had to be done next, was to adhere the white stamped panel with the heart cut from the centre over top of this pink one! Again, I used foam adhesive for dimension.


The sentiments line up perfectly and give a very different look from the first card!  I didn't do any hand drawn border on this card but used the same tiny heart dies for embellishments.


A bit of Glossy Accents on the hearts complete this card.  So easy and quick!!


Here's a look at both cards together. Which one do you like better??


I hope you get a chance to try this technique, it has always been one of my favourites!!  

Thank you so much for stopping by today!!

Here's a list of all CDD Products used in my projects today:


Featured Post

A Simple Thanks Card

Well, well, well. Look who decided to show up...me! It's been an awful long time yet again. I seriously thought I'd be well out of t...