Showing posts with label Stamping. Show all posts

Thursday, September 17, 2020

Tags for your homemade goodies ft. Create a Smile Stamps!

 Hello!! Today I'm going to share a really cute way to dress up your homemade jams or jellies using a super cute stamp set from Create A Smile Stamps!


I used the Summer in a Jar Stamp Set for these tags. This is a sweet little set that has some really cute and rather large images!

I used the jar image along with a couple different berries. I used Copics to colour then fussy cut everything out.  The tag is a die from my stash which I dressed up a little using the Narrow Stripes Stencil and a light grey ink.


What's great about this set is that it comes with a bunch of sentiments that fit on the jar label!  I arranged the images on the tags with a combination of liquid glue and foam tape. And of course, added some black & white bakers twine!


I think these are so sweet and perfect for gift giving!

I hope you will check out this set and all the other amazing CAS stamps, dies and stencils!

Thanks for popping over today! See you soon!

Laurie


Friday, April 17, 2020

Spread Joy not Germs Blog Hop!!!


Hello and welcome!! I'm so happy to be participating in the #spreadjoynotgerms blog hop which was put together by our friends at Catherine Pooler Designs and Hedgehog Hollow. We're coming together to make some Happy cards which we encourage you to send out during this uncertain time.
We are all experiencing something different and out of the norm. There is no better time to send out some happiness, whether it be across the globe or across the street. Let's create a card and make the world smile!

This is a MASSIVE blog hop with TONS of prizes. There are 31 sponsors who have generously donated more than 50 prizes. Please remember that these small businesses are struggling right now and still donated to this hop. Let's help them out a bit:) More details will be provided at the end of the post!


I'm using products from Pink & Main which is generously offering a $25 gift certificate to the online shop! Let's have a look at what I've created!


I went with a clean and simple design. This card could easily be massed produced. I started by cutting a white panel with the largest of the Stitched Rectangles Set 2 dies. I then placed the Mask It Circle Stencil towards the left centre of the panel. Using the Ergonomic Blending Brush, I blended some All That Jazz ink. I repeated the process by adding 2 more circles on the right side of the panel.


Using the stencil, I cut a mask out of typing paper so I could cover the lower half of the circle before stamping the florals.  These come from a fab set called Gorgeous Vases. I chose 3 different bouquets and using Versafine Black Onyx Ink stamped them inside the circles.

The sentiment comes from the Just Because Stamp Set and was stamped onto a Sentiment Strip Die. I originally had the sentiment on just a white banner but decided to add the same blue ink to make it pop of the white background.


I added a few pencil details to one of the flowers in each bouquet but this step could easily be skipped. After adding the panel to a grey card base (yes, it has white heat embossing on it) that I just happened to have in my stash, I added a few black gems and called the card done!  I think this card could be fun to send to a friend, sibling or even a neighbour. Who would you send this card to?

The next stop on this creative journey is : KAREN B.


To be eligible to win, all you need to do is leave a little love at each stop of the hop. This is a large hop and we appreciate you taking the time to comment! You don't have to comment on each stop, but your chances of winning increase with each comment you leave! I suggest maybe grabbing a coffee/tea/glass of wine to keep you company on this journey :)
Deadline to enter is April 24, 2020!!

Winners will be announced on April 27th, 2020 on both Catherine Pooler's Blog and the Hedgehog Hollow Blog!

For more information on all the prizes being offered or if you'd like to see the full list of hoppers, please visit:

or

Thank you so much for stopping by! Have fun hopping and good luck!!

Be well, my friends!

Laurie


Saturday, April 11, 2020

Spring Fling Challenge with Gina K Designs!

Hello and welcome back! Having a lot more time on my hands means being able to participate in card challenges!  I'm finding that being stuck at home has really hindered my creativity and these challenges are an awesome way to fire that mojo back up!

I'm playing along with the Spring Fling Challenge over on the Gina K Designs blog. You really need to check out the inspiration on that page...incredible!


I used the Bold and Blooming Stamp Set for my card today. This is the very first Gina K stamp set I ever got and was hooked ever since! 


I die cut a circle out of Strathmore Mixed Media Paper and lined one of the images along the edge to get just a partial image. I moved the stamp slightly and stamped once more. I made sure not to get the same part of the stamp! I used Versamark Ink and gold embossing powder.

It's been awhile since I used my Zig Clean Colour Real Brush markers so I whipped those out. This is such an easy way to watercolour. And fast!! Because the image is heat embossed, you don't have to worry about going out of the lines.


Once everything was dry, I gold heat embossed the "hello" which is also from the same set.  I layered the painted circle onto a Scalloped Circle Die from Lawn Fawn cut out of kraft cardstock. I love the way gold and kraft look together!

I popped the circles onto a 4.25 X 4.25 white card base and added a few clear sequins to finish it off!


Thank you so much for dropping by this morning! Be well and be safe!

Happy Easter!

Laurie


Wednesday, October 30, 2019

Sketch Challenge for Create a Smile Stamps!

Hello and welcome back to another challenge for Create a Smile Stamps! This week we're playing with a sketch...


I used the Same Frequency Stamp Set for the super cute robot image! 


I used the Focal Die Set along with the second largest Postage Edge Circle Die as the two circles in the sketch.  I used foam tape to attach the robot to give a bit of a "lift".  Then sentiment was stamped onto a banner die from MFT and layered on top of another cut from the same grey cardstock as the cardbase.


To create some seperation, I cut some white cardstock using the second largest Scalloped Rectangle Die and adhered that directly onto the card base.  For a finishing touch, I stamped and fussy cut a few "nuts" that are in the stamp set. I glued them down and added some sparkle to each one using a glitter pen. 


I foam mounted the sentiment and that was it!!  Hope you enjoyed my take on the sketch!

Please join us! We love seeing what you create!

Also, up for grabs is a €25 gift certificate to the Create A Smile online shop...woohoo!  Please visit the CAS Challenge Blog for all the details!!

I wanted to let you know that Create A Smile Stamps has a DESIGN TEAM CALL for the Challenge Team going on right now!!  You can find all the details HERE!

Thanks for stopping in!  See you soon!

Laurie


Monday, October 14, 2019

My Creative Time 96th Edition Sneak Day One!

It's the greatest time of the month!!! We are close to another fabulous new release from My Creative Time!!  I hope you're ready for a week of amazing product sneak peeks!

Emma has designed some of the most incredible dies to get you through the upcoming holiday season.  But first, we are having a look at a new stamp and die set that will help get others through probably the hardest time of their lives...this set is called Keep Fighting and it is beautiful.

My card today is extremely clean and simple. A lot of white space with one focal point.


I heat embossed the gorgeous ribbon/wings image and used the co-ordinating die to cut it out.  I took the base layer die from a set we're showing you tomorrow (oops!) and cut it from white cardstock. I left the die in place and used a light grey ink to add some colour. By leaving the die in the cardstock, you get a lovely white border.

I modified and stamped one of the sentiments from the set in the same grey ink.  I used the co-ordinating die to cut some fun foam and mounted the embossed image on top then adhered the piece to the inked panel.  I also used foam tape to adhere the panel to the card base.


Clean and simple but really makes a statement.  

Thanks for stopping in!! See you tomorrow for another awesome peek at this months release!!

**Sneak Peek Giveaway**

We will be giving away the sets we are showcasing each day to ONE lucky winner!! For example, the sets we showcase on Wednesday, Emma will announce the winner of that on Thursday and the sets we showcase on Thursday will be announced on Friday on the MCT Blog!  All you have to do is leave some love on each of our blogs.  You are not required to comment on every blog, but the more you do comment on, the more chances you have of winning!!   VERY IMPORTANT: Please leave a way for us to contact you with your comment, just in case you are the lucky winner! For extra entries, you can spread the word about this release on Facebook, Twitter or Instagram using #mycreativetime!  Good luck!!


Laurie


Wednesday, September 18, 2019

Create A Smile Stamps Mood Board!

Welcome to another Create A Smile Stamps challenge!  This time around we have a beautiful mood board for inspiration.  Mood boards can be tricky but just go with the flow and see where it takes you!

My inspiration came from the colours and also the shape of a circle. 


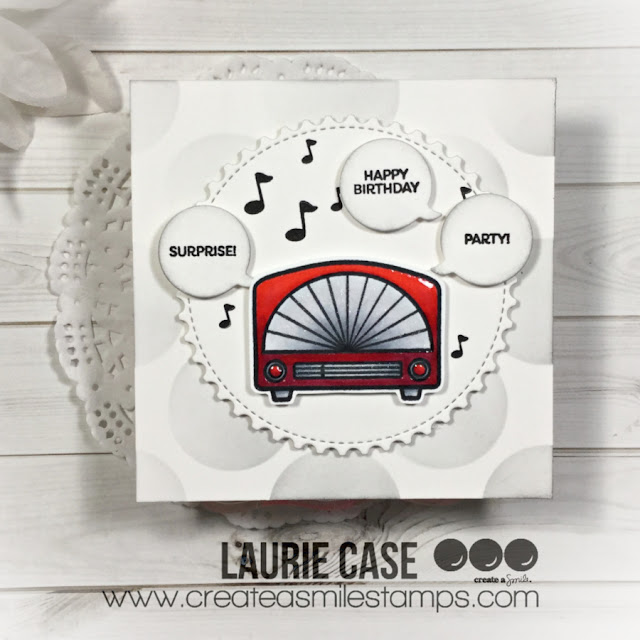
I used the Huge Polka Dot Stencil with some Hickory Smoke Distress Ink for the background.  My focal panel is a circle cut from one of the Postage Edge Circles.  I thought it would be fun to have a bright red radio so I coloured up this vintage looking radio from the Radio Rock Stamp Set. This mini stamp set is so much fun! Before foam mounting the radio onto the circle, I stamped a few of the music notes around it.


The fun sentiments come from the Small Sentiments Stamp Set and were stamped onto small speech bubbles from the Speech Bubbles Cool Cuts Die Set.  These were also foam mounted.  I added the circle panel with foam tape onto the card base, which is 4X4 inches, by the way. I added some sparkle pen and Nuvo Crystal Glaze to the radio to give a shiny, retro look!


And that's my project for you today! I hope you enjoyed and will play along with us!

Remember, you have a chance to win a €25 gift certificate to the CAS shop!  Link up your creations on the CAS Challenge Blog. We LOVE to see what you create!!

Thanks for stopping by! See you soon!

Laurie


Wednesday, May 1, 2019

Create A Smile Stamps Challenge...Favourite Critter!!

Oh, this is a fun one!!  Who doesn't love critter stamps?  Especially, Create A Smile critters!!  There are so many adorable and awesome critter stamps in the CAS shop but the one I gravitated towards today was the Dress Me Up set!  If you loved playing with paper dolls as a child, this set is right up your alley!!


I dressed this adorable bear up in some girly surfing gear!  So, of course I needed to create a summery background.  I used the Focal Point Stencil to create sun rays along with a drift stencil to create some sand and water.  I started blending directly on the card base but decided to cut it down with one of the Scalloped Rectangle Dies because a) who doesn't love a good scallop? and b) I LOVE this die set and just had to use it!


The sentiment comes from the Small Sentiments Stamp Set and was stamped onto one of the Speech Bubbles Dies.  

Before adhering my little scene to a card base, I decided to use the surfboard image to create a subtle background. Frankly, I have a tough time with too much white space :)


Now, it's time for you to dig out your favourite CAS critter stamp and share a project with us!  We love looking at all your fab creations! Plus, you have a chance to win a €25 gift certificate to the Create A Smile Stamp Store, yay!!

Thanks so much for stopping by today!!  See you soon!

Laurie


Monday, April 8, 2019

Manly Monday with My Creative Time!!

Good morning, friends and welcome back!  Today, I'm sharing a masculine card featuring stamps and dies from My Creative Time.

I find the easiest thing to do when creating a masculine card is to start off with a colour palette.  Once I've found a good choice of colours, things usually fall into place. Next, I like to keep the design simple but graphic.

I used the Mad for Plaid Stamp Set to create a background panel for my card. I know I've used this set for other Manly Monday projects but it is SO versatile and works SO well for masculine cards!


I used Catherine Pooler Inks in the colours, Twilight, Lime Rickey, Aquatini and Orange Twist. You can really go all out and create an amazing plaid background with this set, but I kept it simple with diagonal lines.

I used the "you" from the You Dies #2 Set and partially inked up the "you are awesome" stamp from the Amazing Things Stamp and Die Set to create my sentiment.  For the extra pop of colour, I used the Orange Twist and Aquatini inks to blend colour onto the stars, which are from the 3 Star Stitched Dies.


I adhered everything onto a grey circle cut from one of the Bunch of Fun Circles Dies, then foam mounted it all at once onto the striped panel.  A bit of sparkle and Nuvo Crystal Glaze to the "you" and some white gel pen details, finish this card!!

I hope you enjoyed todays project and found a little inspiration!

Thank you so much for visiting today!!

Laurie


Friday, October 19, 2018

Pink & Main and WOW Embossing Powders Blog Hop!!!

Hello crafty friends and welcome back!! Today is an exciting day as Pink & Main has teamed up with Wow Embossing Powders for a fabulous blog hop!!  This hop is jam packed with amazing inspiration from a ton of incredible designers so sit back, relax and enjoy the hop!!  If you arrived from the wonderful Kimberly's Blog, you are on the right track! If not, you can click here for the beginning of the hop!! Stay tuned until the end of this post for all the sweet details on how to win some awesome prizes!!


I was so excited to play with the Turkish Nights Embossing Glitter!! And let me tell you, it didn't disappoint!  It is so sparkly and gorgeous and worked perfectly for snowflakes. Non-traditional snowflakes, that is!


I stamped a bunch of snowflakes that are from the previously released P&M stamp set, Flurries. This is a chunky glitter so some details were lost but that didn't bother me at all!  I used the co-ordinating Flurries Dies to cut out each snowflake.  To continue on with this glittery theme, I die cut a "snowbank" using the Scallop Waves Dies and swiped the WOW Embossing Pad along the top to add  some shimmery snow.


To create a wintery background, I blended Shaded Lilac and Victorian Velvet Distress Inks onto my panel. I should mention that the panel was cut using the Cloudy Frame Dies but I only used the inner portion.


Not a super great blend (or photo, I apologize) but our beautiful snowflakes will cover most of that background!  I used the Snow Sweet Stamp set and co-ordinating dies for my focal image.  This set is filled with the cutest snow people, ever!!


I coloured these sweeties with my alcohol markers and popped them up on the blended panel.  All the snowflakes were adhered using liquid glue.


This stamp set lets you "build" your own sentiment so I chose "You're Snow Wonderful".  Because the snow is a bolder font, I was able to use the Turkish Nights embossing glitter on it as well!


I had "Snow Much Fun" (hahaha) making this card. Glittery snowflakes and cute snow people-can't go wrong with that!!

Up next on the hop is my super talented friend, Lynnea, who will knock your socks off!!

But before you go, check out how you can win some fabulous prizes!!


All you have to do is leave some love on each stop of the hop, easy right??! Pink & Main is giving away a $25.00 gift certificate to one lucky commenter and WOW Embossing Powders is giving away a set of 6 embossing powders with carry case!!! 

Winners will be announced on the Pink&Main and Wow Embossing Powders Blogs on Wednesday, October 22nd at 9:00 am EST.  Good Luck, my friends!!

Thank you for stopping in today...enjoy the hop!!!!

Laurie


Saturday, July 21, 2018

Your Next Stamp Feature Day!!

Welcome to the Your Next Stamp Feature Day where the theme in "Christmas in July"!!  I am not even close to thinking about winter or Christmas but I must admit, it is nice to mix things up through out the year!  It was actually fun to dig through my seasonal stamps and have a play!

I own a few Christmas themed sets from YNS and did use one. But the main focal point comes from a non-Christmas stamp set. Did you know you could make a Christmas card out of ANY set you own? Just use traditional Christmas colours and sentiment and any image you use becomes festive!! Or, you can use a Christmas set in non-traditional colours...I love doing that!

Anyway, enough chatter. Let's take a look at what I made.


I stamped two To-Go Cups from the Thanks A Latte Stamp Set and coloured them in warm greys, green and red. This is the VERY FIRST stamp and die set I purchased from YNS...it's a classic!!  I used the co-ordinating dies to cut them out. The die set has super cute "sleeves" and other shapes to decorate your cups. I chose green and red papers to match the lids.


I stamped, coloured and die cut a few images from the Deck the Halls Stamp Set and foam mounted them to the cups. The greeting also comes from this set.  I foam mounted almost everything to an embossed, white card panel and added plenty of shimmer and shine with Glossy Accents and a sparkle pen.


I added a strip of red cardstock and silver glitter paper to the right side of the cardbase before adding the panel. The heart steam was an afterthought as I felt the top part of the card was a little too bare.

And that, my friends, is my first Christmas card of 2018!!!  I hope you enjoyed!  Now for the fun stuff...

Please go to the Your Next Stamp Blog and comment for a chance to win a stamp set of your choice!! One comment left on the blog will win.  You have until July 24th at 12:00 EST to leave a comment and the winner will be announced on the YNS blog on Jul 26th!!  Good luck!

Have a fabulous day!!

Laurie


Thursday, July 19, 2018

Challenge #204..Rainbows and Butterflies with CAS-ual Fridays!

Hi everyone and welcome back to our next Friday Challenge for CAS-ual Fridays Stamps!! This is another fun one..


Rainbows and Butterflies!!! Yay!!  This just screams pretty, bright and cheerful projects!! First off, let me tell you that I do not own a CAS-ual Fridays stamp or die set that has a butterfly in it. But no worries! I'll show you how I overcame that little obstacle.


I created a panel using the second largest Bubble Box Fri-Die. I created a mask by running that same die as well as one size smaller together through my die cutting machine. This created a frame mask.  I used Tattered Rose Distress Ink to add some colour to the background.  I stamped that gorgeous floral image from the Truth Is Stamp set. Once directly onto the panel and once onto some white cardstock where I could colour and use the co-ordinating Fri-Dies to cut the flowers out. That's where I incorporated the "rainbow".

I adhered the flowers by using the dies and fun foam. I didn't want any of the stamped image underneath showing which is why I didn't use foam tape.


To create the butterflies, I used the hearts from the Fun-Fetti Fri-Dies set. I coloured each heart and adhered them together to form the shape of a butterfly. I drew on the bodies and the antennae as well as a few dots and dashes.  


I glued the Bubble Box panel directly onto a light pink cardbase, added a bit of sparkle and called this one done!!  I hope you found a little inspiration :)

To play along, simply upload your creations over at the Fridays Challenge Blog. You could win a $25 gift certificate to CAS-Fridays Stamps! But if you use CAS-Fridays products on your creation, that amount doubles..wow, $50!!!


Have fun with this challenge! I can't wait to see all your amazing creations!

Until next time...stay crafty!!

Laurie


Saturday, June 2, 2018

Creating a Monochromatic Card with Craftin Desert Divas!

Hello and welcome!! I'm here to share how to create a monochromatic card.  This means using only one colour in different shades or hues to create a beautiful and clean effect.

My colour choice was pink because I knew I was going to use the Hello Beautiful Stamp Set.  I started by picking a light pink shade of cardstock and used the largest die in the Fancy Frames Die Set to cut out a panel.  I will be using the same shade for the card base.


I stamped the large floral image from the set with Versamark Ink onto the die cut panel and heat embossed it with white embossing powder.


I used the Misti to get perfect placement of the stamping. Line the stamp up in one corner, then rotate the paper 180 degrees to get the mirror image in the opposite corner!!

I chose two different pink pencils to do some super simple shading on the images.  This does not have to be perfect. It is simply to add a bit of dimension to a flat image.  I used a very similar shade to the cardstock on the flowers and used a darker pink for the leaves.


I heat embossed the "thank you" sentiment which is also in the Hello Beautiful set in white.


It wasn't quite prominent for me so I did the same thing as with the flowers. I simply coloured around it with one of the pencils!!


This made the sentiment stand out quite a bit more!!  All that was left to do was adhere everything together.  I cut a small white mat for the scalloped panel as I thought it blended a bit too much with the card base.


I foam mounted the focal panel to the card base with a piece of fun foam because every card I make HAS to have something popped up!!


To keep the look "clean", I added some Simply White Nuvo Crystal Drops as embellishments.


And that's my finished Monochromatic card!! I hope you enjoyed this clean, simple yet very pretty one coloured card!!

Thanks for stopping by today, I'll see you soon!!!


Featured Post

A Simple Thanks Card

Well, well, well. Look who decided to show up...me! It's been an awful long time yet again. I seriously thought I'd be well out of t...