Showing posts with label cardmaking. Show all posts

Friday, May 26, 2023

Let's Celebrate with Jane's Doodles

 Hello and welcome!  Today, I'll share a fun card with you featuring a new digital stamp set from Jane's Doodles!  This one is called Surf's Up. This is another fun, must have set.


I have an inexpensive laser printer. I wish it could handle heavier watercolour paper but sadly, it does not. It does, however, handle a 90lb weight mixed media paper. I used an old Canson spiral bound paper book. 
I'm not sure if it's my printer or the paper, but I find that some of the line work will fade or rub off. Easy fix with a fine liner pen though!


I used watercolour pencils to colour the images, then outlined them the best I could. I just had to add some sparkle and shine with a glitter pen and Nuvo Crystal Glaze.


I hope you enjoyed my card featuring this super cute set!

See you soon!

Laurie

Tuesday, June 16, 2020

Big Hugs with Create A Smile Stamps!

Hello, my friends! Today I'm sharing a card made with one of the newest stamps from Create A Smile Stamps! This mini set is called Big Surprise and it is absolutely adorable!! This latest release was full of these mini stamp sets but don't be fooled, they are all so versatile!!


This little cutie was so much fun to colour! I made a simple scene card by die cutting a circle into a 3.5X5 inch white piece of cardstock. I used one of the Stitched Circle Frames to do this. On the card base, I used a light brown ink for sand and a blue ink for the sky. Over top, I added some clouds using the Cloud Pattern Stencil.

Before adhering the aperture panel, I ran it through my die cut machine using a striped embossing folder. I foam mounted the panel then added all the elements.

The sentiment is also part of this set. I fussy cut around the "big" and foam mounted it to the card.


I added a few details with a white gel pen, a sparkle pen and a few sequins! 

I hope you enjoyed today's project!  And just a hint...the June release is almost here!!!! :)

See you soon!

Laurie


Tuesday, May 19, 2020

Create A Smile Stamps Card Share!

Welcome!! I'm dropping in to share a card I made using products from Create A Smile Stamps! I've just recently joined the design team and am over the moon to be a part of this amazing group!

For this card, I've mixed a few stamp sets, old and new!


CAS Products used on this card:

Uplifting Stamp Set: helicopter, clouds
Best Bugs Stamp Set: tiny flower
Ting-a-Ling Stamp Set:  kitty cat

I'll be sharing Create A Smile Stamps cards here once a week so stay tuned!

Thanks for stopping by! See you soon!

Laurie

Thursday, March 12, 2020

Woodland Whimsy with Gina K Designs!

Welcome back to another look at the Woodland Whimsy Stamp Set! This set is part of the newest release from Gina K Designs and was illustrated by the talented Lisa Hetrick!

Today's card features some Copic colouring and fussy cutting!  I wanted the card to be bright and cheerful and to put a smile on someone's face!


I started by stamping and colouring a couple of the flowers, leaves and that awesome hanging branch!   I kept the colours light! I fussy cut each image out. I was a little worried about the branch but it was actually very easy to cut out!. I simply used a craft knife to make an "x" in the centre of the ropes, took my scissors and removed enough of the card stock to maneuver my scissors inside!

I used Wild Dandelion ink to blend a small area on a white panel. To add a bit of interest, I used a polka dot embossing folder. I used foam adhesive to adhere all the elements to the embossed panel.


I added some sparkle pen to the flowers and a few iridescent pearls, then foam mounted the sentiment underneath.


I foam mounted the panel onto an ivory card base and called it done!!

Thank you so much for stopping by and thank you to Gina K for letting me be a part of this fab release!

Laurie


Thursday, February 27, 2020

Gina K Designs February 2020 Release...Guest!

Hello, my friends and welcome back! I'm super excited (and honoured) to be a part of the Gina K Designs February release!  All the amazing new products are available now and you can find them here!!

I've used the new Woodland Whimsy Stamp Set which was illustrated by the oh-so-talented Lisa Hetrick. If you're not familiar with her stamp sets, you can find them all right here!  Her style is so unique and so beautiful!

I've created three different cards using the set and will share them over the next few weeks! Today, we'll start with this one:


 I chose one of the flower stamps as well as one solid leaf and one open leaf leaves images. Using Fog Ink from Simon Says Stamp, I stamped a random pattern onto a white panel. I decided to add some dots to fill in the pattern even more so I used the Lots of Dots Stamp Set from Simon. Once the stamping was done, I used a rectangle die to cut out the middle portion.

I have to admit, I didn't really think this plan through too well. My intention was NOT to do no-line colouring. I should have used a darker ink. But, at this point, I thought I'd see where this ended up! On the centre portion, I coloured up all the open images with alcohol markers. I did not take my time with this. As I laid the colours down, the basic shape of the flower appeared. No two are coloured the same. I actually love the way it turned!


I stamped the large sentiment right over top of the colouring using a darker shade of grey ink. I adhered the uncoloured, frame portion to a white, A2 cardbase and popped up the inner portion with some craft foam.


I added a few clear gems and called this card done!  I really hope you like it!

Thank you so much for stopping by! Be sure to visit again, as I'll have more to show you using the stamp set!

Please visit the Gina K Designs shop to check out all the fab, new products!

See you soon!

Laurie


Monday, February 17, 2020

February Pinkfresh Studio Challenge!

Hey, hi, hello there and welcome back! Today, I'm sharing a card I made for the current challenge over on the Pinkfresh Studio Challenge Blog.


I received some brand new items from their January release and was dying to have a play with them! Speaking of a new release, they are releasing a bunch of gorgeous background stamps today! They have some very unique designs and I may just have to "take a look" aka "add to cart".

Okay, let's have a look at the card I made! It's very clean and simple but I've added a few, subtle details to step it up a notch.


I just had to use the new Curvy Floral Vine Stamp Set. This is a simple layering set that is just beautiful. TIP: I die cut first, then stamped. I don't usually do it this way but I was having some issues having the die fit properly after I stamped the image. **This is NOT a flaw with the products! Photopolymer stamps are flexible so sometimes while placing it on your block or in your MISTI, it can shift slightly. And while it's easy to manipulate the stamps to line up, if you're off just by a little, the die will not line up.**

I used the smaller banner shape from the Essentials: Ornate Banner Die Set on a piece of white cardstock. I have a homemade stencil that easily lets me ink blend a heart shape. I used a light yellow ink.  To add a bit more detail to the banner, I flipped it over and using my scoring board, added score lines every 1/4 inch.


To add a bit more detail to flowers and leaves, I took a slightly darker shade of pencil crayon and added some simple flicks. This made quite a difference!  I used the Curvy Floral Vine die and cut it from white cardstock 3 more times. I adhered all those layers together including the stamped image. This created some nice dimension. For putting everything together, I stamped the sentiment in the middle of the heart using a dark, grey ink.  This sentiment comes from the new Leafy Decor Set. This stamp set is packed with awesome sentiments!!


I adhered the florals to encircle the heart. I foam mounted the focal banner onto an ivory card base that measures 3.75 X 5.25 inches.  I added a few pink jewels from my stash to add a bit of sparkle.

And that's it!  I hope you enjoyed my little process today!

Thanks so much for stopping by!

Laurie


Friday, December 13, 2019

My Creative Time 98th Edition Release Blog Hop and Sale!!


Welcome this month's blog hop for the 98th Edition Release from My Creative Time!!  Even though this is a smaller release, it will have you covered for Valentines Day and beyond! Stay tuned to the end of this post for details on the Freebie and Sale as well as the full hop lineup!!

For my project today, I've used the Freebie Die for this month! It's the Fun Sized Heart Bow Die and it is adorable!! I've also made a shaker card, which I rarely do!!

I used and modified one die cut from the recently released Jar Treat Die to create a shaker.


This was very easy and I'll show you how!  Die cut the stitched layer of the jar, twice. Simply cut around the inside of one of the die cuts to create a frame. It doesn't matter that the top is open as this will have foam tape to seal it off. 


It can also be ugly under there as the "fabric" topper of the jar will cover it :)! On the second die cut (the one not cut up), I inked some light blue ink around the edges as well as adhered some die cut hearts directly on it. The sequins will shake around but the hearts will remain in place. I like this because there will always be something floating in the jar.


After the sequins were in place, I added the frame portion, with the acetate attached, one top. I pressed everything together to make sure it was sealed well.

The Fun Sized Heart Bow Die is actually a great size to decorate the jar!  I just went with a simple white bow to really contract against the pink jar topper.  I stamped a sentiment from the Jar Treat Sentiments onto a white circle cut using one of the smaller dies from the Bunch of Fun Circles Die Set.


I made a 4X4 inch card and embossed the front of it using a polka dot embossing folder. I adhered the jar and sentiment to the card base with a combination of liquid glue and foam tape. And that's the finished card!!


There are two other sizes of Heart Bow Dies in this release and they are all just as sweet!! 

BLOG HOP LINEUP:

Laurie (ME)

BLOG HOP GIVEAWAY!!

For our blog hop giveaway, Emma is giving a $25 gift card to the My Creative Time Store to ONE lucky winner!  All you have to do is leave a comment on each of our blogs. You are not required to comment on every blog but the more you comment, the more chances you have of winning!! Very important:  Please leave a way for us to contact you (with your comment) just in case you are the winner!!

FREEBIE!!

Starting today, Friday, December 13th, 2019 at 8am PST, we will be giving away these adorable new "Fun Sized Heart Bow Die".  This new set will be given to the first 25 shoppers!  It will be automatically added to your package during packing/shipping. Once the 25 shoppers have gone through, this die set will be available for purchase!  So, if it's available in the store, you are not one of the first 25 shoppers.  No exceptions will be made.  The "freebie" is NOT part of the bundle and will be sold separately.

SALE ALERT!!

Don't forget!! Our sale starts right now at the My Creative Time Store!!  Use the code DEC2019 at checkout to receive 15% off your entire in-stock purchase!! The sale ends on Friday, December 20th 2019 at midnight PST!!

On a sad note, this will be my last post for My Creative Time as I've decided to step down from the Design Team.  This wasn't an easy decision as I love Emma, her products and the fabulous group of ladies on this team. I want to thank you all who have left the most amazing comments on my posts, I appreciate you more than you know!! Take care, my friends!!

Laurie

Here's a look at this months release:


Thank you so much for hopping along with us!! Happy Shopping!


Thursday, December 12, 2019

My Creative Time 98th Edition Release Sneak #2!

It's Day Two of sneaks for the upcoming release from My Creative Time!  You are going to love this one!!


We are taking a look at the new Be Mine Stamp Set and Love Letter Die Set. You're Valentines Day cards will be a breeze with these two products!

First of all, I LOVE the font of this stamp set and hope to see more in this style!


I actually created this card for my husband for Valentines. Even thought it has hearts and scallops, the grey and white palette tone down the girly-ness!  I cannot wait until you see the Love Letter Die in person, it is FABULOUS!!  And it comes with that super cute note card that tucks in perfectly (will also hold a gift card).


I stamped the front of the card base using one of the sentiments from Be Mine in a slightly darker grey ink than the cardstock. I used one of the XOXO Border Dies for some added interest and foam mounted the envelope to it.  For a bit of contrast, I matted the die cut panel onto some white cardstock.


These little envelopes are a breeze to put together so mass production would be really easy! 


I hope you enjoyed todays sneak peek and will come back tomorrow for our Blog Hop!!

**Sneak Peek Giveaway**

We will be giving away the sets we are showcasing each day to ONE lucky winner!! For example, the sets we showcase on Wednesday, Emma will announce the winner of that on Thursday and the sets we showcase on Thursday will be announced on Friday on the MCT Blog!  All you have to do is leave some love on each of our blogs.  You are not required to comment on every blog, but the more you do comment on, the more chances you have of winning!!   VERY IMPORTANT: Please leave a way for us to contact you with your comment, just in case you are the lucky winner! For extra entries, you can spread the word about this release on Facebook, Twitter or Instagram using #mycreativetime!  Good luck!!

Laurie


Wednesday, December 11, 2019

My Creative Time 98th Edition Sneak Peek #1!

Welcome back!!  It's that time where we show you some sneak peeks of the upcoming 98th Edition Release from My Creative Time!


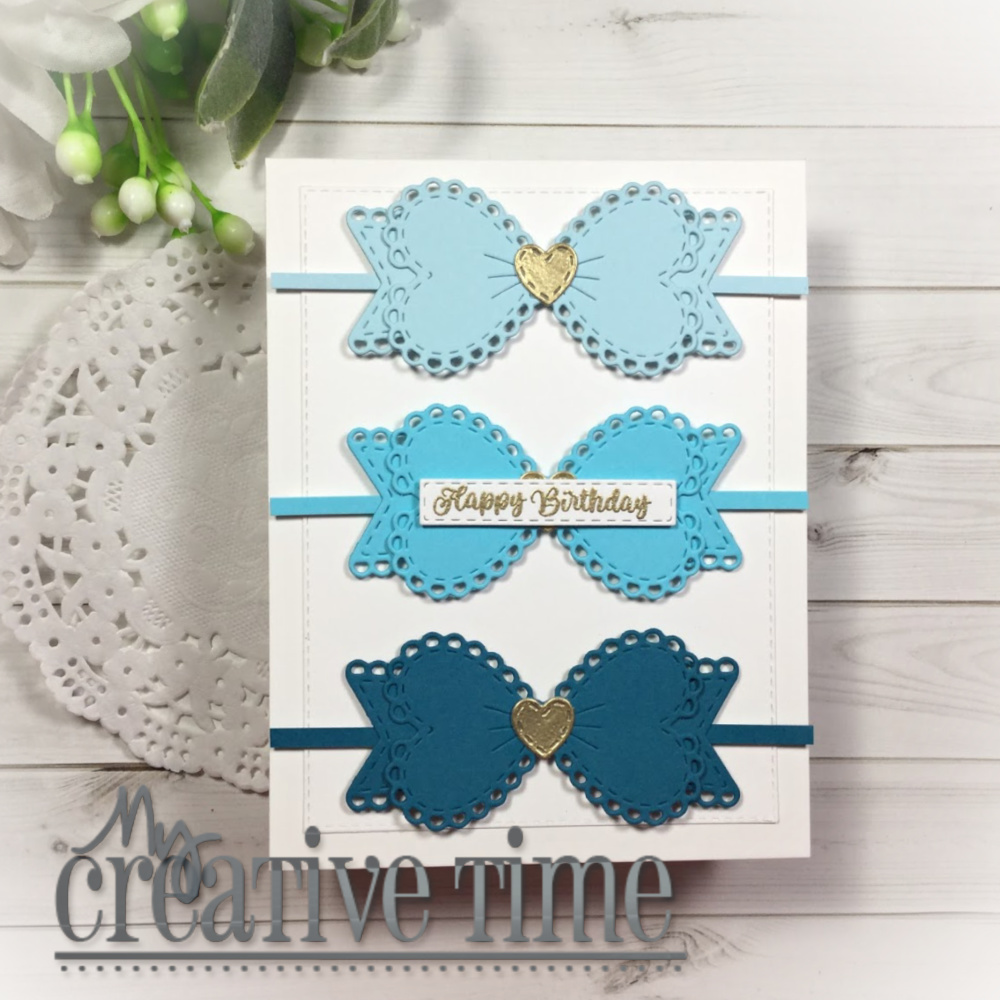
Emma is releasing 3 new Heart Bow dies!  I am a big fan of all the different bows in her line of dies but these may just be my favourite! For my project today, I'm using the Small Heart Bow.  


This is a standard A2 sized card so you can really see the size of this bow.  I went for a gradient look by cutting from three shades of blue cardstock.  The tiny little heart in the centre is part of the die set and looks super cute in gold.  NOTE: I cut tiny strips of cardstock to act as ribbon...this is not included in the die set.

All three bows were foam mounted onto a white panel cut with one of the More Stitched Rectangular Dies. I adhered the panel with liquid glue onto a white card base.


The sentiment comes from the Especially For You Stamp and Die Set and was gold heat embossed onto one the Sentiment Strip Dies.  I foam mounted this, as well. I wasn't going to use the little heart on the centre bow as it was behind the sentiment, but I'm glad I did!


I adore these bow, especially this size. But wait until you see the others!!

Thank you for stopping by! See you tomorrow for another peek!

**Sneak Peek Giveaway**

We will be giving away the sets we are showcasing each day to ONE lucky winner!! For example, the sets we showcase on Wednesday, Emma will announce the winner of that on Thursday and the sets we showcase on Thursday will be announced on Friday on the MCT Blog!  All you have to do is leave some love on each of our blogs.  You are not required to comment on every blog, but the more you do comment on, the more chances you have of winning!!   VERY IMPORTANT: Please leave a way for us to contact you with your comment, just in case you are the lucky winner! For extra entries, you can spread the word about this release on Facebook, Twitter or Instagram using #mycreativetime!  Good luck!!


Laurie


Friday, December 6, 2019

SNS White Christmas Blog Hop ft. Lawn Fawn!

It's time for our last Scrap N Stamp Blog Hop for 2019!! Wasn't it just July a couple of weeks ago?!


We have a fun and easy theme for you this time around...White Christmas!  The focus is to create a mostly white project. I love the white on white look with a little pop of colour. This can give a fun or elegant look. I went with a cute and fun card!


The star of the card is that adorable narwhal!  He's from the mini set, Winter Narwhal, from Lawn Fawn. I coloured him up with a combination of Copic markers: C3, C2, C1 and the colourless blender. This gave just a hint of grey. For my pop of colour, I coloured up his scarf in green. My favourite combination is: G07, YG25 and YG03.

The background was created by cutting one circle out of white cardstock, then running it through with the Polka Heart Background. I then cut a white piece of cardstock using the second largest Fancy Scalloped Circle Dies (Lawn Fawn).  Before adhering the two circle together, I used a light blue ink on the scalloped circle. This is faint, but shows through in a few areas.


I fussy cut the narwhal and foam mounted him onto the heart panel.  Then sentiment comes from the Winter Wavy Sayings Stamp set and was stamped onto one of the Simple Wavy Banners dies, which I also popped up.

I decided to use a few of the die cut hearts, colour them in the same shades of green and inlay them back into the heart background. This added a bit more colour and acted as embellishments!  I added some Nuvo Shimmer Pen to the scarf, the hearts and his horn then a layer of Nuvo Crystal Glaze to give a lot of shine!


We can't wait to see what you create so make sure to upload your creations to the Scrap N Stamp Challenge FB Page!!

PRIZES!
By leaving a comment on each stop of the hop, you have a chance at winning a $50 gift certificate to the SNS Online Store!

GIVEAWAY!
Scrap N Stamp is giving away a $50 gift certificate to one lucky commenter! Just leave a little love on each stop of the hop and you'll be entered to win!! Winner will be announced on the SNS Blog on December 18th! Not only that, but SNS is also giving away a free gift through the online store!

There is no minimum purchase to get this snowflake die but shipping will be added. Just "add to cart" and checkout!! While supplies last! Not valid with any other coupon, sale or promotion. You can find this die HERE!


Here's the complete blog hop lineup:

Laurie (that's me!)
Susan

Thanks for stopping in! Enjoy the rest of the hop!!

Laurie

Wednesday, December 4, 2019

My Creative Time 5 Days of Christmas...Cards

Hello and welcome to our "5 Days of Christmas"! This week we'll be sharing lots of last minute Christmas ideas such as cards, tags, treat holders, gift card holders and whatever else that will help you get your creative juices flowing!


Today is Day 3 and we're featuring cards!  This card is quick and easy to make. A little stamping and die cutting.


A simple background stamped with black ink along with a die cut santa hat in a pop of colour!  This card took no time at all to create!!


**GIVEAWAY**

There will be five (5) winners throughout the 5 Days of Christmas. Up for grabs are 5 of Emmas favourite things shown below.  All you have to do is leave a comment on each of our blogs during the five days to win one of the prizes.  You must comment on each of our blogs each of the 5 days to be considered for a prize.  Please remember to leave your email with your comment so that Emma can contact you if you win.


Please visit Emma's Blog for more inspiration and links to all the blog links to the 5 Days of Christmas!!


Friday, November 15, 2019

My Creative Time 97th Edition Release Blog Hop and Sale!

Welcome to the 97th Edition Release Blog hop for My Creative Time!  All the new products we've been sneaking over the past few days are now available for purchase!


Today I have the pleasure of working with the new Coffee Gift Card Holder Die Set. And as I hinted in my previous post, these sets are very easy to make shaped cards with. Which is what I made for you today!


This set come with a large base layer. So, simply die cut two, score one of them at the top, adhere together and voila! shaped card :)  I went through my stash of patterned paper and found this cute polka dot print that I think went really well with kraft.


You can insert your gift card on the front, open the card and write a message inside! How fun!


The sentiment comes from the Just Brew It Stamp and Die Set and fits perfectly in the circle die from the Bunch of Fun Circles Die Set. You can pair this die set with so much in your stash!!


I hope you're able to pick up a couple of items today and were inspired by the hop!


BLOG HOP GIVEAWAY!!

For our blog hop giveaway, Emma is giving a $25 gift card to the My Creative Time Store to ONE lucky winner!  All you have to do is leave a comment on each of our blogs. You are not required to comment on every blog but the more you comment, the more chances you have of winning!! Very important:  Please leave a way for us to contact you (with your comment) just in case you are the winner!!

SALE ALERT!!

Don't forget!! Our sale starts right now at the My Creative Time Store!!  Use the code NOV2019 at checkout to receive 15% off your entire in-stock purchase!! The sale ends on Friday, November 22nd, 2019 at midnight PST!!

BLOG HOP LINEUP:

ME:)

EXCITING NEWS!!


If you haven't yet heard the news, Emma is having a Design Team Call!! This is one of the most wonderful teams I have ever been a part of and I hope you'll apply!  You can find all the details HERE!!


Featured Post

A Simple Thanks Card

Well, well, well. Look who decided to show up...me! It's been an awful long time yet again. I seriously thought I'd be well out of t...