Monday, October 8, 2018

Made in Minutes with My Creative Time!

Hello crafty friends and welcome back!!  Happy Thanksgiving to all my Canadian friends!!  Today it's all about whipping up a card in minutes using products from My Creative Time!  I mixed a bit of old and new stuff for my project today and since fall is upon us, I used a bunch of gorgeous colours of Distress Inks for my colouring.

I was recently told that I should start making more sympathy/thinking of you cards so that it what I did today.

My favourite way to add colour quickly is to ink blend onto die cut images. This takes no time at all and the results are beautiful!

I started by clear heat embossing the large image from the Carved Heart Stamp and Die Set onto a piece of white cardstock and used Vintage Photo and Brushed Corduroy Distress Inks to add the colour. The embossing resists the ink resulting in a bright, crisp image!


I used the co-ordinating die to cut it out. This set also comes with a bunch of heart dies so I cut a medium sized one of those and added Fired Brick Distress Ink.

The leaves come from the new die set, Little Stitched Leaves which is a must have!! I used Mowed Lawn, Crushed Olive, Spiced Marmalade, Fired Brick and Fossilized Amber to add some shades of Fall.


The sentiment comes from the Vintage Sentiment Stamp Set and was stamped onto the banner die from the Vintage Stitched Label Dies Set.  I used ivory cardstock for a more muted look against the kraft card base.

For a bit of added detail, I added some sparkle pen and Nuvo Crystal Glaze to the heart (which changed the colour slightly) and a few gold gems.


This card took my about 20 minutes to make. The longest of those minutes were trying to decide on where to place the gems and getting my glue to come out of the bottle!

Thank you so much for stopping in today. Much appreciated!

See you soon!

Laurie


Friday, October 5, 2018

My Creative Time 48 Hour Flash Sale!!

Hey guys!! Check it out!!

Good morning & welcome to another "48 Hour Flash Sale!" This sale is for 48 hours ONLY that is going on right NOW & will end on Sunday, October 7, 2018 @ 7am PST. Don't forget to use the code FLASH at checkout to get 20% off of your entire "in-stock" only purchase! Sale applies to in-stock items only! Start shopping here: https://shop.my-creative-time.com/Home_c1.htm

I would always stock up my MCT stash when this sale was on!!!  If you need a little help in deciding what you'd like to pick up, here's a few projects featuring some of my favourite MCT products :)


Mini Gift Box Die, Lowercase Fun Dies

HAPPY SHOPPING!!


Laurie


Wednesday, October 3, 2018

3-D Wednesday with My Creative Time!!

Hello friends and welcome back!! Today I have a cute, felt Halloween ornament to share with you today!

It's nice to make things other than cards and I love when you can combine things like paper crafting and sewing or stitching!!  I used the recently released Witch Hat Topper Die. This die is intended to make the cutest toppers for treat bags but can be used for so much more!

I started by die cutting all the pieces out of a few different colours of felt I had in my stash.


It's best to run them through your die cutting machine a few times to get the cleanest cut. I didn't do that with the hat and spider and ended up with a lot of fuzzy edges on the hat and a torn spider!  What's nice about this particular die is that it is already 2 pieces joined.  This took a bit of pressure off while stitching. Simply fold it over and stitch together!


I used white floss because I thought the contrast would look good.  I also stitched in a piece of bakers twine for the hanger and the little spider!


Here's a look at the completed stitching...


Now, I actually cheated when it came to the band and buckle of the hat. Instead of sewing those pieces on, I used Glossy Accents to adhere them. This glue works great for this!!


I couldn't resist adding small googly eyes to the spider.


I guess you could hand this out to a VERY special trick or treater. Or if you're really ambitious, make a bunch of these ahead of time.  This really didn't take too long to make.

I hope you found a little inspiration here today! These little ornaments can be made with many dies in your stash, you just have to think outside the box a little :)


Thank you for stopping by!!!

Laurie


Friday, September 28, 2018

CAS-ual Fridays Challenge #209

Good morning and welcome to the newest challenge on the CAS-ual Fridays Blog!!  This time around it's a SKETCH CHALLENGE!!


I'm not sure about you but I find sketch challenges always boost the mojo!  If I'm having a particularly hard time coming up with a design idea, I will search card layout/designs and 9 times out of 10, inspiration strikes!!  And what's nice about this type of challenge is that it doesn't have to be exactly like the photo. You can interpret it anyway you like!

Here's my take on this sketch:


I did stick fairly close to the sketch. For the corner "stripes", I used the Tin Roof Stamp Set (which is retiring and at a great cost!) along with a small sentiment from the Somebunny Stamp Set.  I used one of the Bubble Box Dies for a bit of dimension and to house the large Love Ya Fri-die.  

I swapped out florals for hearts on this card which were cut using the Heart Board Fri-dies.  To add the colour to the die cuts I used alcohol markers.


A generous helping of clear sparkle pen and Nuvo Crystal Glaze completed this card.

I hope you can join us for this challenge! I love going through all the entries as it gives me tons of inspiration as well!!

Here's what you're playing for:


Make sure you upload your project on the CAS-Friday Challenge Blog before October 10th, 2018 for a chance to win!!

Thanks so much for stopping by!  See you soon!!

Laurie


Wednesday, September 26, 2018

Inspire Me Wednesday with My Creative Time!

Hello friends and welcome back!  Today I hope to inspire you a little bit using products from My Creative Time!

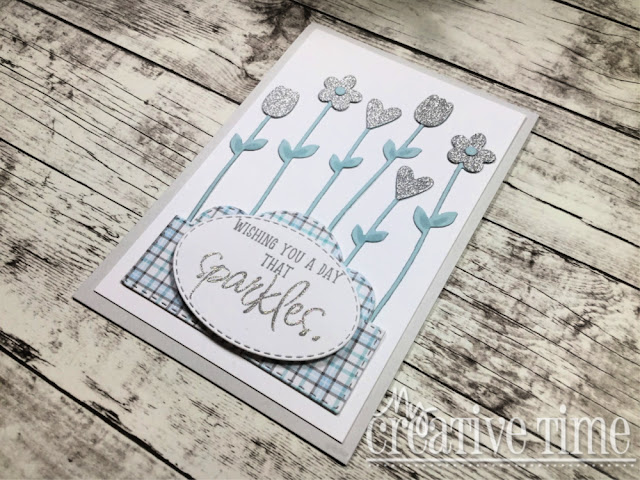
This is a very clean and simple card that came together quite quickly!


I used the Thank You, Mom stamp and die set for the sentiment and the flower die cuts. As you can see, I went with a not so typical colour palette!  To make the sentiment tie in with the theme of the card, I die cut the flower tops out of a silver glitter paper. 


I stamped the sentiment on one of the smaller Scalloped Stitched Oval Dies then foam mounted it onto a piece of patterned paper that was cut with a die from the Pretty Treat Topper Die Set..it fit perfectly!!  I glued everything directly onto a white panel, then adhered that onto a grey card base.  This is not a standard sized card. It measures approximately 3.5 X 5.


Super simple and super cute!!

Thank you for dropping by today. I appreciate your visit!

Until next time...stay crafty!!

Laurie


Sunday, September 23, 2018

Scrap "n Stamp Canada "LEAVES" Blog Hop!!!

The design team for Scrap 'N Stamp Canada has come together for another fabulous blog hop!! You likely arrived from  KAREN. If at any point you get lost along the way, you can find the entire list HERE!     Our theme this time around is "Leaves" and how fitting because where I live the trees are beautiful right now!! Unfortunately, these colours don't stay for long and then it's onto at least 6 months of the white stuff...yuck.  But for now, let's celebrate those gorgeous leaves!!


I made three cards for you today. Maybe a little overboard but once I started creating with the Cover-A-Card Fall Leaves Cling Stamp.  This stamp is fabulous for techniques!!

The first technique was to stamp with watercolours. In this case, Distress Oxide Inks.  I literally just slapped on some watered down ink onto portions of the stamp and pressed it into some Mixed Media Paper.  Tip:  the Misti or any other stamp positioned tool is a must for this!


I started by trying to cover one entire leaf at a time but as you can see, the ink just pools. I ended up applying the ink a couple of times and pressing down.  


As you can see, I used non-traditional colours. I chose Peacock Feathers, Worn Lipstick, Picked Raspberry and Twisted Citron Distress Oxides. After the stamping was done, I trimmed this panel down but before adhering it to a card base, I stamped the entire background stamp onto the base using a light grey ink.


The large "thanks" word die is from Birch Press Designs and is called the Big Thanks-Sugar Script Die. It's awesome!!


A few clear sequins and shimmer pen finished off card #1!!

For my second card, I again used Distress Oxide Inks but in Fall colours. I used Gathered Twigs, Crushed Olive, Fossilized Amber and Fired Brick. This time I used sponge daubers to apply the ink.  I love using sponge daubers to ink up stamps, it's so easy to get many colours on one image and Oxides blend beautifully!!


Now this is where the fun comes in!!  I used Glossy Cardstock from Ranger/Tim Holtz to do the stamping because I knew I wanted to use the Distress Micro Glaze over top.  Once the Oxide Inks are dry, take a blending tool and sponge and rub a SMALL amount of the glaze over top.  The colours brighten and pop off the paper!!  This only works on this particular paper!!


It is just gorgeous in real life!! I trimmed this panel down with a Lawn Fawn Stitched Rectangle die and mounted it onto a brown panel cut with a Fancy Scalloped Rectangle Die (also from Lawn Fawn).  Then everything was mounted onto an ivory card base.


I used the same sentiment die but also added a nest of gold thread behind it.


I think this card turned out beautifully. What do you think??  Okay, now onto my last card and I know there is a name for this technique, I just don't know it!!

I used Tim Holtz Distress Watercolour Cardstock for this one as I knew I was going to use A LOT of water!  I took out my Ken Oliver Colourburst to play with. I have the Caribbean Brights Set.


I used only the three greens. Once my panel was good and dry, I added a lot of anti-static powder to it and clear embossed the entire background stamp. 


It's difficult but you may be able to see some shine in the embossed areas.  I then took Black Soot Distress Ink and put a heavy layer over the entire panel. This gives a beautiful effect.  The panel is black only where there is no embossing powder. When you are done, all you see is the leaves with that gorgeous colour!


To finish this card off, I simply cut down the stamped panel and foam mounted it to a white card base.  I used the same "Thanks" die which was also mounted with foam adhesive.


I think this may be my favourite one of the three!


Three very different cards using the same stamp and die, I love when that happens!! Which one is your favourite? I'd love to know!!


Up next on the hop is the crazy talented JESSICA!!

But don't forget about the fun stuff....

Scrap 'N Stamp is generously giving away THREE $25 gift certificates to the SNS store!! All you have to do is leave a comment on each stop of the hop. You have until September 30th to comment and winners will be announced on the SNS Blog on October 2nd, 2018. Good Luck!!

Have a great day!

Laurie


Friday, September 21, 2018

My Creative Time 83rd Edition Release Blog Hop!!

Hello and welcome to this month's blog hop for the latest release from My Creative Time!! You likely arrived from the beautiful MISS KENDRA'S blog but if not, you can find the whole line up HERE!
 This release is full of products that can be used for cardmaking, gift giving or even home decor!!


***SALE ALERT***
ALSO, DON'T FORGET our sale starts RIGHT NOW here:http://shop.my-creative-time.com/Ne...! Use the code: SEPT2018 to receive a discount off your entire purchase! This sale applies to "IN-STOCK" items ONLY. This sale will end on Friday, September 28, 2018 @midnight PST.
This release is full of products that can be used for cardmaking, gift giving or even home decor!! used the new Cute Pumpkin Tag Die Set for my card today.  Just like always, Emma's die sets are so versatile!

I made a simple Thanksgiving card using the pumpkin die as well as the leaf dies in this set.  The separate pumpkin die is actually made to use on the flap of the tag so it is a little wonky on one side. But pumpkins aren't perfect, are they?!


I decided to use patterned paper for my cute pumpkin today. This size of this die really allows for the pattern to show!  To create the look of torn paper on the front panel, I used one of the dies from the Most Stitched Edges Die set...I love that set of dies!!


The die itself creates some cut lines. This gives you the option to pop up certain parts, which I decided to do. Hard to capture but it looks very cool in person!  The stitched rectangle dies are from the More Stitched Rectangular Dies and the smaller one is actually covering up a sentiment boo-boo. The sentiment comes from the Fall Friends Stamp and Dies (which I stamped in the wrong place!)


This card was so fun and easy to make!!  In case you missed my sneak peek post for this die set, here's a look at what the full die set looks like!


And that's my take on the new Cute Pumpkin Tag Die!! I hope you like!  Up next on the hop is the extremely talented MISS RUTHIE!!

Here's a look at the entire release:


***BLOG HOP GIVEAWAY***

For our blog hop giveaway, Emma is giving away a $25 gift card to the "My Creative Time" store to ONE LUCKY winner! ALL you have to do is leave a comment on each of our blogs! You are NOT required to comment on EVERY SINGLE blog, but the more you comment on, the MORE chances you have for winning! VERY IMPORTANT, PLEASE leave a way for us to contact you w/your comment just in case "YOU" are the lucky winner!
***SPECIAL DISCOUNT CODE***
Starting on Friday, September 21, 2018 @ 8am PST, the first 50 shoppers will receive a special ONE TIME USE discount code that you can use anytime with the exception if there is a sale going on already! This special discount code will be given to the FIRST 50 shoppers! If you are one of the 1st 50 shoppers it will automatically be added to your package at the time of packing/shipping. PLEASE keep in mind, if you are the first 50 shoppers, do NOT throw away your invoices that are included with your orders because that is where your discount code will be!


Featured Post

A Simple Thanks Card

Well, well, well. Look who decided to show up...me! It's been an awful long time yet again. I seriously thought I'd be well out of t...