Showing posts with label Distress Inks. Show all posts

Tuesday, November 12, 2019

Paper Smooches November Challenge!

Hey, friends!  I wanted to drop in quickly with a card I made for the current Paper Smooches Challenge.  This challenge is especially exciting because it's also part of their new Challenge Design Team Call..yippee!!


If you're interested in entering, you can find all the details HERE!

I created a Christmas/Holiday card to add to my stash.  I used a bunch of awesome dies and hardly any stamping...the sentiment only.


I used the following PS products on this card:

Bird House Dies (for the tiny, red bird)

All the "colouring" was done with Distress Inks and either a sponge dauber or ink blending tool. Super quick and easy!


I love how this card turned and hope you do, too!

Thanks for dropping by! Have a great day and see you soon!

Laurie


Wednesday, October 2, 2019

Create A Smile Stamps Sketch Challenge

Welcome to another challenge for Create A Smile Stamps!  We have a sketch for you to follow this time around!


I followed the sketch almost to a tee except for making one card, I made 3 mini cards!  Mini cards are so much fun to make. It is so easy to fill the front up, haha!


I used the Time to Say Thanks Stamp Set. Fall is in the air and I love making autumn cards!  I gold heat embossed the images and used Fired Brick, Spiced Marmalade, Fossilized Amber, Crushed Olive and Peeled Paint Distress Ink to blend on the colour.

I fussy cut each leaf out and popped them up to a small square of corrugated kraft cardstock.


Instead of the horizontal strip on the sketch, I used some twine. Twine always gives such a rustic look.  I added three glittery sequin to each card and stamped the word "thanks" inside each card.


I hope you'll join us for this challenge! We LOVE seeing what you create! You also have a chance to win a €25 gift certificate to the CAS Shop!!


Please link up your creations on the Create A Smile Stamps Challenge Blog!

Thanks for stopping by!

Laurie


Friday, September 6, 2019

Easy Faux Watercolour for Scrap N Stamp Canada!

Welcome to another fun blog hop and challenge for Scrap N' Stamp Canada!!  This one is so much fun and is going to be quite popular I think!  This months theme is watercolour!! Watercolour Wishes, in fact!


I used the Gina K Designs Wreath Builder Bundle for my project today. I love this system of stamps and templates (stencils)!  The possibilities are endless. You can use almost any stamps you already own with these templates as well.

Now, while I love to watercolour lined images, I also like using water based inks/markers to come up with fun and easy techniques. I chose to do some watercolour stamping to create a beautiful faux watercolour look!  This technique works with solid image stamps, which happen to be in the Wreath Builder stamp sets!


The technique is quite simple. Add colour to the stamp, add a bit of water with a damp paintbrush or water brush and stamp down!  That's it!  Your results will vary depending on the amount of water you add. I didn't want my images to distort too much so I used very little water. However,  by adding more water, the images will be more fluid which would look beautiful as well!  To show how easy this process is, I put together a video!!


I used Distress Inks on the card today, mostly because I LOVE the colours.  I used: Picked Raspberry, Seedless Preserves, Crushed Olive, Peeled Paint, Wild Honey and Antique Linen. For the sentiment, I used my favourite shade of embossing powder, Metallic Brass from WOW...I'm addicted to this stuff and the moment!


With a bit of ink, a bit of water and a few turns of your paper/cardstock, you will end up with wreath that looked like it took you hours to create!


Prizes!

SNS is giving a $50 gift certificate away to one lucky commenter. The winner will be announced on the Scrap N' Stamp Blog on September 19th, 2019!!  So, please leave a little love on each stop of the hop for your chance to win! Good luck! As an extra bonus, all watercolour products will be 20% for this weekend only!!

Facebook Challenge!

Remember to add your watercolored creations to the SNS Facebook Page for another chance of winning!!

Here is the complete hop lineup!!

Susan

Thanks so much for hopping along with us!!

Wednesday, August 21, 2019

Mood Board Challenge with Create a Smile Stamps

Hi everyone and welcome back! It's that time where we introduce you to a new challenge over at Create A Smile Stamps! This two week challenge is a...Mood Board!


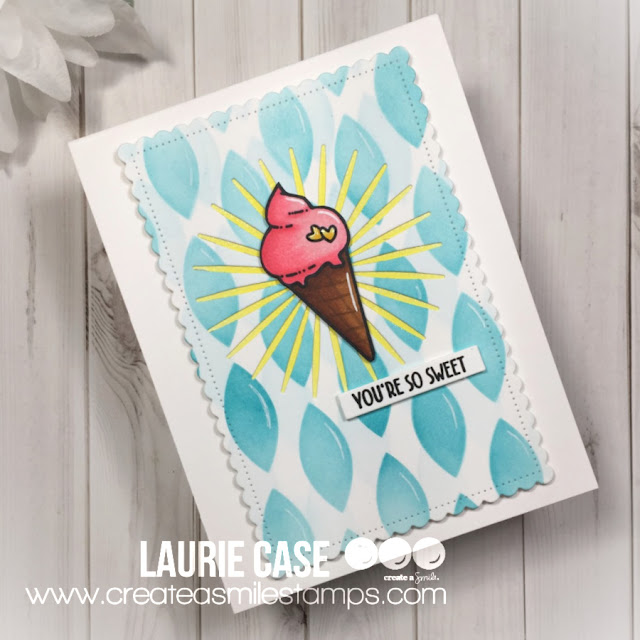
The inspiration for my project came from the lower right image along with the colours.


I used the Petals Stencil along with Peacock Feathers and Tumbled Glass Distress Inks to create the background. It may be hard to tell but there is two layers of ink. I inked Tumbled Glass first, shifted the stencil slightly then used the Peacock Feathers Ink. I then cut the panel down using the 2nd largest Scalloped Rectangle Die.

I coloured up that adorable ice cream cone from the A Little Treat Stamp Set and fussy cut it out. To bring in a bit more yellow, I die cut the centre of the ink blended panel with the Focal Die. I quickly added some yellow ink to a scrap piece of paper to layer behind.

I foam mounted the ice cream onto the die cut panel, foam mounted the panel to a white card base and added the sentiment, which is also from the A Little Treat set.


I hope you'll join us!! Remember there's a €25 gift certificate up for grabs!!

Thanks for stopping by!

Laurie


Tuesday, August 13, 2019

Wild About You with Pink & Main!!

Hello, friends! Welcome back! While the Pink&Main Blog is getting an exciting new look, I'm sharing my latest creation here!


I used the fun, new set called Toucan Do It stamp set and co-ordinating dies for this card along with some fun ink blending.

I started by die cutting a white panel of cardstock using the largest of the Stitched Rectangles Set 2.  I used Peacock Feathers Distress Ink to add some base colour. I focused on the bottom left portion. I then placed the Puffy Hearts Stencil over top and used the same ink, with a harder pressure. This creates such a beautiful look!


I stamped that adorable alligator with Memento Tuxedo Black Ink and used my Copic markers to colour it in.  I cut the image out with the co-ordinating die.


I adhered the heart panel onto a white card base and used foam adhesive to adhere the alligator.  I stamped the sentiment in Versafine Onyx Black ink.  I decided to leave it as it was and not add any sort of embellishment...which is hard for me, haha! I really wanted that background to shine!


Thank you for stopping by today!! I hope you have some time to check out some of these new (and older) products in the Pink & Main Shop!!


Wednesday, June 19, 2019

Sneak Peek Day 3 for My Creative Time!

We're halfway through sneak peeks for the upcoming 92nd Edition Release for My Creative Time! We've had a couple days of baby themed products, now it's time to switch gears to wedding season!!


We are showing you two brand new products today! One stamp and die set and one stand alone die.  Both beautiful, both must haves! Let's start with the die. It's called the Lace Border Die.  This die is both smart and gorgeous. Gate fold cards seem to be all the rage right now and this die makes it easy for you to make them.  It cuts a gorgeous rounded, lacy edge on one side and a score line on the other. So, when you line the edge of the die onto a card base, it will only cut the frilly portion and leave the card base in tact. I hope this makes a bit of sense.


I used this die to cut two edges for a simple, square card.  I had some scrap grey cardstock and thought it looked lovely on top of an ivory card base.  Note: the size of this die is much larger than shown here. I've trimmed it down quite a bit!!


The detail on this die is just beautiful!  

Now onto my second card and my favourite of this release!  I used the new Save Our Date Stamp and Die set for this card.  Along with a little ink blending and I just love how this card turned out!


This die set is so awesome! Die cut in black with a few white accents against the sunset Distress Ink background, it just pops!! The cans on the back of the car are a separate die so you can add them if you want. I think you could use this die for a non-wedding card as well. Just snip the veil off!


I love that small "congratulations" sentiment that comes in the stamp set. It fit perfectly!

And that's today's sneak peek! Hope you enjoyed!

**Sneak Peek Giveaway**


We will be giving away the sets we are showcasing each day to ONE lucky winner!! For example, the sets we showcase on Wednesday, Emma will announce the winner of that on Thursday and the sets we showcase on Thursday will be announced on Friday on the MCT Blog!  All you have to do is leave some love on each of our blogs.  You are not required to comment on every blog, but the more you do comment on, the more chances you have of winning!!   VERY IMPORTANT: Please leave a way for us to contact you with your comment, just in case you are the lucky winner! For extra entries, you can spread the word about this release on Facebook, Twitter or Instagram using #mycreativetime!  Good luck!!


Wednesday, June 12, 2019

Favourite Stamp Set Challenge with Create A Smile Stamps!

Welcome to another Create A Smile Stamps Challenge!!  For the next couple of weeks we will be sharing our favourite CAS stamp set.  Obviously, I love all the sets in the store but one of my true faves is the Funky Feathers Stamp Set. This set has both solid images and outline images. I used one of the outlines.


I white heat embossed the same image numerous times and used some "rainbow-like" Distress Ink colours to ink them up. I fussy cut each feather and arranged them onto a white panel.  Using a piece of Glad Press N Seal, I picked all the feathers up at once and applied foam adhesive to the backs.


I adhered the white panel onto a grey card base. The sentiment comes from another of my favourite sets, All About You.  I stamped it with black ink onto a white strip.  I used foam adhesive to adhere this as well.


I added a few clear sequins for a little shine and called this card done!

I hope you'll play along with us this time around! It's a fun and easy challenge!  There's a €25 up for grabs!

Thanks for stopping by! See you soon!

Laurie


Tuesday, June 11, 2019

Birthday Palooza with My Creative Time!

Hello and happy Tuesday!  Today we're making birthday projects featuring goodies from My Creative Time!

I used only the dies from the Light the Candles Stamp and Die Set. It has co-ordinating dies to cut out the images but it also includes dies to create your own cupcake. In this case, I made a very large, very rainbow cupcake!


I cut one cupcake wrapper and 5 layers of frosting. I used Distress Inks to add some colour. Before adhering the stacked cupcake, I did a simple watercolour smoosh on the background, which was cut with the second largest More Stitched Rectangular Dies.

The cupcake was adhered with foam adhesive. I stamped a sentiment from the Light the Candles Set onto a banner cut with one of the Ribbon End Dies in a bright pink ink.


A few iridescent sequins and a bit of glitter pen finish the card!

Thank you so much for stopping by today!

Until next time...stay crafty!

Laurie


Monday, April 15, 2019

My Creative Time 90th Edition Sneak Peek Day One!!

Hello, crafty friends!! Are you all ready for another AMAZING release from My Creative Time?!!  Today, we're taking a look at two different products which work VERY well together!

First is the Hello Gorgeous Stamp & Die Set.  This is a beautiful stamp set featuring two flamingo images and includes some of the best sentiments, EVER!!  Here's a look at what I made using the set.


I created a little circle scene using the Bunch of Fun Circles Dies, the Floating Clouds Dies and the greenery dies that are included in the Summer Vibes Stamp & Die Set.  I coloured everything with Distress Inks which was quick and easy.  I layered the circle scene onto the largest die in the Bunch of Fun Circles set and before adding that to the card base, I used a leaf embossing folder on the front panel.


I stamped the sentiment onto one of the new Strip Sentiment Dies. You are going to love these dies! They are so cute and not mention versatile. I even have a bonus project featuring these dies for you today! 


I finished this card off with a bit Nuvo Crystal Glaze and some clear sequins.  Let's have a look at my bonus card!


The sentiment strip dies come attached and for this project, that came in handy.  When ran the dies through my die cutting machine using cardstock first, then a scrap piece of paper.  The scrap provides a template which make it really easy to line the die cuts up on the card front.

I white heat embossed different sentiment on the labels then used a rainbow colours of Distress Inks to blend over top.


I did cut craft foam using the dies as well, for perfect dimension.  Then added some co-ordinating rainbow confetti to each sentiment strip. And that call that card, done!! This is a super clean and simple card, but so much fun!!

I hope you enjoyed today's sneak peek!! You won't want to miss tomorrow :)

Sneak Peek Giveaway:

We will be giving away the sets we are showcasing each day to ONE lucky winner! For example, the set we are Wednesday, Emma will announce the winner of that on Thursday and the set we are showcasing on Thursday, Emma will announce that winner on Friday (on the MCT Blog).  All you have to do is leave a comment on each of our blogs. You are not required to comment on on every single blog, but the more you comment, the more chances you have to win! VERY IMPORTANT: Please leave a way for us to contact you when leaving your comment, just in case you are the lucky winner!!  For extra entries, you can spread the word about this release by sharing it on Facebook, Tweeting about it or sharing on Instagram!  Use the hashtag #mycreativetime.  GOOD LUCK!!

Laurie 


Wednesday, April 3, 2019

Create A Smile Challenge...Crafty Friends!

Welcome back to another Challenge for Create A Smile Stamps!!  It's a fun one this week and one we can all appreciate...Crafty Friends!  So get those CAS stamps out and start getting crafty!!

Create A Smile has a must have set in the store called Stamping Friends.  This set is perfect for creating something special for one (or all) of your paper loving buddies!  I used a couple of images from this set and combined them with a couple older stamp sets.


I started by gold heat embossing the gorgeous sentiment from the Happy to Call You My Friend Stamp Set.  I used the Heart Rays Stencil along with Seedless Preserves and Dusty Concord Distress Inks right over top of the sentiment.  I tried to centre it the best I could.  I cut down the inked panel using the second largest die from the Scalloped Rectangles Cool Cuts Set.

I stamped the ink blending tool and a few sequins from the Stamping Friends set.  The sequins were gold heat embossed right off the start and colour was added with the same Distress Inks.  I stamped the blending tool in a light Copic safe ink, coloured it and then added the embossing.  Jury still seems to be out on whether the embossing ruins your marker tips so I played it safe! Everything was fussy cut.


I foam mounted the images and it was at this point I decided to add the "creative" to the card.  This comes from the Same Frequency Stamp Set (which also contains some crafty images!). I simply masked off a portion of the stamp, inked and fussy cut around it.  I adhered the focal panel to an ivory card base...I am loving the white and ivory combination!!


To have the heat embossed sentiment stand out a bit more, I CAREFULLY added a drop shadow using some cool grey markers.  And that's it!!  

Can't wait to see what crafty creation you come up with!!  Please visit the Create A Smile Challenge Blog for more details but in the meantime, this is what you'll be playing for!

Thank you so much for stopping by today!!  See you soon!

Laurie


Tuesday, February 12, 2019

Birthday Palooza with My Creative Time!!

Hello, friends and welcome back!!  Today I'm sharing a quick and easy birthday card using products from My Creative Time.  Because these cards are likely the most needed, it's great when they come together quick!!


I used the recently released Celebration Tags Stamp and Die Set. This set is adorable and has got you covered for almost any occasion.  I die cut all my cupcake pieces out of scrap pieces of patterned paper because who doesn't have a load of that on hand?!


Because I struggle with leaving a lot of white space, I used a stencil to create the rays in the background.  Blueprint Sketch Distress Ink matched the blue hearts almost perfectly!  I used the same ink for the sentiment, using my Misti because Distress Inks are really not meant to stamp with so multiple impressions are needed.


I foam mounted all the die cuts, added some sparkle and Glossy Accents to the hearts and couldn't resist adding a few red sequins!  Looking at this card now, I'm getting some strong July 4th vibes...oh how I wish for July!!

That's all for today. I hope you enjoyed!

Thank you so much for dropping by. I love your visits!!!

Laurie


Thursday, October 25, 2018

CAS-ual Fridays Challenge #211

Welcome back to the new challenge for CAS-ual Fridays Stamps!!  This is the perfect Fall Challenge!!


The colours and textures just scream Fall time to me! Here's what I created for you today...


I used the Acorn Fri-Dies to cut out white cardstock.  I used various yellows, oranges, reds and brown Distress Inks to colour up those die cuts.  This is my favourite way of colouring lately.

I used the Autumn Blessings Stamp set, which co-ordinates with the Acorn Fri-Dies, for the sentiment.  To highlight the sentiment, I used one of the Bubble Box Dies and kraft cardstock. Of course, gold embossing just had to be used here!!

I used a Woodgrain Embossing Folder (Tim Holtz) for the background and foam mounted the sentiment, leaves and acorn.


To add a bit more shine, I die cut one of the Casual Trees Dies out of gold glitter paper and snipped it apart to fit in and around the sentiment die cut.


I was going to add some gold sequins, but thought it was perfect as it was!!

Now, here's what you're playing for...


Please go to the CAS-ual Fridays Blog to link up your creation for a chance to win a $25 gift certificate to the CAS-ual Fridays shop. Remember, if you use CAS-ual Fridays stamps and dies and are chosen as the winner, you will get a $50 gift certificate...wow!!

Good luck and I can't wait to see what you create!

Laurie


Thursday, October 11, 2018

CAS-ual Fridays Challenge #210

Welcome back!! It's time for the newest challenge over on the CAS-ual Fridays Challenge Blog!!  And the theme for this challenge is...


Pinks and greys!! How fun and sweet!!  I decided to make a very feminine birthday card for this challenge.


I used the Treble Clef Fri-Die as the largest image of the card and created around it.  I used Hickory Smoke Distress Ink with a finger dauber to apply the colour.  To dress up that beautiful music note, I used the 4 Petal Fri-Dies and used Spun Sugar and Picked Raspberry Distress Inks and coloured them the same way.


If you look closely, I decided to use the Spun Sugar ink along with the Square Dance Stencil from Catherine Pooler Designs to add a tiny bit of detail to the card front. The sentiment comes from the Heartfelt Sayings Stamp Set and was stamped using Versafine Clair Morning Mist ink.


I added a few pearls to the centre of the flowers as well as some shimmer pen to the note. The tiny grey hearts are actually cut from the bottom of the note..they make great embellishments!!

I really hope you can join us for this fun challenge!  I love seeing what you're creating!!

Here's what you're playing for:


Be sure to link up your project to the CAS-ual Fridays Challenge Blog!!  Good luck and have fun!!

Laurie


Featured Post

A Simple Thanks Card

Well, well, well. Look who decided to show up...me! It's been an awful long time yet again. I seriously thought I'd be well out of t...