Wednesday, October 17, 2018

My Creative Time 84th Edition Release Sneak Peek #2!!


Welcome back to another sneaky peeky for the upcoming 84th Edition Release for My Creative Time!  Today we are showcasing the Santa Hat Lollipop Holder Die!  Emma comes up with the cutest ways to give treats, doesn't she??

But you probably know me well enough to know that I rarely use these lollipop holders as intended. That's because a) I never have lollies in my house and b) I love thinking outside the box when it comes to die cutting!


I used this die to create a cute gift giving tag! This was super simple. I basically just used one half of the die and stamped a sentiment on it, which comes from the Baked with Love Stamp and Die Set. Of course, I just had to use the Gift Card Gift Box Die that we featured yesterday!


I used the Grainy Wood Background Stamp to add that beautiful pattern to the gift box. This die set comes with separate dies for the pom-pom and the trim of the hat.  I used a textured white embossing powder on these pieces and I think it looks super cute!!


I hope you enjoyed today's sneak peek!! Make sure to come back tomorrow for our final reveal!!

***Sneak Peek giveaway!***
We will be giving away the sets we are showcasing each day to ONE lucky winner! For example, the set we are showcasing on Wednesday, Emma will announce the winner of that on Thursday & the sets we are showcasing on Thursday, Emma will announce that winner on Friday on the MCT blog! ALL you have to do is leave a comment on each of our blogs! You are NOT required to comment on EVERY SINGLE blog, but the more you comment on, the more chances you have for winning! VERY IMPORTANT, PLEASE leave a way for us to contact you w/your comment just in case "YOU" are the lucky winner! For EXTRA entries, you can spread the word about this release on Facebook, tweet about it OR even instagram it! #mycreativetime! GOOD LUCK EVERYONE & let's start spreading the word!;)
See you tomorrow!
Laurie


Tuesday, October 16, 2018

My Creative Time 84th Edition Release Sneak #1!


Hello and welcome to the first day of Sneak Peeks for the 84th Edition Release from My Creative Time!!  It's time to start getting into the holiday spirit and this release will definitely get your creative juices flowing!!

Today we are taking a look at the new Gift Card Gift Box Die!!  This is an incredible die that will make giving gift cards or tiny presents so fun!!


This two piece die provides all the cuts and score lines needed to create this cute box!  I paired it with the Made With Love Stamp and Die Set as well as the Small Stitched Scalloped Bow Die to make a fun little present.


I decided to put a pair of earrings in to show you that this is just the perfect gift box for small to medium sized jewellery!


I adore this little box so much and can't wait to use it this Christmas and all year round!!


***Sneak Peek giveaway!***
We will be giving away the sets we are showcasing each day to ONE lucky winner! For example, the set we are showcasing on Wednesday, Emma will announce the winner of that on Thursday & the sets we are showcasing on Thursday, Emma will announce that winner on Friday on the MCT blog! ALL you have to do is leave a comment on each of our blogs! You are NOT required to comment on EVERY SINGLE blog, but the more you comment on, the more chances you have for winning! VERY IMPORTANT, PLEASE leave a way for us to contact you w/your comment just in case "YOU" are the lucky winner! For EXTRA entries, you can spread the word about this release on Facebook, tweet about it OR even instagram it! #mycreativetime! GOOD LUCK EVERYONE & let's start spreading the word!;)
Thanks for stopping in today!!! I'll be back tomorrow for another amazing sneak!!
Laurie


Thursday, October 11, 2018

CAS-ual Fridays Challenge #210

Welcome back!! It's time for the newest challenge over on the CAS-ual Fridays Challenge Blog!!  And the theme for this challenge is...


Pinks and greys!! How fun and sweet!!  I decided to make a very feminine birthday card for this challenge.


I used the Treble Clef Fri-Die as the largest image of the card and created around it.  I used Hickory Smoke Distress Ink with a finger dauber to apply the colour.  To dress up that beautiful music note, I used the 4 Petal Fri-Dies and used Spun Sugar and Picked Raspberry Distress Inks and coloured them the same way.


If you look closely, I decided to use the Spun Sugar ink along with the Square Dance Stencil from Catherine Pooler Designs to add a tiny bit of detail to the card front. The sentiment comes from the Heartfelt Sayings Stamp Set and was stamped using Versafine Clair Morning Mist ink.


I added a few pearls to the centre of the flowers as well as some shimmer pen to the note. The tiny grey hearts are actually cut from the bottom of the note..they make great embellishments!!

I really hope you can join us for this fun challenge!  I love seeing what you're creating!!

Here's what you're playing for:


Be sure to link up your project to the CAS-ual Fridays Challenge Blog!!  Good luck and have fun!!

Laurie


Wednesday, October 10, 2018

Whatever Wednesday with My Creative Time!!

Hello everyone and welcome back!! Today I made a set of mini encouragement cards.  These cards are 3 X 3 inches are just super sweet!  I think they'd would be perfect to put into a lunch box, backpack or maybe even briefcase!

I used the Stitched Mini Frame and Arrow Dies to start the this project. I adore this little set of dies, it is just the cutest!!  For the images, I chose both the girl and boy from the You're A Hit, Valentine Stamp and Die Set.  The die cuts two separate pieces, the frame and the inner window. I selectively stamped each image onto the inner square piece.


I used my Copic markers to colour these cuties in, then added a bit of Tumbled Glass Distress Ink to take away some of the harshness of the white background.  I attached the frame and the inside piece using Scotch Tape at the back.


The sentiments for each card come from the Be Your Best Selfie Stamp and Die Set.  Again, this is a great little stamp set with awesome sentiments and two fabulous "selfie" word dies!


I actually had the start die cuts sitting in my die cut pile and the colours just happened to match perfectly!  I attached the star to each frame and then foam mounted the picture frame to the card base.


It's so nice to make smaller sized cards. They are great for all your small die cuts and images are quick and fun to make!!

I hope you enjoyed today's "Whatever Wednesday"!  Thank you so much for stopping in, much appreciated!!

See you soon!!

Laurie


Monday, October 8, 2018

Made in Minutes with My Creative Time!

Hello crafty friends and welcome back!!  Happy Thanksgiving to all my Canadian friends!!  Today it's all about whipping up a card in minutes using products from My Creative Time!  I mixed a bit of old and new stuff for my project today and since fall is upon us, I used a bunch of gorgeous colours of Distress Inks for my colouring.

I was recently told that I should start making more sympathy/thinking of you cards so that it what I did today.

My favourite way to add colour quickly is to ink blend onto die cut images. This takes no time at all and the results are beautiful!

I started by clear heat embossing the large image from the Carved Heart Stamp and Die Set onto a piece of white cardstock and used Vintage Photo and Brushed Corduroy Distress Inks to add the colour. The embossing resists the ink resulting in a bright, crisp image!


I used the co-ordinating die to cut it out. This set also comes with a bunch of heart dies so I cut a medium sized one of those and added Fired Brick Distress Ink.

The leaves come from the new die set, Little Stitched Leaves which is a must have!! I used Mowed Lawn, Crushed Olive, Spiced Marmalade, Fired Brick and Fossilized Amber to add some shades of Fall.


The sentiment comes from the Vintage Sentiment Stamp Set and was stamped onto the banner die from the Vintage Stitched Label Dies Set.  I used ivory cardstock for a more muted look against the kraft card base.

For a bit of added detail, I added some sparkle pen and Nuvo Crystal Glaze to the heart (which changed the colour slightly) and a few gold gems.


This card took my about 20 minutes to make. The longest of those minutes were trying to decide on where to place the gems and getting my glue to come out of the bottle!

Thank you so much for stopping in today. Much appreciated!

See you soon!

Laurie


Friday, October 5, 2018

My Creative Time 48 Hour Flash Sale!!

Hey guys!! Check it out!!

Good morning & welcome to another "48 Hour Flash Sale!" This sale is for 48 hours ONLY that is going on right NOW & will end on Sunday, October 7, 2018 @ 7am PST. Don't forget to use the code FLASH at checkout to get 20% off of your entire "in-stock" only purchase! Sale applies to in-stock items only! Start shopping here: https://shop.my-creative-time.com/Home_c1.htm

I would always stock up my MCT stash when this sale was on!!!  If you need a little help in deciding what you'd like to pick up, here's a few projects featuring some of my favourite MCT products :)


Mini Gift Box Die, Lowercase Fun Dies

HAPPY SHOPPING!!


Laurie


Wednesday, October 3, 2018

3-D Wednesday with My Creative Time!!

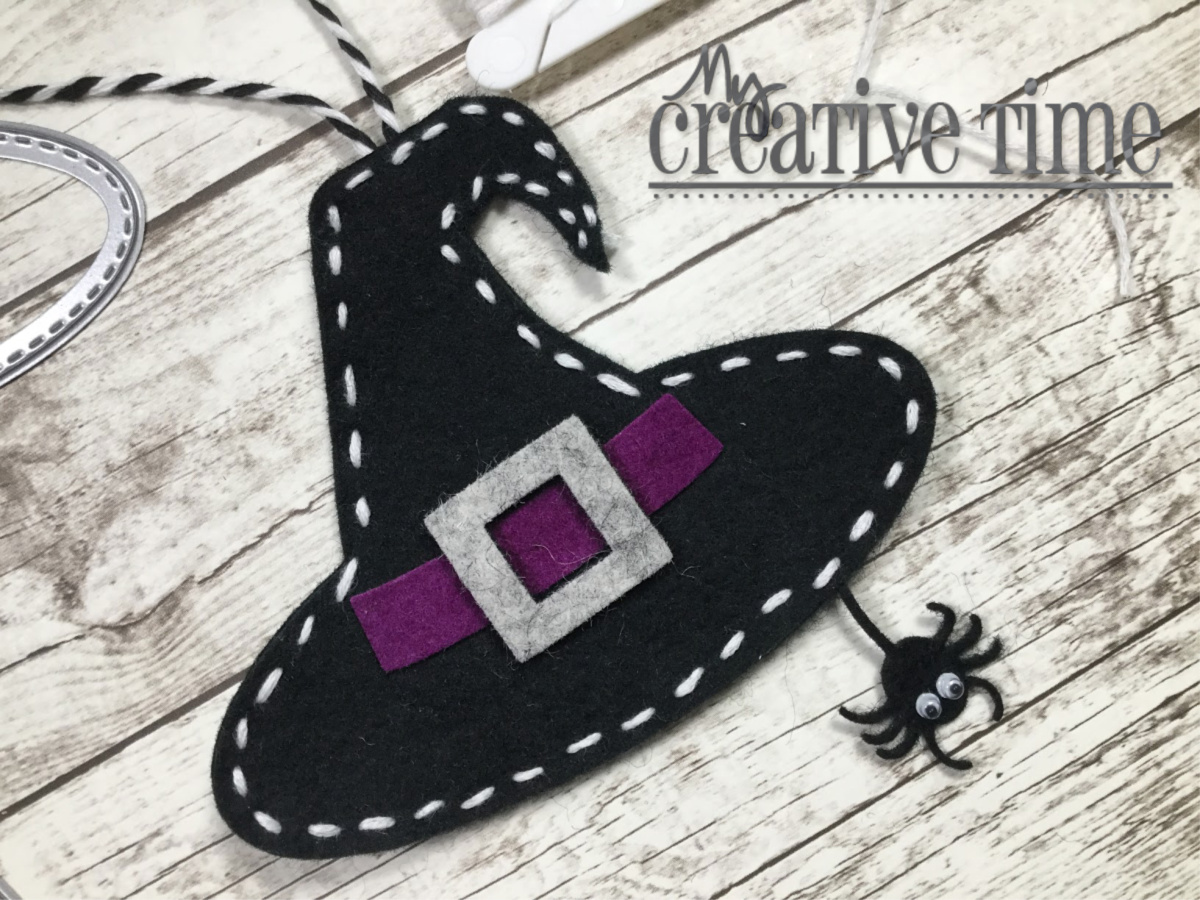
Hello friends and welcome back!! Today I have a cute, felt Halloween ornament to share with you today!

It's nice to make things other than cards and I love when you can combine things like paper crafting and sewing or stitching!!  I used the recently released Witch Hat Topper Die. This die is intended to make the cutest toppers for treat bags but can be used for so much more!

I started by die cutting all the pieces out of a few different colours of felt I had in my stash.


It's best to run them through your die cutting machine a few times to get the cleanest cut. I didn't do that with the hat and spider and ended up with a lot of fuzzy edges on the hat and a torn spider!  What's nice about this particular die is that it is already 2 pieces joined.  This took a bit of pressure off while stitching. Simply fold it over and stitch together!


I used white floss because I thought the contrast would look good.  I also stitched in a piece of bakers twine for the hanger and the little spider!


Here's a look at the completed stitching...


Now, I actually cheated when it came to the band and buckle of the hat. Instead of sewing those pieces on, I used Glossy Accents to adhere them. This glue works great for this!!


I couldn't resist adding small googly eyes to the spider.


I guess you could hand this out to a VERY special trick or treater. Or if you're really ambitious, make a bunch of these ahead of time.  This really didn't take too long to make.

I hope you found a little inspiration here today! These little ornaments can be made with many dies in your stash, you just have to think outside the box a little :)


Thank you for stopping by!!!

Laurie


Featured Post

A Simple Thanks Card

Well, well, well. Look who decided to show up...me! It's been an awful long time yet again. I seriously thought I'd be well out of t...