Showing posts with label Create A Smile Challenge. Show all posts

Wednesday, September 30, 2020

No Line Colouring with Create a Smile Stamps!

 Good morning and happy Wednesday! I'm back to share a card made using one of the newest stamp sets from Create a Smile Stamps! And I've also decided to do some no line colouring with my pencils!


This simple eucalyptus image is from the Breathe In, Breathe Out Stamp Set. This set has multiple images in different sizes. I used one of the smaller ones so as not to get overwhelmed while colouring.
I'm not an accomplished colourer. I don't really go for realism and my technique is my own. I do it purely for the fun of it. I just want good results that I'm happy with. This is the stress-free way!!


After colouring, I used the second largest die from the Stitched Circle Frames. This cuts the inner portion as well as the detailed frame. The coloured panel measures 3.75X3.75 inches. I adhered it to a 4X4 square card base. I glued the frame down, added a piece of fun foam (cut using the same die), then adhered the coloured portion on top!


The sentiment comes from the Small Sentiments Set. I resisted the urge to add any further embellishments, leaving it clean and simple.

Thanks for dropping by today! See you soon!

Laurie


Wednesday, December 11, 2019

Create A Smile Stamps Challenge..Mood Board.

Hello and welcome to the final challenge of the year for Create A Smile Stamps!! I am so sad my term has come to an end on this team. I'm so thankful to Christine for giving me this opportunity to show my love for her products. Also, this team of designers are absolutely amazing and I have so much love and respect for them all. It has been a fabulous year!!

But enough sadness, let's get on to the card!!  We are playing with this stunning mood board:


Everything about this is stunning but I took inspiration from the bottom right photo and came up with this...


I love the pink and golden combination so I tried to replicate it using Antique Linen, Tattered Rose and Worn Lipstick Distress Oxide Inks. To create the bokeh effect, I used a dot stencil from my stash and used a baby wipe to remove some of the ink. It worked perfectly!!


I did spray the background with a mixture of Perfect Pearls and water to give it a gorgeous, subtle shimmer. I die cut the panel using the second largest Scalloped Rectangle die.  To up the cuteness factor, I coloured up that sweet fox from the Cool Buddies Stamp Set, fussy cut him/her out and adhered it to a die cut snowbank.

Before adhering the snowbank to the panel, I gold heat embossed the berry sprigs from the Floral Decorations set.  The sentiment was also heat embossed and comes from the Santa Clumsy Set.


I foam mounted the panel onto a white card base that measures 3.5X5 inches.  I added a few white gel pen details to the fox and some shimmer pen to the scarf.  I was going to add some gold sequins but thought I'd let that background shine on its own!

Thank you for stopping in today, I hope you enjoyed this card!  Remember, up for grabs is a €25 gift certificate to the Create A Smile Stamps online shop! Please upload your creations to the Create A Smile Challenge Blog so we can enjoy and marvel at your talent!!


Wednesday, November 27, 2019

New Create A Smile Stamps Challenge!

Happy Wednesday and welcome back! It's the start of a new challenge over on the Create A Smile Stamps Challenge Blog! And this week, it's a sketch challenge!


CAS has the cutest winter/christmas stamps and the snowmen are some of my favourite images!  I used the Cool Buddies set for my card today.  This set was recently "brought back" and I'm so happy it was!!


I created the background by white heat embossing some of the snowflake images from the set onto a panel of light blue cardstock.  I added Faded Jeans and Chipped Sapphire Distress Ink to the edges to give it a perfectly blended look. I love using this "cheater method" to achieve almost perfect results!


I stamped, coloured and fussy cut this cute snow dude and popped him up over a snowbank cut with a die I had in my stash.  The speech bubble comes from the Bujo Basics set and fit the sentiment perfectly!

You may notice the embossed lines on the card base. Well, this started out as a mistake as I accidentally scored the card base in the wrong spot. So, I went with it and scored every half inch and it turned out okay!


A few sequins and a glossy carrot nose finish off this card. I hope you found some inspiration here today and will play along with us. 

Remember, up for grabs is a €25 gift certificate to the Create A Smile Stamps online shop!

Thanks for stopping by!  Have a great day!

Laurie


Wednesday, November 13, 2019

Create A Smile Stamps Mood Board Challenge!

Welcome back, friends!!  Today is the start of another challenge over at Create A Smile Stamps! We've got a beautiful mood board to inspire you...

I took inspiration from the wood, wreath and the colour gold.  I started by breaking out the Wreath Builder Template from Gina K Designs (a must have, in my opinion) and the Floral Decorations Stamp Set.  Before creating my wreath, I used a circle die that matched up to the largest Postage Edge Circle Die. I wanted to make sure my wreath didn't get too big!


I chose a variety of images from the stamp set and created the wreath using Icing on the Cake Ink from Catherine Pooler Designs. The sentiment comes from the Decorated Wishes Add On Stamp Set, this is one of my all time favourite stamp sets!  I used Versamark Ink and Gold Embossing Powder from WOW.  I then used the circle die (same one I used for a guide), to cut around the wreath.


To create the gold Postage Edge Circle, I simply pressed the Versamark Ink pad around the edge and added the same gold embossing powder. I did this twice to get a nice smooth finish.  I decided to add a few gold heart to my wreath using a good ol fashioned acrylic block.


I foam mounted the circle onto an ivory card base that was dry embossed using an embossing folder from Stampin' Up.  I refrained from adding any embellishments :)

Thanks for stopping in today!  I hope you'll join us for this challenge! As always, you'll be playing for a €25 gift certificate to the Create A Smile Stamps online shop!  For more details, please visit the Create A Smile Stamps Challenge Blog.


Wednesday, October 30, 2019

Sketch Challenge for Create a Smile Stamps!

Hello and welcome back to another challenge for Create a Smile Stamps! This week we're playing with a sketch...


I used the Same Frequency Stamp Set for the super cute robot image! 


I used the Focal Die Set along with the second largest Postage Edge Circle Die as the two circles in the sketch.  I used foam tape to attach the robot to give a bit of a "lift".  Then sentiment was stamped onto a banner die from MFT and layered on top of another cut from the same grey cardstock as the cardbase.


To create some seperation, I cut some white cardstock using the second largest Scalloped Rectangle Die and adhered that directly onto the card base.  For a finishing touch, I stamped and fussy cut a few "nuts" that are in the stamp set. I glued them down and added some sparkle to each one using a glitter pen. 


I foam mounted the sentiment and that was it!!  Hope you enjoyed my take on the sketch!

Please join us! We love seeing what you create!

Also, up for grabs is a €25 gift certificate to the Create A Smile online shop...woohoo!  Please visit the CAS Challenge Blog for all the details!!

I wanted to let you know that Create A Smile Stamps has a DESIGN TEAM CALL for the Challenge Team going on right now!!  You can find all the details HERE!

Thanks for stopping in!  See you soon!

Laurie


Wednesday, October 16, 2019

Mood Board Challenge with Create A Smile Stamps!

Welcome back for another challenge over on the Create A Smile Stamps Challenge Blog!  We have a gorgeous new mood board to give you some fall inspiration!!


Full of fall themed colours and images, this board should definitely get you in the Fall spirit!  Unfortunately, in my neck of the woods, we skipped that season and as I write up this post it is snowing and blowing :(.  

I used the Floral Decorations Stamp Set along with some fall colours to create my card today.  I blew the dust off my Derwent Inktense Pencils for the colouring.  I forgot how much fun those things were!  I decided to heat emboss all the images with Copper Metallic Embossing Powder from WOW. I love this colour!!


After the colouring was complete, I trimmed the panel down, then used a scalloped edge die to give a pretty scalloped edge.  I cut the You Twice Die out of the same cardstock as my card base and added a coat of clear embossing powder over the top. I love how it changed the shade of the kraft and gave it some super, shiny dimension!  The small sentiment comes from the All About You Stamp Set and was heat embossed in the Metallic Copper.

Before adhering the panel, I decided to clear heat emboss some of the images from the Floral Decorations set directly onto the card base...it just looked a little too plain.


I used a heart die set to cut 3 tiny hearts out of the kraft cardstock and used the clear EP on those as well.

I hope you found a little inspiration here today and I really hope you'll join us for the challenge!  We LOVE seeing what you create!  And remember, there's a €25 gift certificate the the Create A Smile Stamps online store up for grabs!!

Thanks for dropping by today!  See you again!

Laurie


Wednesday, October 2, 2019

Create A Smile Stamps Sketch Challenge

Welcome to another challenge for Create A Smile Stamps!  We have a sketch for you to follow this time around!


I followed the sketch almost to a tee except for making one card, I made 3 mini cards!  Mini cards are so much fun to make. It is so easy to fill the front up, haha!


I used the Time to Say Thanks Stamp Set. Fall is in the air and I love making autumn cards!  I gold heat embossed the images and used Fired Brick, Spiced Marmalade, Fossilized Amber, Crushed Olive and Peeled Paint Distress Ink to blend on the colour.

I fussy cut each leaf out and popped them up to a small square of corrugated kraft cardstock.


Instead of the horizontal strip on the sketch, I used some twine. Twine always gives such a rustic look.  I added three glittery sequin to each card and stamped the word "thanks" inside each card.


I hope you'll join us for this challenge! We LOVE seeing what you create! You also have a chance to win a €25 gift certificate to the CAS Shop!!


Please link up your creations on the Create A Smile Stamps Challenge Blog!

Thanks for stopping by!

Laurie


Wednesday, September 18, 2019

Create A Smile Stamps Mood Board!

Welcome to another Create A Smile Stamps challenge!  This time around we have a beautiful mood board for inspiration.  Mood boards can be tricky but just go with the flow and see where it takes you!

My inspiration came from the colours and also the shape of a circle. 


I used the Huge Polka Dot Stencil with some Hickory Smoke Distress Ink for the background.  My focal panel is a circle cut from one of the Postage Edge Circles.  I thought it would be fun to have a bright red radio so I coloured up this vintage looking radio from the Radio Rock Stamp Set. This mini stamp set is so much fun! Before foam mounting the radio onto the circle, I stamped a few of the music notes around it.


The fun sentiments come from the Small Sentiments Stamp Set and were stamped onto small speech bubbles from the Speech Bubbles Cool Cuts Die Set.  These were also foam mounted.  I added the circle panel with foam tape onto the card base, which is 4X4 inches, by the way. I added some sparkle pen and Nuvo Crystal Glaze to the radio to give a shiny, retro look!


And that's my project for you today! I hope you enjoyed and will play along with us!

Remember, you have a chance to win a €25 gift certificate to the CAS shop!  Link up your creations on the CAS Challenge Blog. We LOVE to see what you create!!

Thanks for stopping by! See you soon!

Laurie


Wednesday, September 4, 2019

New Create A Smile Challenge!!

Welcome back! It's the beginning of September, can you believe it?? Where is this year going and why is it in such a hurry?  I say that every fall because I cannot stand winter. Especially, the Canadian Prairies winters. I've lived her all my life and I still can't get used to them!  But enough rambling about the changing seasons...it's time for another CAS Challenge and this week we have a sketch!


It's a clean and simple design that you can make not so clean and simple if you'd like!  I followed the design pretty much to a tee this time.


To create the hexagon shapes, I used the Hexagon Web Stencil. This is a very cool stencil! I chose the size of the hexagon and then took a brush with a little paint on it and lightly traced the shape.  I carefully removed the stencil and filled in the entire hexagon.  I did two layers of watercolour to get the hard edges that I love so much and repeated 3 times.

To jazz it up a bit, I used some gold paint thinned out with water and added a generous amount of splatter! 


I decided to do some rough outlines with a black pen on the inner portion of each hexagon. This defined the shape a bit more.  I took the "hey" sentiment from the Decorated Wishes Add On Set and used Versaclair Ink in Nocturne. To make the sentiment stand out a bit more, I added a bit of a drop shadow with a white gel pen.  I cut down the panel using a stitched rectangle die and foam mounted it onto a grey, A2, top fold card base.

And that's my take on the sketch!!  

Please link up your fab creations on the Create A Smile Stamps Challenge Blog. We love seeing what you create and how the theme inspires you! Remember, you're playing along for a chance to win a €25 gift certificate to the Create A Smile Stamps Shop!!

Thank for dropping by! See you soon!

Laurie


Wednesday, August 21, 2019

Mood Board Challenge with Create a Smile Stamps

Hi everyone and welcome back! It's that time where we introduce you to a new challenge over at Create A Smile Stamps! This two week challenge is a...Mood Board!


The inspiration for my project came from the lower right image along with the colours.


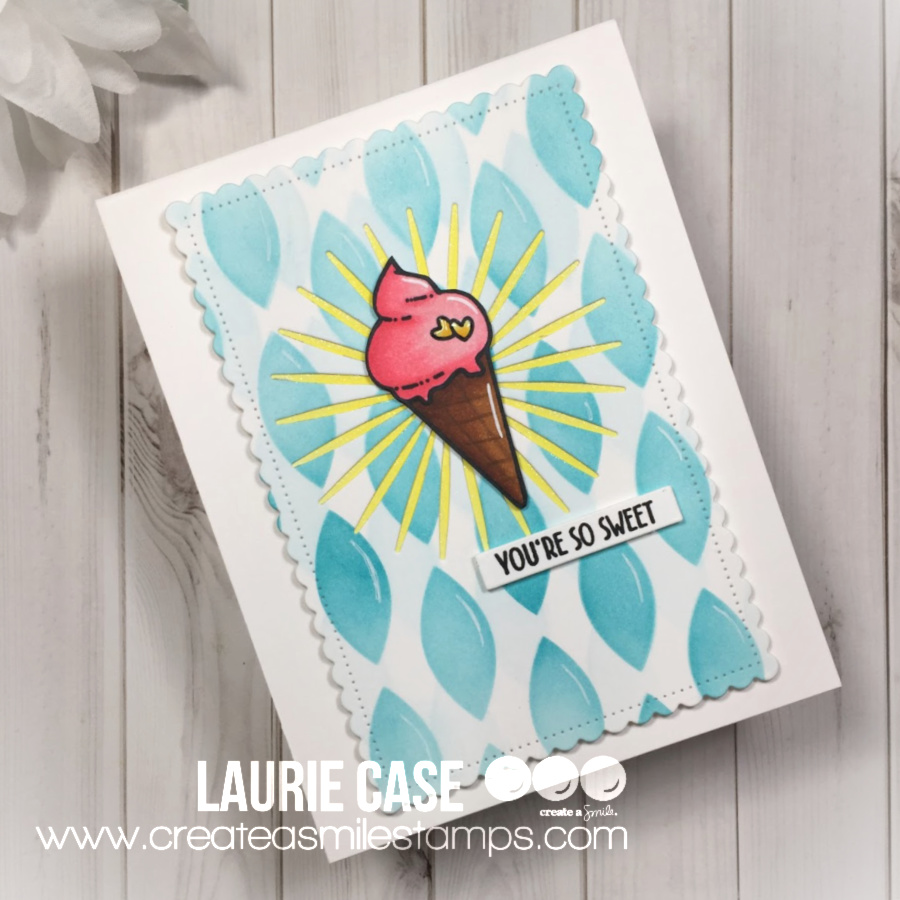
I used the Petals Stencil along with Peacock Feathers and Tumbled Glass Distress Inks to create the background. It may be hard to tell but there is two layers of ink. I inked Tumbled Glass first, shifted the stencil slightly then used the Peacock Feathers Ink. I then cut the panel down using the 2nd largest Scalloped Rectangle Die.

I coloured up that adorable ice cream cone from the A Little Treat Stamp Set and fussy cut it out. To bring in a bit more yellow, I die cut the centre of the ink blended panel with the Focal Die. I quickly added some yellow ink to a scrap piece of paper to layer behind.

I foam mounted the ice cream onto the die cut panel, foam mounted the panel to a white card base and added the sentiment, which is also from the A Little Treat set.


I hope you'll join us!! Remember there's a €25 gift certificate up for grabs!!

Thanks for stopping by!

Laurie


Wednesday, August 7, 2019

Create A Smile Sketch Challenge!

Hello, hello!! Today, is the start of another fun challenge over on the Create A Smile Stamps Challenge Blog! We have a very cool sketch for you to work with this time around!


Remember, you don't have to follow this sketch exactly! Just go with where your creativity takes you!  I, myself, followed it almost to a tee :)


I started by stamping, colouring and fussy cutting a few images from the uber cute Best Bugs Stamp Set.   I created the partial oval scene panel by partial die cutting a rectangular piece of cardstock with a circle die. But, Create A Smile has a sweet die set that creates this shape perfectly! Check out the Stacked Pierced Ovals!


Before I adhered the scene to the card base, I used the Diagonal Grid Stencil along with Spun Sugar Distress Ink to add a bit texture.  Of course, a few white gel pen details add so much!


The sentiment is from the Best Bugs stamp set. I stamped the sentiment on a white cardstock strip. I decided to layer that onto a banner die that I inked with the same pink ink. This acted like the little flag portion of the sketch!

Thank you for dropping in today! I hope you'll play along with us! Up for grabs is a €25 gift certificate to the CAS online store!!

Please visit the Challenge Blog for more details and to link up your creation!!

See you soon!

Laurie


Wednesday, July 24, 2019

Create A Smile Stamps Challenge!

Welcome to another crafty challenge from Create A Smile Stamps!  We're mixing things up a bit this time by using a Mood Board!


I was always daunted by creating from a mood board. I didn't really know what I should do with all these images!  But I finally figured out it's all in what speaks to you. The images themselves?  Or the colours? Or both?  You can find inspiration in all the photos or just one! It's all up to you:)

I found inspiration in the colours and the floral images. And this is what I came up with..


I used the fabulous Floral Decorations Stamp Set and created my own patterned paper. Instead of black ink, I used a dark brown ink to stamp the images. I coloured them in using yellow, brown and pinks.  I decided to add in a purple as well!

For the sentiment, I used the large "you" from the All About You Stamp Set. I stamped it in the same brown ink and used my purple markers to colour it in. I then painstakingly fussy cut it! To seperate it from the stamped panel, I used the 3rd largest die from the Scalloped Rectangles Cool Cuts. I stamped the sub-sentiment from the same sentiment set then foam mounted the scalloped die on top.


I used liquid adhesive to adhere the large "you".  Because there were wood veneers on the mood board, I went through my stash and found a few wooden hearts which I glued down.  I put the panel onto a kraft cardstock and called this card done!


I hope you enjoyed my take on the mood board. I cannot wait to see what you come up with!!  Remember you're playing for a €20 gift certificate to the CAS store!  There's a bunch of new goodies in the shop so a shopping spree will be fun!

Thanks for stopping by today! See you soon!

Laurie


Wednesday, July 10, 2019

Create A Smile Sketch Challenge!

Welcome back to another challenge hosted by Create A Smile Stamps!  We have a Sketch Challenge for you this time around!


I love sketch challenges. They always seem to get the creative juices flowing. What's nice about them is that they can be taken literally or you can put your own spin on them!  Wherever the idea takes you is okay!!

I made a very bright card for this challenge! Like most of us, I have a stash of patterned paper that I rarely use. But I thought some of it would go great with the rainbow colouring I did on this card.


I stamped out those gorgeous hearts from the Colour Your Heart Out stamp Set, coloured them rainbow style and fussy cut each one. I used the second largest of the Scalloped Rectangles Dies on white cardstock and arranged all those hearts according to the sketch. 


I foam mounted the rainbow hearts and used glue to adhere the two smaller hearts.  Something else I rarely do is stamp the sentiment in anything but black, brown or grey. I used a yellow ink here and love the way it looks!

The rectangle panel was foam mounted to the card base, which I covered in the yellow polka dot paper. I added 3 clear sequins to finish the card off.


Thank you for stopping by today!  I cannot wait to see your take on this sketch!  

Remember to link up your projects on the Create A Smile Challenge Blog for a chance to win a €25 gift certificate to the CAS Store!!

Laurie


Featured Post

A Simple Thanks Card

Well, well, well. Look who decided to show up...me! It's been an awful long time yet again. I seriously thought I'd be well out of t...