Showing posts with label lawn fawn. Show all posts

Friday, April 3, 2020

Sending Paper Hugs Blog Hop with Scrap N Stamp Canada!

Welcome to our monthly blog hop for Scrap n' Stamp Canada. It's such a crazy time in our world right now and we thought it would be fun to make cards with the theme "paper hug". In this particular point in time, this is the safest hug we can give!


I've used a combination of stamps and dies from different companies. But really, the star of the show is the Tall Type Alphabet from Concord & 9th!! I love this die set. I know the price can be a little daunting but it really is worth every penny. From creating custom sentiments to personalization on your cards or scrapbook layouts, a good alpha bet die is great to have.  This one, in particular is a great size. Not too big,  not too small.


I started by die cutting the "paper hugs" out of white cardstock and set them aside. The big florals are the Stitched Flower Frame and Outside In Stitched Flower Die Sets. I cut all the pieces from scrap cardstock. 

After adhering the flower pieces to the outer edges of a white card base, I decided to add some pattern to the die cut letters. I used the Playful Patterns Stamp set, also from Concord & 9th, which co-ordinates with the Tall Type Alphabet Dies. I used the Tranquil Teal Gina K Ink from the 2018 Assortment Ink Cubes to add the pattern, which just happened to match the leaves perfectly!!


I cut the letters again but this time from craft foam. I wanted to add some dimension but couldn't imagine cutting foam squares that tiny or repeatedly cutting from scrap cardstock! I adhered the letters together and down on the card using Nuvo Deluxe Adhesive.

The sentiment looked good but not exactly "finished". I went through my stash of stamps and found a sentiment in the Love Bugs Stamp Set from MFT that said "sending a smile your way". I stamped it out in the same Tropical Teal ink then trimmed around and removed the "smile" portion.


I popped up the sub sentiments well. After looking at the card, I decided to add some light grey shading with a copic marker around the flowers to try to add some faux dimension (it's very hard to see).  I used a white gel pen to add some details to the flowers and leaves and also added some white pearl accents.

I hope you enjoyed my project for today and I encourage you to create and send a "Paper Hug" to someone special!

(**affiliate links used at no cost to you. If you order through any of the links, I receive a small commission which I'm very grateful for so, thank you!

PRIZE ALERT:

One lucky commenter will win a $50 gift certificate to the SNS shop! So, please leave a little love at each stop to increase your chances of winning!  Good luck! You have until April to leave a comment and the winner will be announced on the SNS Blog. Along with the chance to win the gift certificate, every order placed this weekend will receive the Paper Hugs stamp set fromPicket Fence Studio for FREE (while supplies last).

FACEBOOK CHALLENGE:

You can also participate in the challenge on our Facebook Page which you can find HERE. We also have a fun, new challenge up on this page!! It's called the 30 Days of Cardness Challenge and we're hoping you'll play along! Everyday this month, we'll give you cue words to help fire up your mojo!!

BLOG HOP LINEUP:

Kia

See you soon!

Laurie

Friday, December 6, 2019

SNS White Christmas Blog Hop ft. Lawn Fawn!

It's time for our last Scrap N Stamp Blog Hop for 2019!! Wasn't it just July a couple of weeks ago?!


We have a fun and easy theme for you this time around...White Christmas!  The focus is to create a mostly white project. I love the white on white look with a little pop of colour. This can give a fun or elegant look. I went with a cute and fun card!


The star of the card is that adorable narwhal!  He's from the mini set, Winter Narwhal, from Lawn Fawn. I coloured him up with a combination of Copic markers: C3, C2, C1 and the colourless blender. This gave just a hint of grey. For my pop of colour, I coloured up his scarf in green. My favourite combination is: G07, YG25 and YG03.

The background was created by cutting one circle out of white cardstock, then running it through with the Polka Heart Background. I then cut a white piece of cardstock using the second largest Fancy Scalloped Circle Dies (Lawn Fawn).  Before adhering the two circle together, I used a light blue ink on the scalloped circle. This is faint, but shows through in a few areas.


I fussy cut the narwhal and foam mounted him onto the heart panel.  Then sentiment comes from the Winter Wavy Sayings Stamp set and was stamped onto one of the Simple Wavy Banners dies, which I also popped up.

I decided to use a few of the die cut hearts, colour them in the same shades of green and inlay them back into the heart background. This added a bit more colour and acted as embellishments!  I added some Nuvo Shimmer Pen to the scarf, the hearts and his horn then a layer of Nuvo Crystal Glaze to give a lot of shine!


We can't wait to see what you create so make sure to upload your creations to the Scrap N Stamp Challenge FB Page!!

PRIZES!
By leaving a comment on each stop of the hop, you have a chance at winning a $50 gift certificate to the SNS Online Store!

GIVEAWAY!
Scrap N Stamp is giving away a $50 gift certificate to one lucky commenter! Just leave a little love on each stop of the hop and you'll be entered to win!! Winner will be announced on the SNS Blog on December 18th! Not only that, but SNS is also giving away a free gift through the online store!

There is no minimum purchase to get this snowflake die but shipping will be added. Just "add to cart" and checkout!! While supplies last! Not valid with any other coupon, sale or promotion. You can find this die HERE!


Here's the complete blog hop lineup:

Laurie (that's me!)
Susan

Thanks for stopping in! Enjoy the rest of the hop!!

Laurie

Friday, October 4, 2019

Let's Get (Di)Stressed Blog Hop with Scrap N Stamp Canada!!

Welcome back, my friends!  It's time for our monthly blog hop for the Scrap N Stamp Canada Store!  This is a fun one! We are "Di-stressing" with Distress Oxide Inks!!


I love my original Distress Inks but the Oxides with their pigment ink properties can be a whole lot more fun sometimes! I've tried a lot of techniques with them but I know there are tons more. Today, I'm going to share my favourite with you and that's using Distress Micro Glaze and Glossy Cardstock to create some amazing backgrounds!

I used Seedless Preserves, Chipped Sapphire and Shaded Lilac Distress Oxides, watered down.  You can apply the inks any way you'd like. I did one panel using a paint brush, the other with the smooshing technique.


The one on the left is with the paintbrush, the right one is smooshed. The key here is to work in layers, especially when smooshing.  I applied one colour, heat set, applied another colour and so on.  After each panel was dry, I flicked some clean water to create some droplet effects.

Now, this is where the magic happens. While the panels are beautiful, they appear dull and chalky.  the Distress Micro Glaze magically brightens things up making the colours super vibrant!


I use a regular blending tool and foam to apply.  It does not take much!!! Just a light dab into the container and there's enough for both panels!!


Above the line is where the glaze was applied. Just look at how that purple pops!! Isn't it fabulous?!  What's also great about the Micro Glaze is that is waterproofs your project. So anything underneath won't run, bleed or get reactivated.  After applying the product, simply wipe any excess off with a paper towel.

I used the smooshed panel as I thought it looked galaxy-like.  So, I added some white, acrylic paint splatters to enhance that effect. And to make it even more sky looking, I used a bunch of stars and constellations from the Upon A Star Stamp Set and co-ordinating dies from Lawn Fawn (sorry, this set is not in stock at the moment!).


I used Versamark Ink along with Silver Embossing Powder. The Glossy cardstock embosses beautifully. Just make note that it is a slippery surface so your stamp will want to slide around!

I layered the panel onto a shaped card base made from die cutting two of the largest Fancy Scalloped Rectangle Dies (also, Lawn Fawn), scoring one panel approximately 1/2 inch from the top, applying adhesive and adhering the two panels together.


There is so much detail in all that ink plus the white paint splatters really stand out!


And to keep the sparkle going, I added a few clear sequins!  I hope you enjoyed reading about my favourite Oxide technique!  

Remember, you can show us your favourite technique over on the SNS Facebook Challenge Page! We love to see what you create!

The Scrap N Stamp Store is giving away one $50 gift certificate to one lucky commenter at each stop of the hop so make sure to leave some love!! Also, all things Oxide, including the new sprays will be 10% off with the code OXIDE10.. ends October 6th!! Fine Print:  Not valid with any other coupon, sale or promotion. Valid on in stock items only.

Here's the complete hop lineup:

Laurie (me!!)
Nancy E
Chala

Thanks for joining us this time around! Have fun hopping!

Laurie

Friday, August 2, 2019

Pop 'N Hop with Scrap 'N Stamp!!!

Welcome back to our monthly blog hop for Scrap 'N Stamp Canada!  We are playing with a cool new product that's available in the shop right now!!


The design team have all made pop up box cards today made using kits from The Paper Cut. This line of products lets you create fun, interactive cards without investing in pricey dies! These kits include all pre-cut cardstock, in all the pieces you need!  Some of the kits available are the Pop Up Box, Triple Mini Window Card, Swingin' Z-Fold Card, Stair Step Card, Graduation Cap Card and even a Slider Card! I should also mention that some of these kits come in different sizes and colours!

I personally don't own any box card die sets.  I don't make many interactive cards such as these, so investing the money just doesn't make sense.  BUT, with that being said, if you've been on the fence on buying any of these die sets, I would suggest playing with one of The Paper Cut kits. This will give you some sort of an idea on how often you would be creating these specialty cards!

Anyway, enough chit chat! Let's have a look at what I made for you today!


I used the Square Pop Up Box Card kit in white.  Assembling the box was as easy as adding two strips of Scor-Tape to tabs. The part that took the longest was trimming out all the patterned paper to adhere to the flaps.  I used an older Lawn Fawn paper pack for that!  I have to admit the dimension of the little scene is pretty awesome!


I used the adorable Happy Village Set (unfortunately, out of stock at the moment) and its co-ordinating dies. I love this set and get a lot of use out of it! I coloured everything up with my alcohol markers.


I used an extra house for the front flap of the card along with a sentiment from the Wavy Sayings Stamp set which was stamped onto one of the Simple Wavy Banner Dies.


This flattens completely and fits into a 6X6 square envelope.  You would add your sentiment on the back of this card.  I want to apologize for these photos. Like I said, I rarely make such dimensional cards so I'm used to flat lay photography :)

I hope you enjoyed my project for this hop!! You'll find the full blog hop list below!


GIVEAWAY!!

One lucky commenter will receive a $50 gift certificate to the SNS online store!! The winner will be announced on August 15, 2019 on the Scrap N' Stamp Blog. So, leave a little love on each stop to increase your chances of winning!!

FACEBOOK CHALLENGE

Today, also starts a new challenge on the SNS Facebook Page and the theme is 3-D cards or cards that POP!! We hope to see your creations!!

Thank you for hopping along with us today! Remember to leave a comment by August 14th!!

Friday, May 3, 2019

Floral Frenzy Blog Hop with Scrap N' Stamp Canada!!

Welcome to this month's SNS Blop Hop where the theme is FLORALS!!  What better way to celebrate the arrival of spring than with lots of lovely blooms?!


I love cardmaking with floral images. They are always so much fun to colour, especially watercolour!  For my project today, I didn't use any images. I chose to combine watercolour with die cutting.  


I used the recently released Outside In Stitched Flower along with the Stitched Flower Frame Dies to create my bright and happy card!  I die cut all the pieces out of Bristol Paper and used Spiced Marmalade, Mustard Seed, Crushed Olive, Peeled Paint and Picked Raspberry Distress Inks to add some messy colour.

For the white backdrop panel, I used an embossing folder that gives a corrugated look and simply tore around the edges.


The card base is 5 X 4 inches. I wanted some of the flower and leaves to hang off the edge and still have the card fit into a standard envelope.  The card base is made out of Sticky Note cardstock (also from Lawn Fawn) and is available in the Sherbert Pack. For the sentiment, I used the Simple Wavy Banners Dies along with the Wavy Sayings Stamp Set.  I die cut a banner from the same yellow cardstock as well as white.  I stamped the sentiment on the white banner with Versafine Black Onyx Ink then snipped the ends of the yellow banner and layered them underneath.  


I just love that sweet smiley face with the rosy cheeks!  I added some Nuvo Crystal Glaze to the cheeks for a bit of shine. To finish off the card, I added a some Onyx Black Crystals.


Thank you so much for hopping along with us today!!  Remember to visit the SNS Challenge Page on Facebook where you can enter your flowery project!!

GIVEAWAY!!

Scrap N' Stamp is giving away ONE $50 gift certificate to one lucky winner!  All you have to do is leave a comment on each stop of the hop for your chance to win!!

BLOG HOP LINEUP:

Laurie (that's me!)


Friday, April 5, 2019

"Background Check" Challenge and Blog Hop for Scrap 'N Stamp Canada

Welcome back, friends!!  Today is the start of another challenge for Scrap 'N Stamp Canada!  It's all about backgrounds!  The door is pretty wide open here...you can use a background stamp, use multiple images to create a background, ink blend, watercolour or use a stencil. The sky's the limit on this one!!


For my project, I decided to create my own stencil using a cover die AND trying out my new Life Changing Blending Brushes from Picket Fence Studio!! I was so excited to see that the SNS Store started to carry this line of stamps and dies!  The process took a bit of a turn about halfway through this card so let's take a look!!

I started by stamping, colouring and fussy cutting a few images from the Stuck On You Stamp set from Concord & 9th.


I decided to create my own stencil for the background of my card.  I used the Polka Heart Background Die from Lawn Fawn.  I die cut it out of printer/typing paper.


Initially, I thought I wanted a green heart background to co-ordinate with the cacti so I used a medium blending brush along with Twisted Citron, Crushed Olive and Peeled Paint Distress Inks. These brushes work awesome with stencils!!  I did try to do some direct ink blending without a stencil, and I just couldn't get the hang of it with these brushes. I also noticed quite a bit of wrist fatigue as well :(.  At this point, I would highly recommend these brushes for stencilling and small areas but personally, I'll continue to use the Ranger Ink Blending Tool for full backgrounds. 


You can see the nice blend these brushes create! And I was surprised at how well the ink cleaned off! I simply rubbed it onto a paper towel before each colour change.  And I did change the colour theme here!!  I just flipped over my home made stencil and used Worn Lipstick Disress Ink.


After I was done with the ink blending, I used a Wonky Stitched Rectangle Die to cut down the panel. I love the way it turned out!


Now it was just a matter of putting all the elements together!!  I used foam adhesive to adhere all my potted cacti onto the panel.


I should mention that I did a bit of paper pieces on the flower pots using some scraps of patterned paper in my stash.


I wanted to keep the card fairly CAS so I didn't add much else to it.


I love the soft blend these brushes gave and would definitely recommend them!

Just so happens, that for this weekend only, Scrap 'N Stamp is offering 20% off the Picket Pence Brushes when you use the CODE: BRUSH20!!

PRIZES:

There will be eight (8) grab bags along with one (1) $50 gift certificate to the SNS Store!  Now, those are some awesome prizes!!  All you have to do is leave some love at each stop of the hop for your chance to win!

CHALLENGE BLOG:

Remember, to enter your project on the SNS Challenge Page for another chance to win!!

BLOG HOP LINEUP:

Laurie (that's me!)

Thanks for hopping along with us today!!

Laurie


Friday, February 15, 2019

"Some Like It Hot" Blog Hop with Scrap N' Stamp!!

Welcome to our monthly blog hop and challenge!! The theme this month is "Some Like It Hot" with the idea of hot beverages in mind!!  There has been so much inspiration posted on the SNS Challenge Page already so I hope you'll check it out!!  There's prizes to be won and a special discount code posted there, as well!!


This was a fun card to make!! I, myself, LOVE coffee but have been known to indulge in a latte from time to time!  I combined a bunch of Lawn Fawn products on my card today, so let's take a look!!


The main focus of the card is the adorable mugs from the Thanks A Latte Stamp Set. But to jazz them up a bit, I did some simple masking and stamped the beautiful floral image from the Simply Celebrate Stamp Set. This gave the mugs such a great pattern!!  I used some of the lightest shades of my Tombow Dual Brush Pens for the colouring.  


I added some glitter to flowers, leaves and also the "whipped cream" on the smaller mug using the Clear Wink of Stella Pen. For the "froth" stamp on the coffee, I used a slow drying brown ink and added clear embossing powder. I love the shine and dimension it gives!!

After the images were coloured, I used the co-ordinating dies to cut them out.  I cut a circle out of Strathmore Mixed Media paper (the same paper I used for the mugs) with a circle die.  Using the same pink marker as I used for the large flowers, I did a bit of ink smooshing onto the circle.  I scribbled the marker onto a plastic sandwich bag, spritzed with water and pressed it onto the die cut. To add a bit more flair, I layered the smooshed circle onto a Fancy Scalloped Circle Stackables (the largest one)which was cut out of plain white cardstock.


Before adhering my focal piece, I decided to use an embossing folder on my kraft card base.  This is the Diagonal Stripe Embossing Folder from Taylored Expressions and it is awesome!!

The sentiment comes from the Thanks a Latte set and was stamped onto a banner.  Of course, I just had to add the smiling heart!! A few clear sequins and this card was done!!


I love the way this turned out and I hope you do too!  Even though this may be on the feminine side, I gave it to my husband yesterday :)

Here is the full blog hop list:

Me (you are here)

And don't forget about leaving us each some love for the chance to win a fabulous prize!!!! We will be giving away 9 prizes in total!!  There will be 8 "some like it hot" prize packs and 1 $50 gift certificate to the SNS store. Winners will be chosen at random. Good luck!!

Thank you so much for hopping along with us today!

See you soon...

Laurie


Saturday, August 25, 2018

Shake Up Summer Blog Hop with Scrap 'N Stamp Canada!!

Hello and welcome back!  Are you ready to shake things up a bit?  Today Scrap 'N Stamp is having a blog hop featuring SHAKER CARDS!


I will admit that I do not make a lot shaker cards. Why? I'm really not sure. They are not that hard to make and are always so fun to give out.

Sit back, relax and enjoy all the incredible shaker cards made by my team mates! Please stay tuned until the end of this post for details on prizes, because what's a blog hop without prizes :)!

There are tons of products on the market that make constructing shaker cards super easy. These include dies with co-ordinating "pouches" for all your shaker bits and pieces. Tonic Studios make a bunch of different shaped sets including a circle, balloon, star and heart.  These sets come with the die AND 5 pouches and are really affordable. These products eliminate the use of acetate which can be a bit frustrating to use!

Now, after all that being said, I actually went "old school" and created my shaker using acetate (shakes head).  While these sets are fantastic, I wanted a bit more room for all my shaker bits and pieces.  I started by stamping and die cutting all the images from the More Rustic Wildflowers set from MFT.


I lined up all the stamps on my Misti by using the dies as a guide. Once everything was stamped, I was able to die cut everything with one pass!


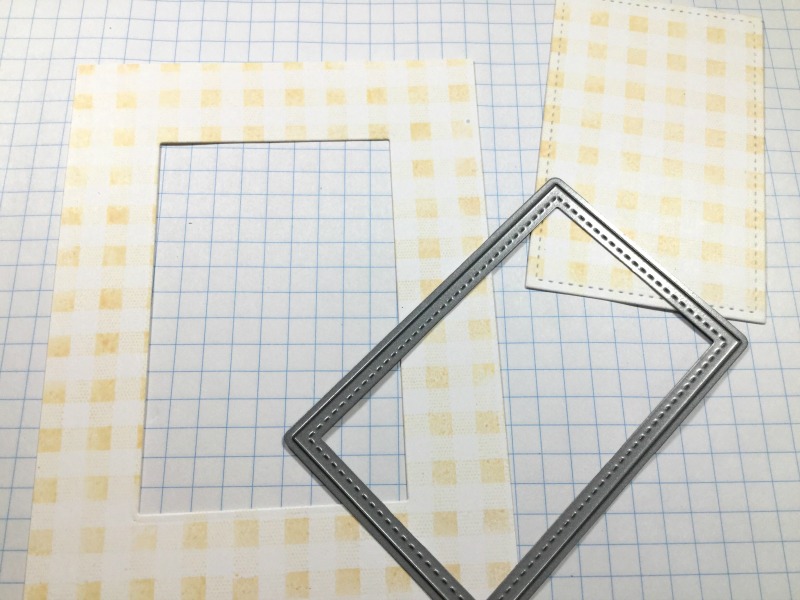
Next, I stamped a panel of white cardstock with an old Gingham Background Stamp but you could use any stamp or patterned paper for this.  To create the window for my shaker, I used one of the Stitched Rectangle Dies from Lawn Fawn.


To make the window a little prettier, I made a frame out of white cardstock using this same die as well as one die larger from the Fancy Scalloped Rectangle Dies from Lawn Fawn.


By nesting the two dies together and running them through your die cutting machine, you will end up with a frame that fits perfectly around the window!


I trimmed a piece of acetate and adhered it to the back side of this panel. Any plastic packaging will work for this.  To create the "well" for the bits and pieces, I placed a border of foam tape around the edges of the plastic.  I use this foam tape.


Before adding the sequins, I wanted to line up my sentiment stamp which will be on the card base itself.  I did a dry run on the placement of all my flowers and lined up the sentiment on my Misti.


The sentiment comes from the beautiful Choose Happy Stamp Set from Penny Black and I stamped in Versafine Clair Nocturne Ink.

Now it's time to add all the sparkle and shine. I used an old sequin mix plus some Nuvo Confetti Crystal Cloud Circles.  Here's a little tip:  after removing the lining from the foam tape, add another layer of acetate, this will make it heaps easier to line the shaker panel on your card base. You can flip it over and nothing will spill out!!!


I may have overdid it on the sequins as you have to give it quite a shake to see the full sentiment.


I placed my little floral arrangements is opposite corners using a combination of Nuvo Deluxe Adhesive and foam squares.


I'm really happy with the final outcome and had heaps of fun creating this card!!  Just wait until you see what the other designers came up with...you'll be blown away!!

Here's the full blog hop line up:

Laurie (YOU ARE HERE)

PRIZES!!!

Scrap 'N Stamp Canada is giving away ONE Tonic Die and Shaker Set to one lucky commenter on each stop of the hop. There will also be one set given away on the Scrap 'N Stamp Facebook Page! That's SEVEN in total!!  So please leave some love on each of our posts for a chance to win one of these amazing sets!  Winners will be announced on Saturday, September 1st on the SNS Blog!  Good Luck!!

SALE!!

All Shaker Windows are 20% off right now!!

Thank you so much for hanging in there with me. I know this post was a bit lengthy :)

See you soon and happy blog hopping!!

Laurie


Featured Post

A Simple Thanks Card

Well, well, well. Look who decided to show up...me! It's been an awful long time yet again. I seriously thought I'd be well out of t...