Showing posts with label design team. Show all posts

Monday, August 27, 2018

Made In Minutes with My Creative Time

Hello, my crafty friends and welcome back to another "Made In Minutes"!!  I honestly need to start timing myself for these posts to prove how quickly some of these projects come together!

My Creative Time (Emma) is known for all their amazing packaging and treat holder dies, so I decided to use one for my project today.  Before starting on Emma's Design Team, I never made any sort of 3-D project or treat holder. I always found them too intimidating with all the measurements, cutting and scoring.  But all of these dies take all the stress right out of it!!

I used the Mini Gift Box Die.  This is a fairly new die to the shop and as I'm writing this post, it's currently out of stock so I do apologize!! But never fear, they will be back in stock shortly!!

I cut the die out of 80lb white cardstock. It cut, scored and folded beautifully!


There is a cut on each of the corner flaps. These create little tabs that simply fold into each other.


You don't actually need any adhesive for this little box to stay together. I did add a couple strips just so the side flaps would stay up, but again, not necessary.

I measured the area inside the stitched detail lines on all four sides to create some layers with patterned paper.


1.25 inch squares worked perfectly which I added to all sides of the box.

So cute!! As you can see, I cut a small circle using the Bunch of Fun Circle Dies and also used the Lower Case Fun Dies to cut out the letter "c" to personalize the box a bit more.


To give you an example of what can fit in these gift boxes, I placed a package of sequins along with a jar of Perfect Pearls.  There is definitely room left over!!


All that's left to do at this point is add my little monogram and tie it up with a piece of ribbon!!


This little box is so stinkin' cute!  


Just think of all the ways you can personalize this box or decorate it for every season!! Or how great would these be for birthday or wedding favours??!! 


Now I promise you that this was literally made in minutes. About 10 actually!  The hardest part was tying the silly ribbon!!

Thank you so much for stopping in today. I appreciate your visits!

Until next time...stay crafty!!

Laurie


Saturday, August 25, 2018

Shake Up Summer Blog Hop with Scrap 'N Stamp Canada!!

Hello and welcome back!  Are you ready to shake things up a bit?  Today Scrap 'N Stamp is having a blog hop featuring SHAKER CARDS!


I will admit that I do not make a lot shaker cards. Why? I'm really not sure. They are not that hard to make and are always so fun to give out.

Sit back, relax and enjoy all the incredible shaker cards made by my team mates! Please stay tuned until the end of this post for details on prizes, because what's a blog hop without prizes :)!

There are tons of products on the market that make constructing shaker cards super easy. These include dies with co-ordinating "pouches" for all your shaker bits and pieces. Tonic Studios make a bunch of different shaped sets including a circle, balloon, star and heart.  These sets come with the die AND 5 pouches and are really affordable. These products eliminate the use of acetate which can be a bit frustrating to use!

Now, after all that being said, I actually went "old school" and created my shaker using acetate (shakes head).  While these sets are fantastic, I wanted a bit more room for all my shaker bits and pieces.  I started by stamping and die cutting all the images from the More Rustic Wildflowers set from MFT.


I lined up all the stamps on my Misti by using the dies as a guide. Once everything was stamped, I was able to die cut everything with one pass!


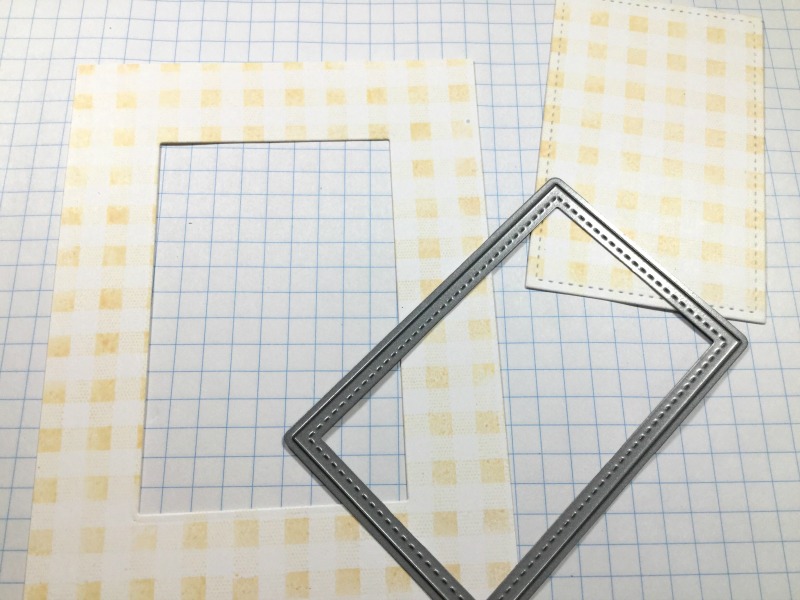
Next, I stamped a panel of white cardstock with an old Gingham Background Stamp but you could use any stamp or patterned paper for this.  To create the window for my shaker, I used one of the Stitched Rectangle Dies from Lawn Fawn.


To make the window a little prettier, I made a frame out of white cardstock using this same die as well as one die larger from the Fancy Scalloped Rectangle Dies from Lawn Fawn.


By nesting the two dies together and running them through your die cutting machine, you will end up with a frame that fits perfectly around the window!


I trimmed a piece of acetate and adhered it to the back side of this panel. Any plastic packaging will work for this.  To create the "well" for the bits and pieces, I placed a border of foam tape around the edges of the plastic.  I use this foam tape.


Before adding the sequins, I wanted to line up my sentiment stamp which will be on the card base itself.  I did a dry run on the placement of all my flowers and lined up the sentiment on my Misti.


The sentiment comes from the beautiful Choose Happy Stamp Set from Penny Black and I stamped in Versafine Clair Nocturne Ink.

Now it's time to add all the sparkle and shine. I used an old sequin mix plus some Nuvo Confetti Crystal Cloud Circles.  Here's a little tip:  after removing the lining from the foam tape, add another layer of acetate, this will make it heaps easier to line the shaker panel on your card base. You can flip it over and nothing will spill out!!!


I may have overdid it on the sequins as you have to give it quite a shake to see the full sentiment.


I placed my little floral arrangements is opposite corners using a combination of Nuvo Deluxe Adhesive and foam squares.


I'm really happy with the final outcome and had heaps of fun creating this card!!  Just wait until you see what the other designers came up with...you'll be blown away!!

Here's the full blog hop line up:

Laurie (YOU ARE HERE)

PRIZES!!!

Scrap 'N Stamp Canada is giving away ONE Tonic Die and Shaker Set to one lucky commenter on each stop of the hop. There will also be one set given away on the Scrap 'N Stamp Facebook Page! That's SEVEN in total!!  So please leave some love on each of our posts for a chance to win one of these amazing sets!  Winners will be announced on Saturday, September 1st on the SNS Blog!  Good Luck!!

SALE!!

All Shaker Windows are 20% off right now!!

Thank you so much for hanging in there with me. I know this post was a bit lengthy :)

See you soon and happy blog hopping!!

Laurie


Friday, August 17, 2018

CAS-ual Fridays Challenge #206

Hey friends! Welcome back! Today is the start of a new challenge on the CAS-ual Fridays Blog!!  We are making projects with a Back To School Theme. I cannot believe it's that time, summer always flies by.


I have a niece going into Grade 11 so this card is for her.  I used the Flower Power Stamp Set (which is one of my faves!) 


The plan for this card started out completely different than the way it ended up.  I stamped the You Rock with Barely Beige ink from Simon Says Stamp.  I originally thought I would do no-line colouring on these letters but my skills are what you'd call...lacking. So after the colouring was done, I decided to rest restamp in Versamark Ink and gold heat emboss.  


I heat embossed "truth is" which is from the Truth Is Stamp Set also in gold and foam mounted the strip in between the focal sentiment.


The embellishments are made using the Fun-Fetti Fri-Dies cut from gold cardstock which I made using Versamark and gold embossing powder.

On the inside of the card, I stamped an encouraging sentiment also from the Truth Is Stamp Set.


I hope you find some inspiration today and don't forget to link up your creations to the CAS-ual Fridays Blog for a chance to win an amazing prize!!!


What are your playing for? 10 winning entries will be highlighted on this blog each Thursday before a new challenge is set to go live the next day.  In addition, Michele has generously offered up a $25 gift certificate to the overall winner at CAS-ual Fridays Stamps. And if that weren't enough, if the chosen winner has used CAS-ual Fridays stamps and/or dies as the main focus in the card, that gift certificate will increase to $50. 

Thank you for stopping by today!!  I'll see you soon!!

Laurie


Thursday, August 9, 2018

Birthday Palooza with My Creative Time!

Hello and welcome back!! It's time to make a birthday card using products from My Creative Time!!  I chose to make a sewing themed card using stamps and dies that were released last month!!

I started by stamping, colouring and die cutting a couple of images from the You're Sew Special Stamp and Die set.  This is a fab set to make cards for all your sewing friends!


I stamped a background panel in a light grey ink using the various small images from the set.  I foam mounted my coloured images to the panel as well as the sentiment. The sentiment was stamped on one of the Ribbon End Dies.  I thought it would look cute to tie some bakers twine around the banner.


The stamped panel was adhered onto the largest of the More Stitched Rectangular Dies and then onto a white card base cut to the same size.  A few clear sequins, shimmer pen and Nuvo Crystal Glaze finish of this fun card!!


Thank you so much for stopping in today!!  I hope you found just a wee bit of inspiration :)

Until next time...stay crafty!!

Laurie


Sunday, August 5, 2018

First Project For The Ink Road Stamps!!

Hello and welcome!! I am so excited as my first official Design Team project for The Ink Road is live!!  If you aren't familiar with Lara's stamp and dies, you must check out her shop!!  The stamps are so amazing!!  Totally unique and something you won't see anywhere else!!!


Beautiful florals, trendy stripes and a quote from "Friends" in stamp form...what is better??

Please check out The Ink Road Blog for all the details and products used on this card!  And while you're at it, check out the shop...you won't be disappointed!

Thanks for stopping in!  I'll be back soon!!

Laurie

Thursday, August 2, 2018

CAS-ual Fridays Challenge #205!!

It's that special Friday when a new Challenge starts for CAS-ual Fridays!!  I love being a part of this team as it challenges me as well, which we all need sometimes!!  For the next two weeks, it's all about.....


Pattern stamping! This is very popular right now. And a whole lotta fun!  Here's what I came up with...


I actually made this for my husband for our anniversary!! I thought by leaving the majority of the card in black and white it would have a masculine feel. Even though there are tons of flowers on it!!  I haven't given it to him yet so I'm not sure how well it will go over, hahaha!

That gorgeous floral "love" comes from the Flower Power Stamp set which is one of the best stamp sets ever!!


The sentiment is from the Heartfelt Saying Set and was stamped on a white cardstock strip and matted with black to make it stand out a bit better from the background. It may be hard to tell, but I added a drop shadow to the background stamping to help it pop off the white cardstock a bit.  Unfortunately, I ran out of my C1 Copic and had to use C3 which I had a hard time blending out.


For a little pop of colour, I added red to all the hearts. As well as Glossy Accents :)

Remember to visit the CAS-ual Fridays Challenge Blog to link your creations up!! You're playing to win a $25 gift certificate to the CAS-fridays shop BUT if you are the winner and you've used CAS-fridays products, that gift certificate doubles to $50!!!!


Thank you so much for visiting today!! Good luck and have fun with this challenge!!

Laurie


Tuesday, July 31, 2018

Tag It Tuesday with My Creative Time

Welcome back! So happy you're here!  I love Tag It Tuesday because tag dies are so versatile!  You can use it as intended, as a tag, you can place the tag onto a card base for a fun design element or you can even make the tag into a card itself!  So many possibilities!!

Today, I made a tag with a fold. Not quite a card but almost.  I started by die cutting the fourth largest tag dies from the Chunky Stitched Tags Die Set. I then used this die cut as a template to create what will be the back portion.


The back flap is approximately 3/4 inch longer than the front.  I made a score line on the back flap before adhering the two pieces together which will make it open easier!


This particular set of dies does not have the hole portion as part of the die so I used a hole punch. 


Now what worked amazingly well as the reinforcement of the hole was the little donut die from the Just Brew It Stamp and Die Set ! How's that for luck??  I cut and decorated a bunch of cookies from the Baked With Love Stamp and Die Set to decorate the front of the tag.


Before sticking everything together, I decided to add a decorative border along the edge of the front flap.  I used the scalloped die from the More Stitched Edges Die Set to cut a piece of red cardstock.


I think this finished the edge nicely.  I silver embossed the sentiment and adhered all the cookies onto the front of the tag.


I stamped "Thinking of You" on the inside of the tag which comes from the Mini Spring Greeting Stamp Set.


And that's my tag for today!!  Really easy and fun to make!


Thank you so much for dropping in today!!

Until next time...stay crafty!!

Laurie


Thursday, June 7, 2018

A Little Announcement!!!

Hi friends!!  I have some exciting news to share with you today!!  I've recently joined the Design Team for Scrap N' Stamp Canada!!!  This is an online retailer of all my favourite crafty supplies in Canada including My Favourite Things, Lawn Fawn, Concord and 9th and many more!!

I wanted to share a quick project made using supplies that can be purchased in the shop!! I think this card shows what my style of cardmaking is.  Clean, simple and hopefully, cute!!

One of my favourite stamp sets from Hero Arts is the Believe in Yourself Narwhal set. The images are just so cute and the sentiments are perfect for any sort of encouragement card!!


I did some quick colouring with Copic markers and used the co-ordinating dies to cut out the images. For the background, I used the Sunrise Radiating Rays stencil from MFT along with Tattered Rose, Worn Lipstick and Seedless Preserves Distress Oxide Inks.  I really wanted a bright, contrasting colour to the warm grey of the narwhal.


The "ocean" part of the ink blending was done in Broken China Distress Oxide Ink. I added some Glossy Accents to a few areas on the images to give some dimension and shine!


And some Nuvo Jewel Drops in the colour Sea Breeze finish off this card!!  I love to create simple scenes like this where the focal image "pops"!!

I am so excited and happy to be a part of this team and can't wait to showcase products that are available right here in Canada!!!

Thank you for stopping by today!!  See you soon!

Laurie


Saturday, March 10, 2018

Stretching the use of your Dies!

Hi everyone and welcome!! I'm here to share a rather long post with you.  I tried my best to compress as much information into this post without boring you or losing you halfway!!  I hope you'll stick with me because this is a fun one!!

It's all about "thinking outside the box" when it comes to your dies.  I don't know about you, but I have quite the stash!  It was so fun to go through my CDD dies and come up with something different!  Let's get to it, shall we??

What I'm showing you today is nothing new. It's a technique that has been around for awhile. It's called Punch Art.  This is where you create different characters or critters out of paper punches.  In this case, we're using our dies.  Before I got started, I sketched out the basics of what I wanted to do.


I am a fantastic artist, lol!!!  You will notice that the girl in my sketch and what I ended up with are completely different. But that's okay because all the same dies were used :).  Before actually cutting up good cardstock, I die cut everything out of copy paper and arranged the pieces to see how things would look and to see if I needed to add or take away anything.


When I was happy with the layout of each, I started die cutting the cardstock. Let's make the bunny first!  I cut the smaller scalloped circle from the Stitched in Circles Die set out of white cardstock, this would make the face. For the ears, I used the second smallest oval from the Fancy Stitched Label Dies for the base of the ears, and the smallest oval for the "inside" of the ear.

Before adhering anything together, I added a bit of colour with Tattered Rose Distress Ink to the inner ears and also a bit on the scalloped circle to give a bit of a blush.


I didn't want round shaped eyes as I knew the nose was also going to be round. After going through every CDD die set I have, I settled on one of the tiny elements from the Scene Builder Dies.  I cut those out of black cardstock.  The nose is from the stars/circle confetti die from the Pocket Pieces Hello Dies.  I cut this from white cardstock and added more Tattered Rose.


My bunny was really starting to take shape at this point but I felt it needed a little something more.  So I die cut another of the same scalloped circle I used for the head, then took one of the Stitched Scalloped Dies and partially cut that circle down.


This created the look of puffy fur and added a bit more dimension. All that was left to do was glue everything together and add some whiskers!


Oh yeah, and what bunny doesn't need a sweet little bow??  The bow is from the Shaker Tags Die Set and is just the cutest thing, ever!!  I foam mounted this cutie onto some grey cardstock that I adhered the largest of the Inside Scalloped Rectangle to. Then everything was put onto a white card base.


The sentiment comes from the JellyBean Kisses stamp set and was heat embossed in white.


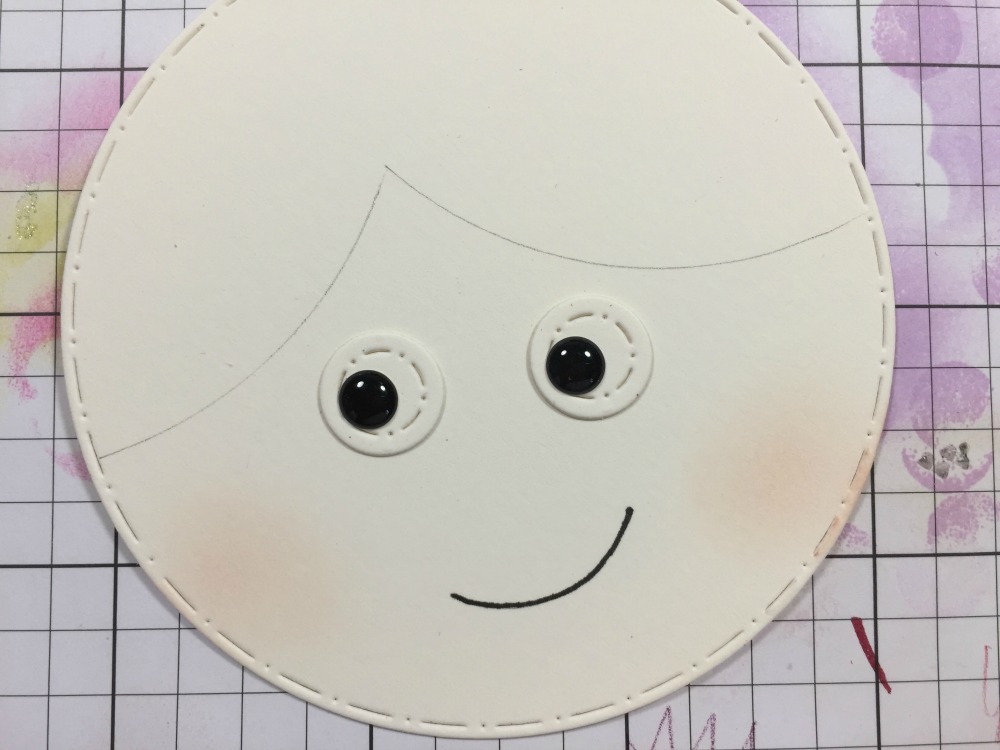
Now, let's take a look at the little girl!  The majority of this one was made using the Stitched in Circles Die Set!!  I used the largest plain, stitched circle die in this set and cut it from some Ivory cardstock.  I added some blush to the "cheeks" using the Tattered Rose ink.


For the eyes, I used the small circle die in the Inside Scalloped Rectangle Dies and added a black enamel dot to each.  I used a black marker to draw the smile.  The pencil marks you see are going to be where her "bangs" are and were a guide for eye placement. 

The bangs were made by cutting the same circle die out of kraft cardstock and partially cutting two pieces.  It's so hard to explain so here's a photo..


Whats inside of the die will cut and give you a pointed oval shape. I did this twice making one a bit larger. The rest of her "hair" was made using the largest scalloped die in the Stitched in Circles Set with kraft cardstock as well.  I trimmed off the bottom of the die cut with scissors to give it a bob haircut appearance!


I created a shirt for her using some patterned paper from the Kraft in Colour paper pad, also by using the large stitched circle die.  To create a bit of interest, I used one of the elements from the Shaker Tags Die Set to give a ruffle look.


The small ivory circle will be used to create a little neck and the flowers are from the Crazy Stitched Frame Dies and will act as accessories ;)!

All the pieces were adhered using liquid glue. This created one large piece that I was able to foam mount to a white, top fold card base.


Here, you can see the ruffle detail on her shirt!  I think she turned out super cute!


The sentiment comes from the Say It Big stamp set.  I just love how cute those flower look!


Well, that's it for me today!! I hope you got some inspiration on how to look at your dies a bit differently!!  These cards were SO MUCH fun to make!!

Thank you for hanging in there!! Until next time...

Laurie


Here's a list of all the CDD Products Used:


Featured Post

A Simple Thanks Card

Well, well, well. Look who decided to show up...me! It's been an awful long time yet again. I seriously thought I'd be well out of t...