Friday, September 21, 2018

My Creative Time 83rd Edition Release Blog Hop!!

Hello and welcome to this month's blog hop for the latest release from My Creative Time!! You likely arrived from the beautiful MISS KENDRA'S blog but if not, you can find the whole line up HERE!
 This release is full of products that can be used for cardmaking, gift giving or even home decor!!


***SALE ALERT***
ALSO, DON'T FORGET our sale starts RIGHT NOW here:http://shop.my-creative-time.com/Ne...! Use the code: SEPT2018 to receive a discount off your entire purchase! This sale applies to "IN-STOCK" items ONLY. This sale will end on Friday, September 28, 2018 @midnight PST.
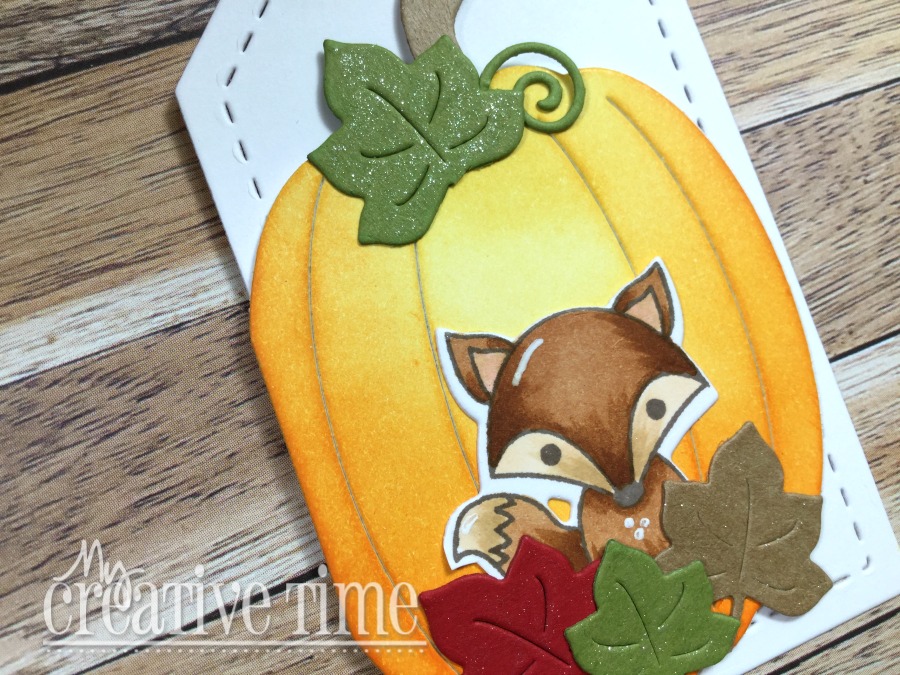
This release is full of products that can be used for cardmaking, gift giving or even home decor!! used the new Cute Pumpkin Tag Die Set for my card today.  Just like always, Emma's die sets are so versatile!

I made a simple Thanksgiving card using the pumpkin die as well as the leaf dies in this set.  The separate pumpkin die is actually made to use on the flap of the tag so it is a little wonky on one side. But pumpkins aren't perfect, are they?!


I decided to use patterned paper for my cute pumpkin today. This size of this die really allows for the pattern to show!  To create the look of torn paper on the front panel, I used one of the dies from the Most Stitched Edges Die set...I love that set of dies!!


The die itself creates some cut lines. This gives you the option to pop up certain parts, which I decided to do. Hard to capture but it looks very cool in person!  The stitched rectangle dies are from the More Stitched Rectangular Dies and the smaller one is actually covering up a sentiment boo-boo. The sentiment comes from the Fall Friends Stamp and Dies (which I stamped in the wrong place!)


This card was so fun and easy to make!!  In case you missed my sneak peek post for this die set, here's a look at what the full die set looks like!


And that's my take on the new Cute Pumpkin Tag Die!! I hope you like!  Up next on the hop is the extremely talented MISS RUTHIE!!

Here's a look at the entire release:


***BLOG HOP GIVEAWAY***

For our blog hop giveaway, Emma is giving away a $25 gift card to the "My Creative Time" store to ONE LUCKY winner! ALL you have to do is leave a comment on each of our blogs! You are NOT required to comment on EVERY SINGLE blog, but the more you comment on, the MORE chances you have for winning! VERY IMPORTANT, PLEASE leave a way for us to contact you w/your comment just in case "YOU" are the lucky winner!
***SPECIAL DISCOUNT CODE***
Starting on Friday, September 21, 2018 @ 8am PST, the first 50 shoppers will receive a special ONE TIME USE discount code that you can use anytime with the exception if there is a sale going on already! This special discount code will be given to the FIRST 50 shoppers! If you are one of the 1st 50 shoppers it will automatically be added to your package at the time of packing/shipping. PLEASE keep in mind, if you are the first 50 shoppers, do NOT throw away your invoices that are included with your orders because that is where your discount code will be!


Thursday, September 20, 2018

My Creative Time Sneak Peek Day 4

Are you ready for the last sneak peek for the My Creative Time September Release??! It's another good one so get ready!!

Today we're featuring the new Little Stitched Leaves Dies.  This is a mighty, little set of dies that will come in handy over and over again.


I've made Fall themed projects all week and decided to use some non-traditional leaf colours for this card.  Aren't those leaves adorable? I love all the detail. And the cute little curly-q's!!


The sentiment is from the Every Little Thing Stamp Set which fits perfectly on the Vintage Label Die Set!  

Just think of all the possibilities with this die set!  I think it would look beautiful as table confetti at any holiday dinner, just change up the colours!!

Thanks so much for stopping in today!!  Please come back tomorrow as we celebrate this release with a blog hop!!

***Sneak Peek giveaway!***
We will be giving away the sets we are showcasing each day to ONE lucky winner! For example, the set we are showcasing on Wednesday, Emma will announce the winner of that on Thursday & the sets we are showcasing on Thursday, Emma will announce that winner on Friday on my blog! ALL you have to do is leave a comment on each of our blogs! You are NOT required to comment on EVERY SINGLE blog, but the more you comment on, the more chances you have for winning! VERY IMPORTANT, PLEASE leave a way for us to contact you w/your comment just in case "YOU" are the lucky winner! For EXTRA entries, you can spread the word about this release on Facebook, tweet about it OR even instagram it! #mycreativetime! GOOD LUCK EVERYONE & let's start spreading the word!;)
See you tomorrow!

Laurie

Wednesday, September 19, 2018

My Creative Time Sneak Peek Day 3

Welcome back!! We're halfway through sneak peek week for My Creative Time. And today we are showing you an awesome new treat holder!

This is the Pumpkin Lollipop Holder and it's too cute!!!  I usually will try to make cards out of these treat holder dies but today I actually used this die as intended, well almost!!


I didn't use it for a lollipop but I did use it as a treat holder!  It's very easy to decorate this treat holder because it comes with all the parts and pieces!!


I used Glue Dots to stack two pieces of salt water taffy together and they fit perfectly!  Want a great way to give a treat or even to decorate your Thanksgiving table!!


I love this die and I know I'm going to get lots of use out of it!!  I hope you'll join us tomorrow for the last day of sneaks!  See you then!!

***Sneak Peek giveaway!***
We will be giving away the sets we are showcasing each day to ONE lucky winner! For example, the set we are showcasing on Wednesday, Emma will announce the winner of that on Thursday & the sets we are showcasing on Thursday, Emma will announce that winner on Friday on her blog! ALL you have to do is leave a comment on each of our blogs! You are NOT required to comment on EVERY SINGLE blog, but the more you comment on, the more chances you have for winning! VERY IMPORTANT, PLEASE leave a way for us to contact you w/your comment just in case "YOU" are the lucky winner! For EXTRA entries, you can spread the word about this release on Facebook, tweet about it OR even instagram it! #mycreativetime! GOOD LUCK EVERYONE & let's start spreading the word!;)

Laurie


Tuesday, September 18, 2018

Pink & Main Sneak Peek!!

Hey friends!!  I wanted to share a little peek at one of the upcoming stamp set from Pink & Main!!

This entire release is fantastic but the Deck the Palms set is one of my favourites!!

All the detail can be found on the Pink & Main Blog :) September Release will be available on Friday!!!!


Thank you so much for stopping by!  

Laurie

My Creative Time Sneak Peek Day #2

Welcome back MCT fans! It's day two of sneaks and you are going to love this next product!!  All products shown this week will be available for purchase THIS Friday!  And don't forget about the blog hop that's happening Friday, as well.

Today, we're sneaking a peek at the new Cute Pumpkin Tag Die!  This is another in Emma's series of Cute Tags.


Isn't this adorable?!  This set comes with bits and pieces to complete the pumpkin, including the large pumpkin on the front.

I used the previously released Fall Friends Stamp and Die Set to decorate the front of tag. These products worked perfectly together!!


These tags are perfect for giving as they allow for a sentiment to be stamped on the inside.


I hope you enjoyed today's sneak peek. Come back tomorrow for another super cute sneak!!

***Sneak Peek giveaway!***
We will be giving away the sets we are showcasing each day to ONE lucky winner! For example, the set we are showcasing on Wednesday, Emma will announce the winner of that on Thursday & the sets we are showcasing on Thursday, Emma will announce that winner on Friday on her blog! ALL you have to do is leave a comment on each of our blogs! You are NOT required to comment on EVERY SINGLE blog, but the more you comment on, the more chances you have for winning! VERY IMPORTANT, PLEASE leave a way for us to contact you w/your comment just in case "YOU" are the lucky winner! For EXTRA entries, you can spread the word about this release on Facebook, tweet about it OR even instagram it! #mycreativetime! GOOD LUCK EVERYONE & let's start spreading the word!;)
Thanks for stopping by!!

Laurie


Monday, September 17, 2018

My Creative Time Sneak Peek Day One!!

Hello, friends!!  It's release week for My Creative Time!!  This is a warm and cozy release so settle in for a week of amazing peeks!

Today we're taking a look at the new Made With Love Stamp and Die Set.  This set is perfect for your homemade gifts! From papercrafts, knitting, crocheting or baking, this set will have you covered!


I attached the sweet die cut tag to a scarf that I had on hand.  Sadly, I don't know how to knit or crochet.  I love this tag and the sweet images that are in this set. 


So, that's it for Day One! Remember, we have a full week of sneak peeks as well as a Blog Hop on Friday so I hope you'll join me!!

***Sneak Peek giveaway!***
We will be giving away the sets we are showcasing each day to ONE lucky winner! For example, the set we are showcasing on Wednesday, Emma will announce the winner of that on Thursday & the sets we are showcasing on Thursday, Emma will announce that winner on Friday on her blog! ALL you have to do is leave a comment on each of our blogs! You are NOT required to comment on EVERY SINGLE blog, but the more you comment on, the more chances you have for winning! VERY IMPORTANT, PLEASE leave a way for us to contact you w/your comment just in case "YOU" are the lucky winner! For EXTRA entries, you can spread the word about this release on Facebook, tweet about it OR even instagram it! #mycreativetime! GOOD LUCK EVERYONE & let's start spreading the word!;)
See you tomorrow!!

Laurie

Friday, September 14, 2018

Neat & Tangled Throwdown: Making Your Own Cover Plate with Small Dies!!!

Hey, crafty peeps!  Today I decided to participate in the Neat & Tangled Throwdown which happens to be a tutorial challenge!


I love creating tutorial style blog posts and I try to do them often. I actually do have a You Tube channel but I'm very bad at it!  If you're so inclined, you can check it out HERE :)  

I decided to create my own cover plate style card front using small dies.  This is a fun and easy technique although a bit time consuming.  Now, I say time consuming because I did run into a slight problem that haunted me through the entire process, which I'll share with you a bit later!

I wanted to get a fairly symmetrical look to the die cutting so I started by dividing my 4.25 X 5.5 inch piece of cardstock into 4 equal sections.


So, 2 1/8 on the short side and 2.75 on the long side.  I chose the Medallion Flower Builder Nice and Neat Dies for the die cutting.  These dies are the perfect size and shape to make an entire background.


I lined up the largest die at the corner where the 2 lines intersect. It snuggled it perfectly there!  And I made sure the smaller leaf was centred over one of the lines. Now, as I looked at this, I thought to myself "you'll never line this up the same every time". So, I sat there until it came to me. Adhere the dies together so they can be moved as one piece!!  Great idea. Executed poorly. This is the beginning of the problem that followed me to the end of this card.


I decided to use Press N' Seal.  This stuff works great for moving around die cuts, however not so good for actual die cutting. Yes, this stuff held the dies beautifully! It did not tear the cardstock at all. But....every time I ran it through, it left a bit of whatever it is that makes it sticky on the cardstock.  I didn't think it was a big deal because it seemed to come off easily with a white eraser, so I kept going.  But even as I would erase, it would just reappear later on.  TIP: Use a low tack painters tape or 3M Post It Tape for this!!


See what I mean?  Even cat hair stuck to it, hahah!!  The positive of using the Press N' Seal was that it was transparent so it was easy to place the dies where they needed to go.  


All you have to do is turn the cardstock and place the dies in all four corners, making sure to line up the top leaf with the pencil line!  


This was the first four cuts.  I felt like there were a few places that were too "empty" so I added a couple more dies and this time used 3M Pore Tape to adhere them.


I should mention that I did keep all the positive die cuts.  These will make our faux cover die look more intricate!


I trimmed the panel down to 3.5 X 5 inches.  At this point, I wasn't super impressed with how this was looking so I set it aside...for a day. When I got back to it today, I knew what I wanted to do. Ink blending with Distress Oxides!!  I chose three colours but ended up only using one, my favourite of all time..Crushed Olive!


And of course no ink blended panel would be complete without water splatters!


I used regular white cardstock for this, not watercolour paper.  Works great but you can't overdo it with the water or your paper will start to disintegrate!  I did dry this with my heat tool but was able to give it an extra few minutes because I had yet to do the most tedious part of this whole process...apply foam tape!!


Ugh, I know! But it was well worth the effort!!  Once that was adhered to the ink blended panel (which was also cut to the same dimensions of the die cut panel), it was time to adhere some of the positive die cuts back into place.


My preferred adhesive for things like this is Glossy Accents.  Not sure why cause it can be messy but you can't beat the hold of this stuff!!

Okay, folks. We're almost there!  Time to place a few clear sequins (which kind of evened out the design a bit),


And stamp the sentiment!


I used one of the greeting from the Scandinavian Prints Stamp Set and stamped it onto a die cut banner.  The white banner needed a bit of definition from the white die cut panel so I layered it up with a light grey one! This just so happens to be the same grey cardstock I used for the base!

And here (finally) is the finished card...


This really is an easy card to make IF you don't use Press N' Seal. Live and learn, right?!


Thank you so, so much for hanging in there with me for this one! I hope I was able to inspire you to maybe give this a try!!  I know I'll be trying this again!


Until next...stay crafty!!

Laurie


Featured Post

A Simple Thanks Card

Well, well, well. Look who decided to show up...me! It's been an awful long time yet again. I seriously thought I'd be well out of t...