Showing posts with label tag die. Show all posts

Friday, October 18, 2019

MCT 96th Edition Release Blog Hop!!

Are you all ready for some incredible inspiration using new products from this month's release??


For my project today, I used the new Keep Fighting Stamp and Die Set.  This is an encouraging and uplifting set.  I did not make a card today, but what I thought, would work as a bookmark or something to hang from a rear-view mirror. So the recipient would be constantly reminded to Keep Fighting!


I used the middle sized doily die from the Bunch of Stitched Doily Dies. I cut it twice from white cardstock and adhered the two together.  On another piece of white cardstock, I ombre stamped one of the angel wing images using a few pink inks. I used the co-ordinating die to cut it out as well as cut it from craft foam.


Of course, I added a touch of shimmer!  I added three tiny hearts as well, just to give it some extra love.  On the back, I stamped the "keep fighting" sentiment in the same inks.


I think this set is beautiful and though we do not like having to make these types of cards, this set will make it a bit easier.

Thanks for joining us today!!

Laurie


BLOG HOP LINEUP:

Laurie (ME)

BLOG HOP GIVEAWAY!!

For our blog hop giveaway, Emma is giving a $25 gift card to the My Creative Time Store to ONE lucky winner!  All you have to do is leave a comment on each of our blogs. You are not required to comment on every blog but the more you comment, the more chances you have of winning!! Very important:  Please leave a way for us to contact you (with your comment) just in case you are the winner!!

FREEBIE!!

Starting today, Friday October 18th, 2019 at 8am PST, we will be giving away these adorable new "HoHoHo Die".  This new set will be given to the first 25 shoppers!  It will be automatically added to your package during packing/shipping. Once the 25 shoppers have gone through, this die set will be available for purchase!  So, if it's available in the store, you are not one of the first 25 shoppers.  No exceptions will be made.  The "freebie" is NOT part of the bundle and will be sold separately.
SALE ALERT!!

Don't forget!! Our sale starts right now at the My Creative Time Store!!  Use the code OCT2019 at checkout to receive 15% off your entire in-stock purchase!! The sale ends on Friday, October 25th 2019 at midnight PST!!

Here's a look at this months release!!

Keep Fighting

Snowflake Tag Die

Christmas Tree Tag Die

Big Santa Dies

HoHoHo Die (FREEBIE)

Money Envelope Die




Thursday, November 8, 2018

Birthday Palooza with My Creative Time!

Hello my friends and welcome back!! It's all about birthday projects for My Creative Time.  I decided to make a birthday tag card. Yep, a card and tag all in one!

I started by die cutting 2 of the scalloped tag from the Tag Dies Die Set. On one of the tags, I scored along one side at 1/4 inch. This happens to line up perfectly with the corner edge at the top and the first scallop at the bottom.  I used Scor-Tape along the fold that created.


After the two pieces are attached, it looks like a tag but acts like a card!!  To decorate the front, I cut the label die from the Vintage Stitched Label Die Set out of a piece of fun patterned paper. This is one of my most used die sets...I love the shape!  This label also works fabulously with the Bunch of Stitched Doily Dies. I used the second smallest in this set.  For the focal image, I die cut pieces to build a cupcake from the Light The Candles Stamp and Die Set out of some mixed media paper.
I used this particular paper because I wanted to do some simple watercolour with my Tombow Markers.


Everything just fit so well together in that label die!!  I stamped a sentiment on the front of the tag/card as well as the inside.  The sentiments come from the Light the Candles set as well.


I added a little twine to the front tag only and a little Glossy Accents to the cherry!


And there it is!! Hope you enjoyed!!

Thank you so much for dropping by today!  I'll be back soon!!

Laurie


Tuesday, September 18, 2018

My Creative Time Sneak Peek Day #2

Welcome back MCT fans! It's day two of sneaks and you are going to love this next product!!  All products shown this week will be available for purchase THIS Friday!  And don't forget about the blog hop that's happening Friday, as well.

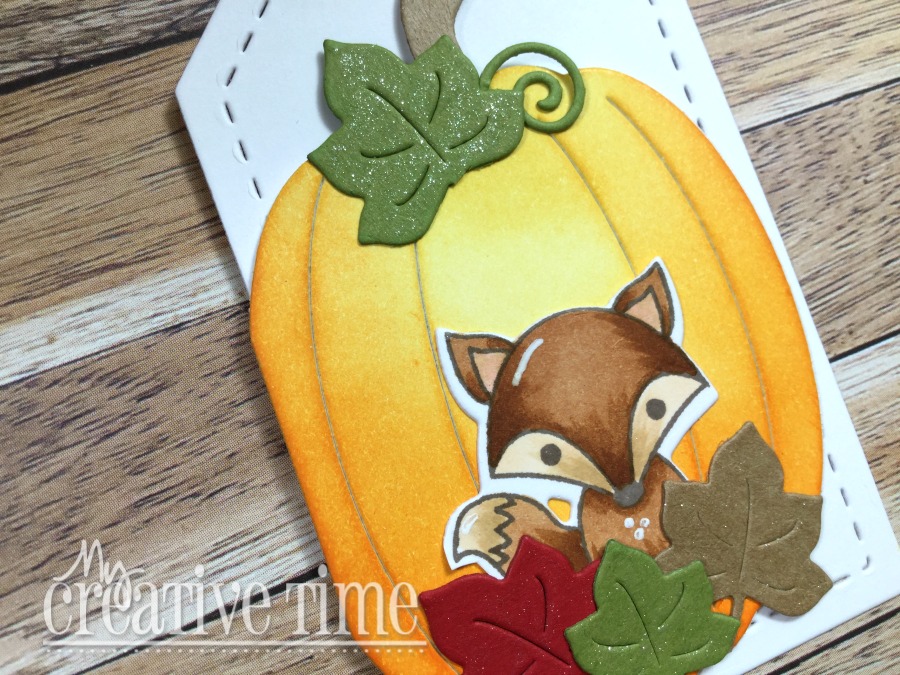
Today, we're sneaking a peek at the new Cute Pumpkin Tag Die!  This is another in Emma's series of Cute Tags.


Isn't this adorable?!  This set comes with bits and pieces to complete the pumpkin, including the large pumpkin on the front.

I used the previously released Fall Friends Stamp and Die Set to decorate the front of tag. These products worked perfectly together!!


These tags are perfect for giving as they allow for a sentiment to be stamped on the inside.


I hope you enjoyed today's sneak peek. Come back tomorrow for another super cute sneak!!

***Sneak Peek giveaway!***
We will be giving away the sets we are showcasing each day to ONE lucky winner! For example, the set we are showcasing on Wednesday, Emma will announce the winner of that on Thursday & the sets we are showcasing on Thursday, Emma will announce that winner on Friday on her blog! ALL you have to do is leave a comment on each of our blogs! You are NOT required to comment on EVERY SINGLE blog, but the more you comment on, the more chances you have for winning! VERY IMPORTANT, PLEASE leave a way for us to contact you w/your comment just in case "YOU" are the lucky winner! For EXTRA entries, you can spread the word about this release on Facebook, tweet about it OR even instagram it! #mycreativetime! GOOD LUCK EVERYONE & let's start spreading the word!;)
Thanks for stopping by!!

Laurie


Tuesday, March 20, 2018

Tag It Tuesday with My Creative Time!

Welcome and happy Tuesday!! My project is a little different today but trust me, it does involve tags!
A good set of tag dies is a must have in any craft room. Two or three different sets is even better :), but if you're new to die cutting or just starting out on your crafty journey, here are a couple of recommendations.


This is a great starter set. Two pretty designs with stitching detail and they are a GOOD size!


This set is genius! These tags perfectly layer on the Tag Dies but also come with a couple of border dies and word dies!! These dies are also large enough to use on their own!!  And finally..


These are my current favourite tag dies and what I'll be using today!  These are generously sized and do not come with a pre cut hole at the top. This opens up many possibilities!! You decided where and if you even want a hole!!   Anyway, let's get on to my project!!

I started by die cutting three of the mid-sized tag from the Chunky Stitched Tag Dies, three times out of white cardstock.  I laid them out on my grid paper to measure.  The three side by side measured 6.5 inches across and almost 2.75 inches high. You can use any sized tag die for this card, but be sure to get these measurements before you make your cardbase!!!


I cut another piece of white cardstock down to 7 X 7 inches square and scored it at 3.5.  This will become my card base.

I blended Worn Lipstick and Squeezed Lemonade Distress Oxide Inks onto each of the tags and sprayed them with water to give a nice splattered effect. I also cut 2 different doilies from the Bunch of Stitched Doilies Dies out of the same white cardstock. I will do some stamping on these.


For my main focal point, I decided to stamp, colour and die cut one of the floral images from the Healing Wishes Stamp and Die Set. I did some very simple colouring using coloured pencils (or pencil crayons as we like to call them up here in these parts!).  I partially stamped a couple of the other images onto the small doilies and coloured them in as well!!


So now it's time for assembly. I adhered each tag to the card base that I created. I made sure the first tag was flush against the left hand side and exactly at the top fold.


Because I made the card base larger than needed, I had to trim the right side as well as the bottom. I used my guillotine trimmer for this! Next, I trimmed around each tag die with scissors, this being the end result..


Very cool, tag shaped card!!  All that was left to do was adhere my doilies to each panel using foam adhesive and add a sentiment!


I had to stagger the doilies slightly to accommodate the sentiment, which also comes from the Healing Wishes set.  I added a bit of detail with a clear sparkle pen, some Nuvo Drops in White Blizzard and some clear confetti sequins.


I absolutely ADORE how this turned out!! 


And I'm also in love with that stamp and die set!!


Thank you so much for stopping by today!! I hope you found a little inspiration here :)

Until next time...

Stay crafty, my friends!

Laurie


Tuesday, February 20, 2018

Tag It Tuesday with My Creative Time!

Hello crafty friends and welcome back!!  Today I'm sharing a tag made using some fabulous products from My Creative Time.

This winter is feeling very long, we've had the coldest February in quite a few years!  I'm ready for it to just be over!!  To help out with my winter blues, I decided to use bright, cheerful colours for my project today.

I started by die cutting two pieces of pink cardstock with the largest tag from the brand new Chunky Stitched Tag Dies..love these! I apologize in advance if you see a lot of projects with these.  I cut two because the cardstock I used is quite flimsy so adhering them together gave a lot of stability.  I cut the second largest tag, which is also a stitched tag, out of white cardstock and layered them together with foam adhesive.


Because these dies do not have the ribbon hole in them, I was able to punch two holes at the top and make a flat knot. This is easy. Simply feed each end of the ribbon into the two holes on the FRONT of the tag and come up back through to the front!

I stamped one of the beautiful flowers from the Just Because Stamp and Die Set with Versamark Ink onto some Mixed Media paper.  I heat embossed with Silver embossing powder.  I used one shade of purple and green of my Tombow Dual Brush Pens to do some super simple watercolour.


For the sentiment, I chose the Big Hello Die and cut it four times out of grey cardstock.  I adhered both the flower and the sentiment with liquid glue. After looking at this tag for a couple of minutes, I decided it needed just a little something more.

I die cut one of the sweet butterflies from the Mini Butterfly Dies out of the same Mixed Media paper and used the same purple and a pink colour to make it pretty.


And of course a little sparkle was in order so I used my Spectrum Noir Clear Overlay pen on the big Hello and the butterfly.  Because the Tombow markers are reactive to water/liquid, they reacted in a very cool way on the butterfly. Almost looks tie dyed!!


Isn't that sparkle fabulous?!

Thank you so much for stopping by today! I had so much fun making this sweet, happy tag. I hope you enjoyed and got to pick up a few goodies from the shop as well :)

Until next time...stay crafty!!

Laurie


Thursday, February 15, 2018

My Creative Time 76th Edition Sneak Peek Day 3!

Okay everyone, today is the last day of our sneak peeks for this release!  I know you've seen some amazing inspiration so far, so let's keep it going!!

Today we are taking a look at the new Chunky Tag Dies!  A good set of tag dies is a must in every craft room. You may be thinking to yourself, "I already have a good set of tag dies", and you probably do, but...these are different, I promise.

First of all, these are an awesome size. Second, they layer. And third, which I think is a plus, is that they do not cut a hole for the ribbon.  This is a nice feature because you can use them just as shaped dies without the hole getting in the way!  I think everyone owns some sort of hole punch, so it's easy to place the hole wherever you'd like it.

I discovered that by cutting two of the largest "tags" in this set and adhering them together with 1/8" Scor-Tape, you can actually make a pocket that will fit a gift card!


Nice view, right? We'll get to the front in a minute :). I didn't actually have a gift card on hand but I cut a piece of cardstock down to the size of a credit card and it slid in and out without a problem!

For the front of my gift card pocket, I stamped the polka dots from the Egg Decorations set, which we showed you yesterday, in a light purple ink.  I took the next die to the largest one, which happens to be stitched and cut that from white cardstock as well. 


The sentiment comes from the Fun Vertical Greeting Stamp and Die set.  The hearts come from the I'll Never Let You Go set that we sneaked on Tuesday!  I did some basic ink blending on each heart and die cut them out.  I did used a hole punch on the stitched layer, as I wanted to add a bit of ribbon. I foam mounted that layer on and added some sequins as well!

This set has a lot of possibilities and I can't wait to show you more!!

***Sneak Peek giveaway!***
We will be giving away the sets we are showcasing each day to ONE lucky winner! For example, the set we are showcasing on Wednesday, Emma will announce the winner of that on Thursday & the sets we are showcasing on Thursday, Emma will announce that winner on Friday on my blog! ALL you have to do is leave a comment on each of our blogs! You are NOT required to comment on EVERY SINGLE blog, but the more you comment on, the more chances you have for winning! VERY IMPORTANT, PLEASE leave a way for us to contact you w/your comment just in case "YOU" are the lucky winner! For EXTRA entries, you can spread the word about this release on Facebook, tweet about it OR even instagram it! #mycreativetime! GOOD LUCK EVERYONE & let's start spreading the word!;)
Thank you for being here today! Remember, tomorrow is our big release Blog Hop so I hope you're ready for more inspiration!!!!
Laurie

Wednesday, February 14, 2018

My Creative Time 76th Edition Sneak Peek Day #2

Hello my crafty peeps!!  Welcome to our next sneak peek for the upcoming My Creative Time Release!!

Today we are showing you a look at the new Cute Stitched Egg Tag and the Egg Decorations stamp set, which happens to be the freebie this month!  The two go hand in hand.

Here's what I made for you today!


Since I do not have a treat bag die, which I must remedy that situation soon, I made my own out of a simple piece of copy paper and a few easy folds.  To make the top of the "bag" a bit more fancy, I used one of the border dies from the More Stitched Edges Die Set. I then blended on some Dusty Concord Distress Ink to give it a bit of colour.

The Cute Stitched Egg Tag die was cut out of white cardstock along with one of the egg layers which are also included in this set!  I gold heat embossed the polka dot stamp from the Egg Decoration Stamp set onto that layer.  And to give it contract against the white tag, I added more of the same Distress Ink.

I gold heat embossed the sentiment as well on the inside of the tag. The sentiment is included in the Egg Decorations set!


I glued the tag directly to the bag.  For a bit more pop, I cut the Fun Sized Scalloped Stitched Bow Die from some cut checked paper and popped that on top of the tag!

There you have it!  This line of dies from the shop are just so creative, I adore them all!!  Now, onto the fun stuff!

***Sneak Peek giveaway!***
We will be giving away the sets we are showcasing each day to ONE lucky winner! For example, the set we are showcasing on Wednesday, Emma will announce the winner of that on Thursday & the sets we are showcasing on Thursday, Emma will announce that winner on Friday on my blog! ALL you have to do is leave a comment on each of our blogs! You are NOT required to comment on EVERY SINGLE blog, but the more you comment on, the more chances you have for winning! VERY IMPORTANT, PLEASE leave a way for us to contact you w/your comment just in case "YOU" are the lucky winner! For EXTRA entries, you can spread the word about this release on Facebook, tweet about it OR even instagram it! #mycreativetime! GOOD LUCK EVERYONE & let's start spreading the word!;)
Thank you for stopping in today and I'll see you tomorrow for our final sneak peek!!

Laurie


Thursday, January 18, 2018

MCT 75th Edition Sneak Peek #3

Hello and welcome!!  Today I'd love to show you one of three die sets being release tomorrow from My Creative Time!!  This is an incredible release!! Keep reading for all the details on how you can win this die set!!

Today we are showing off the new Cute Heart Tag Die. Can you say unique??  This die set has so many possibilities!  Let's have a peak at my project...

I didn't think too much "outside the box" with this card.  I simply made the tag as intended out of white cardstock, and die cutting the layering pieces with some patterned paper.


That cute little girl image comes from the You're A Hit Valentine stamp set, which is actually ON SALE!!  I coloured her with a combination of Copic markers and Promarkers. And of course I just had to pop her up with some foam adhesive!  When you open the tiny little heart flap, it reveals the sentiment which comes from the I Adore You Kit, which I'm so sorry to say, has been sold out.


I made the card base out of the XOXO Border Dies, which were sneaked yesterday and are AWESOME!!  I simply cut two panels and adhered them together with Scor-Tape.

Before placing my tag on the front of the card, I adhered one of the partial hearts on the inside and finished off the sentiment.


isn't the detail of those border dies incredible?!?  I added some lace ribbon and twine to the top of my tag and foam mounted it on the base.  I added a little sparkle with a Spectrum Noir Clear Sparkle Overlay pen on the heart, the polka dots on the dress and the bows in her hair. And that's my finished card!!


***Sneak Peek giveaway!***
We will be giving away the sets we are showcasing each day to ONE lucky winner! For example, the set we are showcasing on Wednesday, Emma will announce the winner of that on Thursday & the sets we are showcasing on Thursday, Emma will announce that winner on Friday on my blog! ALL you have to do is leave a comment on each of our blogs! You are NOT required to comment on EVERY SINGLE blog, but the more you comment on, the more chances you have for winning! VERY IMPORTANT, PLEASE leave a way for us to contact you w/your comment just in case "YOU" are the lucky winner! For EXTRA entries, you can spread the word about this release on Facebook, tweet about it OR even instagram it! #mycreativetime! GOOD LUCK EVERYONE & let's start spreading the word!;)


Featured Post

A Simple Thanks Card

Well, well, well. Look who decided to show up...me! It's been an awful long time yet again. I seriously thought I'd be well out of t...