Monday, May 28, 2018

Made in Minutes with My Creative Time!

A big hello and welcome back!!  Today it's all about whipping up a card quickly!  And my project for you was made in roughly 10 minutes!!

I do have to admit that this is not the norm for me.  When I sit down to make a card, 9 times out of ten I do not have a plan. Today was no exception except for the fact that I knew what products I wanted to use and I also had on hand a bunch of scrap watercolored pieces of cardstock.  I tend to hoard almost everything I have and today that came in very handy!!


As you can see, I decided to use the Birthday Cake Die and the Time to Celebrate Stamp set from the latest release.  And of course, there are my scraps!

I die cut both layers of icing out of the blue paper and the candle and flame out of the green/yellow paper.  But I wanted one more embellishment for my cake, so I used the single flower die along with the dots in the Flower Border Die set. I cut the flower from the green/yellow paper and the row of dots out of the blue.


I die cut the large cake die out of plain white cardstock along with a couple extra icing layers and adhered my cake pieces together.


I think adding extra icing is always a good idea, don't you :)?


I stamped the sentiment just above the cake in black ink and decided to add the remaining blue dots (flower centres) as embellishments.


I was struggling with the all the open space so I took a white Gelly Roll pen and added some stitching detail around the card and some dots around each circle embellishment.  Such a simple thing to do yet is very effective!


And that's the finished card!! Like I said, this came together very quickly because I had scraps to use! But patterned paper would also work excellent for this as well!

Thank you for stopping by today!  

Until next time...stay crafty!!

Laurie


Saturday, May 26, 2018

Day Two of the Studio Katia 2nd Anniversary Blog Hop!!


Studio Katia is celebrating their 2nd Anniversary and I am beyond thrilled to be a part of this celebration!! I've been a fan of this Canadian company since it arrived on the scene two years ago and my love for the products keeps getting stronger!!

We are celebrating this anniversary with a New Release and it's incredible!!  6 new Clear Stamp Sets,  4 sets of Co-ordinating dies, 4 new stand-alone Creative Dies, 2 new stencils and of course, new embellishments!!!

You should have arrived from the incredibly talented CAROL and your next stop with be the beautiful KRISTINA!!  If you get lost along the way, a full list of the hoppers will be at the end of this post!  Also, stay tuned for information on the incredible giveaways!!!

My cards feature a "Sea" theme for you today using all new products!!  I made 4 cards in total but seriously could have kept going!!  Let's take a look, shall we??

My first card features the mini stamp set, Shell-ebration as well as its co-ordinating dies. The star of this stamp set is the cutest little turtle who's ready to party! But in this case, he just wants say "I love you"!


I created the window with one of the dies from the Dotted Frames: Scalloped Frames Die Set.  This easily could have been made into a shaker but I wanted the embossed waves to really shine! And speaking of those waves, they were created using the new Brush Stroke Wave Stencil and Silver Pearl Embossing powder.


The elements such as the seaweed, coral and little crab come from the brand new Under the Sea stamp set.  This set also has a matching set of dies available and I'll show you more now!!


Again, I created a little window scene using the Brushstroke Waves Stencil, an oval die from the Dotted Ovals and a couple colours of Distress Ink.  That puffer fish is my favourite from the set and  is so cute paired with the fish hook and tiny worm!!


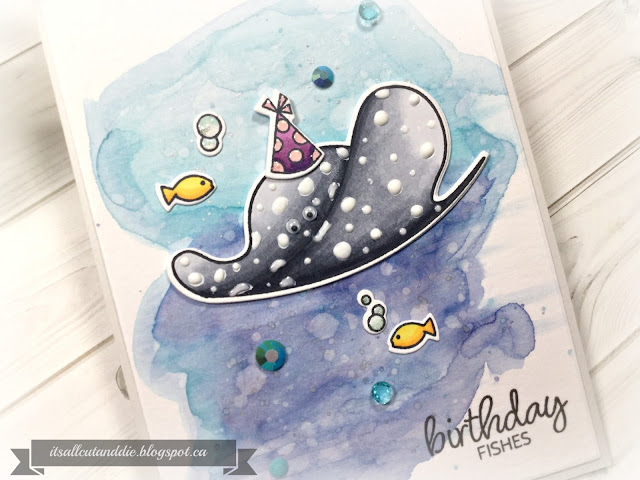
Of course, no sea themed card is complete without bubbles so I added a few Iridescent Bubbles.  Clean and simple but really cute!  I made one more card that really shows off this stamp set!!  What is so different about this set is that is does not have a whale in it! It has something way cooler...a stingray!!  I googled stingrays before I started colouring to get an idea of what colours they were! And look what I found!  A polka dot stingray!!!


Naturally, I went with that :)  I got a bit more "fancy" with this card and created a watercolour background complete with water splatters.  


I used the birthday hat from the Kobi the Birthday Bear Set as the scale was perfect!!  White Nuvo drops were added over top of white gel pen for a bit of dimension and some March Crystals add some sparkle!!


Of course, my next project had to be a shaker and the new Seashell Shaker Die is perfect for this!!

I created a background with the Brushstroke Waves Stencil and Distress Inks.  I white heat embossed a sentiment which is from the Shell-ebration set.


Instead of using foam tape to build up the shaker, I die cut several of these dies and layered them together and then placing a silver glitter die cut on top!!  I used the brand new Dots Chunky Confetti Glitter, Diamond Sparkle Stars and some Silver Seed Beads for the shaker bits.  The sentiment from the Shell-ebration stamp set works perfectly for this card.  


I had a blast creating with these new goodies and I expect you will too!!!

Blog Hop Giveaway!!!!

Studio Katia is giving away TWO $100 CAD gift certificates on each day of the hop, that's FOUR chances to win!!  Winners will be chosen randomly from the comments left on EACH blog in the hop! Make sure to leave comments by June 2nd, 2018 11:59pm EST. Winners will be announced on the Studio Katia Blog on June 3rd, 2018!!  Good luck!!!!

Here's the complete Blog Hop List for today!!

Laurie...YOU ARE HERE:)


Thank you so much for stopping in today and thank you to Studio Katia for letting me be a part of this incredible hop!!!!

Laurie


Friday, May 25, 2018

LDRS Creative May Release Day Three!!


Welcome to the third and final day of the LDRS May Release Blog Hop!! I hope you've been enjoying all the fabulous-ness you've been seeing!!  And today will be no exception!

Thank you for joining us on our LDRS Creative inspiration week blog hop! We are showcasing lots of gorgeous projects using products from our new release. You can even see them in action with step-by-step projects by our amazing designers! 

We have some awesome new critters with the Candibean Safari and the Polkadoodles Just Because and Sink Or Swim stamp sets, fabulous dies with the Woodland Foliage Frames, Petite Pinafore Build-A-Card, Petal Perfection Accordion and Happy Days Circle sets, and last but not least, a gorgeous Country Friends Sweet Pea Paper Pack for you to use with all your crafting projects!

Simply use the list at the end of the post to keep hopping! 

Each day we are giving away a $25 LDRS Creative gift card to one lucky hopper!  To enter leave a comment on each blog in the hop, plus follow us on Facebook and Instagram. Winners will be announced on the LDRS Creative inspiration blog on May 29th.

For the release event we are excited to offer some great savings!

Save 20% on EVERYTHING and use code MAY20
(Coupon valid until midnight EST 5/27/18)


Again, I have two cards to share using two new stamp sets.  This first stamp is called Just Because and it's adorable!  I started by stamping the image onto Bristol Paper using the Raven Hybrid Ink.  I used this ink and paper because I wanted to use some water based markers for the colouring.


Now, this image may look a bit daunting but what is awesome about the packaging of these stamps is that is comes with a fully coloured image on the front which I used for reference!

After the image was coloured, I fussy cut around it.


I created a simple background using green and blue inks and a little masking.


I popped the image onto the card front and stamped a sentiment from the Friendly Greetings Stamp Set.


A few white enamel dots finish off this clean and simple card!


This image is just so darling!!


My second card shows you the new Sink or Swim stamp.  This time I decided to use Copic markers for the colouring. Again, use the coloured insert of the set for reference!!


Another super cute image!!  And it looks completely different to the one coloured with watercolours!!  I made a window card using the ovals from the new Woodland Foliage Frames Die Set.  The image was adhered to the inside of the card but can be seen through the window on the front panel.


The sentiment comes from the new Safari set and works perfectly!  Here's a look at both cards, side by side, to compare the colouring.


I hope you enjoyed todays look at the new May Release projects!!

Hop along and comment for your chance to win!! Here's the full list of the today's hop! 


Thank you for joining us this week for a look at the new cuteness that is now available!!!!!

Until next time...stay crafty!!

Laurie


Thursday, May 24, 2018

LDRS Creative May Release Day Two!!

Thank you for joining us on our LDRS Creative inspiration week blog hop! We are showcasing lots of gorgeous projects using products from our new release. You can even see them in action with step-by-step projects by our amazing designers! 

We have some awesome new critters with the Candibean Safari and the Polkadoodles Just Because and Sink Or Swim stamp sets, fabulous dies with the Woodland Foliage Frames, Petite Pinafore Build-A-Card, Petal Perfection Accordion and Happy Days Circle sets, and last but not least, a gorgeous Country Friends Sweet Pea Paper Pack for you to use with all your crafting projects!

Simply use the list at the end of the post to keep hopping! 

Each day we are giving away a $25 LDRS Creative gift card to one lucky hopper!  To enter leave a comment on each blog in the hop, plus follow us on Facebook and Instagram. Winners will be announced on the LDRS Creative inspiration blog on May 29th.

For the release event we are excited to offer some great savings!

Save 20% on EVERYTHING and use code MAY20

(Coupon valid until midnight EST 5/27/18)

Hello!!!  Welcome back for another look at some of the new goodies from LDRS!!!  We continue on with the cuteness today by looking at the new die set, Build-A-Card Pinafore!!

This set is incredible!! Not only does it create a card base shaped like the cutest little dress, it comes with a ton of dies to help you decorate it!!  These dies can also be used on their own. I'll share two cards today that show you both ways!

My first example, is how to use this set as intended.  This creates a large card and so easily!


Isn't this just the sweetest??!  The layers include a scalloped top layer and a cute apron!!  The papers from the new Country Friends Paper pack are perfect for this!!  I added some flower dies at the top of the dress (which are included in this set) and the bow is from the Happy Days Die Set. Which I think is the perfect accent.  Everything being released works so well together.


That gorgeous Hello Word Die is a previously released die which is a must have!  I also added some stitching detail with a white gel pen.


After adhering everything together, I noticed that my apron was a bit crooked. That's okay. If things like this happen to you, don't stress. It's handmade and it's an original!!!  

My second card uses just the flower dies from this set.  I die cut them out of white cardstock and using Olive Branch, Dark Wash Jeans, Dand-D-Lion and Lipstick Jungle Hybrid Inks blended on some colour.


I should mention that the leaves are not in this set but LDRS carries the Fancy Flowers Dies and the Super Sprigs Die Set to help with the greenery!!

I die cut two ovals from the new Woodland Foliage Frames Set and created a floral spray along the bottom.


The sentiment is from the Safari set stamped on a die from the Build-A-Card Pinafore set. See how everything works together??!!


This card came together quickly and I adore that butterfly! A few white gel pen details finish this card!

Thank you for stopping in today and I'll see you tomorrow for our final day of the hop!!

Hop Along and comment so you could win!! Here is the full list for the hop:

LAURIE CASE...(you are here)

Laurie :)


Wednesday, May 23, 2018

LDRS Creative May Release and Tutorial Style Post!!


Thank you for joining us on our LDRS Creative inspiration week blog hop! We are showcasing lots of gorgeous projects using products from our new release. You can even see them in action with step-by-step projects by our amazing designers! 

We have some awesome new critters with the Candibean Safari and the Polkadoodles Just Because and Sink Or Swim stamp sets, fabulous dies with the Woodland Foliage Frames, Petite Pinafore Build-A-Card, Petal Perfection Accordion and Happy Days Circle sets, and last but not least, a gorgeous Country Friends Sweet Pea Paper Pack for you to use with all your crafting projects!

Simply use the list at the end of the post to keep hopping! 

Each day we are giving away a $25 LDRS Creative gift card to one lucky hopper!  To enter leave a comment on each blog in the hop, plus follow us on Facebook and Instagram. Winners will be announced on the LDRS Creative inspiration blog on May 29th.

For the release event we are excited to offer some great savings!

Save 20% on EVERYTHING and use code MAY20
(Coupon valid until midnight EST 5/27/18)


Today, I'm showing you the new Safari Stamp and Die Set, the Accordion Die(used in a completely different way than intended) and the Happy Days Die Set.  If you like cuteness, this release is right up your alley!!

I started by stamping almost all the images from the Candibean Safari stamp set using the Raven Hybrid Ink.  When in doubt, just stamp them all!!


I just had to colour the lion pink!! I didn't use it or the monkey on this card but never fear, I kept them in my stash for a future project!!  Before using the co-ordinating dies, I used a craft knife to cut out the inner portions of the tree. The die doesn't do this and doesn't need to be done but I'm a little particular :)


If you decide to this, do it before you use the die. It will make your life easier! These dies leave a little white border around the images, which I personally love!


Oh, the cuteness!!  To create my mini scene, I die cut the stitched circle from the Happy Days die set out of white cardstock and used the Darkwash Jeans ink to add some colour. These inks are super vibrant, juicy and just all around wonderful!


Now, for whatever reason, I'm loving the look of white on ivory. So I die cut the scalloped circle, also from the Happy Days Set out of white and will use an ivory card base.


To give interest and detail to the card, I used the Accordion Die to create a fancy edge.  This is very easy to do with this die because it does not have a cutting edge on the top. This is so you can make the cut as long as you want, if you decide to make a rosette.  I lined up the die at the bottom of the front flap...


And ran it through my die cutting machine.


What a pretty edge!!  It also gives some embossed line detail. This are actually fold lines if you were to use the die as intended.  I ended up trimming both sides of the card base to even up the scallops on each end.  I simply repeated the process on the back flap of the base.


I stamped the sentiment in the top right corner in brown ink. 


After playing with the layout, I decided the front was a bit too plain so I took a small leaf image from the stamp set and stamped a border using the same ink.


All that was left to do was adhere my die cuts and images. I placed the ink blended circle on top of the scalloped circle and using a combination of liquid glue and foam adhesive, arranged the tree, grass and that adorable giraffe!


I always add Glossy Accents to my cards in some way. I thought the spots could use a little shine!


I think this would be a wonderful card for a little boy! Not girly at all!

Thank you for joining me today! I hope I was able to provide a little insight on how to use your dies in different ways!  Please be sure to stop by tomorrow for a look at more new products!!!

Hop along so you can win!!!  Here is a complete list of today's hop!!


LAURIE CASE...(you are here)

See you tomorrow for a look at more awesome goodies!!

Laurie


Inspire Me Wednesday with My Creative Time!

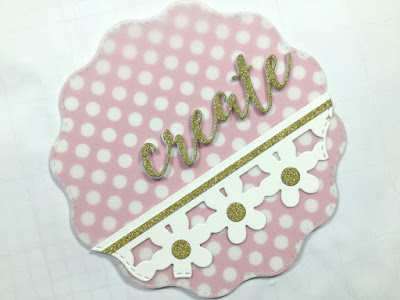
Hello friends and welcome back to another Inspire Me Wednesday with My Creative Time!!  I have for you today and super cute, shaped card.  Sometimes I get a little tired of having rectangular cards so I mixed things up a little bit and created a scalloped circle card!

I started by die cutting the large scalloped circle from the Bunch of Fun Circles Dies, twice, out of white cardstock.  I took one of the die cuts and scored it about 1/2 inch from the top.


All you have to do is add a strip of adhesive on the flap and adhere the two panel together.  This gives you a cute shaped card!


I cut a piece of the same white cardstock using the new Flower Border Die and trimmed the edges using the scalloped circle die. This gave it the same shape and also the stitching detail.  I had some gold glitter paper laying around so decided to cut the centres for the flowers, a tiny strip for an accent and also one of the "create" word dies from the Create Stamp and Die Set. To give it some colour, I cut a piece of polka dot paper using the scalloped die, as well.


 I wanted the word die cut to be more dimensional so I cut 4 extra words out of white cardstock and adhered them together.


I originally used the more scripty of the word die but ended up changing my mind to the bold, typeset die.  But the process was the same! I did a dry run of the placement and decided that the pink patterned paper looked a bit too stark.


By adding a die cut piece of vellum overtop, it softened the look and I was happier with that.


I adhered all my pieces to the vellum panel first and used those areas to place my adhesive so it wouldn't show.  Essentially, the edges are not glued down but it won't go anywhere!


I stamped the "created to" sentiment onto a strip of white cardstock using a grey ink.  And here you can see I used the more bold word die.


It's hard to capture the sparkle in the photos but in real life it's so pretty!!


Thank you for stopping in today!! I hope you found a wee bit of inspiration here today!!

Until next time...stay crafty!!

Laurie


Featured Post

A Simple Thanks Card

Well, well, well. Look who decided to show up...me! It's been an awful long time yet again. I seriously thought I'd be well out of t...