Showing posts with label watercolour. Show all posts

Friday, May 26, 2023

Let's Celebrate with Jane's Doodles

 Hello and welcome!  Today, I'll share a fun card with you featuring a new digital stamp set from Jane's Doodles!  This one is called Surf's Up. This is another fun, must have set.


I have an inexpensive laser printer. I wish it could handle heavier watercolour paper but sadly, it does not. It does, however, handle a 90lb weight mixed media paper. I used an old Canson spiral bound paper book. 
I'm not sure if it's my printer or the paper, but I find that some of the line work will fade or rub off. Easy fix with a fine liner pen though!


I used watercolour pencils to colour the images, then outlined them the best I could. I just had to add some sparkle and shine with a glitter pen and Nuvo Crystal Glaze.


I hope you enjoyed my card featuring this super cute set!

See you soon!

Laurie

Saturday, April 11, 2020

Spring Fling Challenge with Gina K Designs!

Hello and welcome back! Having a lot more time on my hands means being able to participate in card challenges!  I'm finding that being stuck at home has really hindered my creativity and these challenges are an awesome way to fire that mojo back up!

I'm playing along with the Spring Fling Challenge over on the Gina K Designs blog. You really need to check out the inspiration on that page...incredible!


I used the Bold and Blooming Stamp Set for my card today. This is the very first Gina K stamp set I ever got and was hooked ever since! 


I die cut a circle out of Strathmore Mixed Media Paper and lined one of the images along the edge to get just a partial image. I moved the stamp slightly and stamped once more. I made sure not to get the same part of the stamp! I used Versamark Ink and gold embossing powder.

It's been awhile since I used my Zig Clean Colour Real Brush markers so I whipped those out. This is such an easy way to watercolour. And fast!! Because the image is heat embossed, you don't have to worry about going out of the lines.


Once everything was dry, I gold heat embossed the "hello" which is also from the same set.  I layered the painted circle onto a Scalloped Circle Die from Lawn Fawn cut out of kraft cardstock. I love the way gold and kraft look together!

I popped the circles onto a 4.25 X 4.25 white card base and added a few clear sequins to finish it off!


Thank you so much for dropping by this morning! Be well and be safe!

Happy Easter!

Laurie


Sunday, September 15, 2019

MFT's 2019 Card Design Superstar Challenge!

Hi everyone and welcome back!  I've decided to enter the MFT 2019 Card Design Superstar Challenge!! This is always daunting as there are so many talented card makers out there!


Last year I entered the Clean and Simple category but white space isn't my forte, haha!  So, this time around I thought I'd enter into the Colouring Virtuoso category. Now, I do not possess an outstanding technical ability (I totally googled the meaning of virtuoso, hahahaha) in colouring. But as I sat down to create this card, I thought it leaned more towards colouring than CAS.


I decided to make a shaped card using some older, oval dies from MFT. The Stitched Mini Scallop Ovals the Double Stitched Oval (which appear to not be available anymore).  I created the base by die cutting 2 of the scalloped ovals, scoring one about 3/4 inch from the top and adhering them together.  

I stamped the flower from the Beautiful Bloom Stamp Set with Versamark Ink then used clear embossing powder over top.  I watercoloured it using the Vintage Pastels set from Prima in the colour    Breezy. I added a bit of Stone Grey to the centre and an even more watered down version of the same colour around the outside of the flower.

I used the Double Stitched Oval Die to cut a portion of the image and layered it onto the card base. It was at this point I decided it needed a popped up frame. I nested the Double Stitched Oval die inside the Scalloped Oval Die and ran it through my die cutting machine to create the frame. I used foam tape to adhere it and give it more dimension.


Before adhering the sentiment, I decided to add some flicks of a darker colour using coloured pencils in 2 shades of green. This really made the image pop and gave it some much needed detail!  The sentiment comes from the Essential Sentiments Stamp Set.  Before calling this card done, I added a few Sparkling Clear sequins.


Thank you so much for stopping by!  

Laurie


Friday, September 6, 2019

Easy Faux Watercolour for Scrap N Stamp Canada!

Welcome to another fun blog hop and challenge for Scrap N' Stamp Canada!!  This one is so much fun and is going to be quite popular I think!  This months theme is watercolour!! Watercolour Wishes, in fact!


I used the Gina K Designs Wreath Builder Bundle for my project today. I love this system of stamps and templates (stencils)!  The possibilities are endless. You can use almost any stamps you already own with these templates as well.

Now, while I love to watercolour lined images, I also like using water based inks/markers to come up with fun and easy techniques. I chose to do some watercolour stamping to create a beautiful faux watercolour look!  This technique works with solid image stamps, which happen to be in the Wreath Builder stamp sets!


The technique is quite simple. Add colour to the stamp, add a bit of water with a damp paintbrush or water brush and stamp down!  That's it!  Your results will vary depending on the amount of water you add. I didn't want my images to distort too much so I used very little water. However,  by adding more water, the images will be more fluid which would look beautiful as well!  To show how easy this process is, I put together a video!!


I used Distress Inks on the card today, mostly because I LOVE the colours.  I used: Picked Raspberry, Seedless Preserves, Crushed Olive, Peeled Paint, Wild Honey and Antique Linen. For the sentiment, I used my favourite shade of embossing powder, Metallic Brass from WOW...I'm addicted to this stuff and the moment!


With a bit of ink, a bit of water and a few turns of your paper/cardstock, you will end up with wreath that looked like it took you hours to create!


Prizes!

SNS is giving a $50 gift certificate away to one lucky commenter. The winner will be announced on the Scrap N' Stamp Blog on September 19th, 2019!!  So, please leave a little love on each stop of the hop for your chance to win! Good luck! As an extra bonus, all watercolour products will be 20% for this weekend only!!

Facebook Challenge!

Remember to add your watercolored creations to the SNS Facebook Page for another chance of winning!!

Here is the complete hop lineup!!

Susan

Thanks so much for hopping along with us!!

Wednesday, September 4, 2019

New Create A Smile Challenge!!

Welcome back! It's the beginning of September, can you believe it?? Where is this year going and why is it in such a hurry?  I say that every fall because I cannot stand winter. Especially, the Canadian Prairies winters. I've lived her all my life and I still can't get used to them!  But enough rambling about the changing seasons...it's time for another CAS Challenge and this week we have a sketch!


It's a clean and simple design that you can make not so clean and simple if you'd like!  I followed the design pretty much to a tee this time.


To create the hexagon shapes, I used the Hexagon Web Stencil. This is a very cool stencil! I chose the size of the hexagon and then took a brush with a little paint on it and lightly traced the shape.  I carefully removed the stencil and filled in the entire hexagon.  I did two layers of watercolour to get the hard edges that I love so much and repeated 3 times.

To jazz it up a bit, I used some gold paint thinned out with water and added a generous amount of splatter! 


I decided to do some rough outlines with a black pen on the inner portion of each hexagon. This defined the shape a bit more.  I took the "hey" sentiment from the Decorated Wishes Add On Set and used Versaclair Ink in Nocturne. To make the sentiment stand out a bit more, I added a bit of a drop shadow with a white gel pen.  I cut down the panel using a stitched rectangle die and foam mounted it onto a grey, A2, top fold card base.

And that's my take on the sketch!!  

Please link up your fab creations on the Create A Smile Stamps Challenge Blog. We love seeing what you create and how the theme inspires you! Remember, you're playing along for a chance to win a €25 gift certificate to the Create A Smile Stamps Shop!!

Thank for dropping by! See you soon!

Laurie


Monday, June 17, 2019

Sneak Peek Day for My Creative Time!

Welcome to another week of sneak peeks for the upcoming 92nd Edition Release from My Creative Time! It's all about weddings and babies this month..super adorable!


Today, we're having a little look at the new stamp and die set called Sweet Little Smile.  This adorable set has the sweetest elephant images along with some of the most unique sentiments!


I created a panel using Distress Resist Spray and some hand drawn, watercolored hearts.  I am a bit obsessed with the Vintage Pastels Watercolour palette from Prima.  The colours are perfect for baby cards!

I painted in the elephant with the same watercolour set. This is kind of an odd shaped card as I made a couple of errors which resulted in the panel getting smaller, haha


The sentiment also comes from the same set. I stamped it out and fussy cut around it then popped it up on some foam adhesive.  I added a sweet bow and a few confetti pieces. Quick, easy and oh so cute!

Thanks for stopping by! See you tomorrow for another adorable sneak peek!!

Laurie

**Sneak Peek Giveaway**

We will be giving away the sets we are showcasing each day to ONE lucky winner!! For example, the sets we showcase on Wednesday, Emma will announce the winner of that on Thursday and the sets we showcase on Thursday will be announced on Friday on the MCT Blog!  All you have to do is leave some love on each of our blogs.  You are not required to comment on every blog, but the more you do comment on, the more chances you have of winning!!   VERY IMPORTANT: Please leave a way for us to contact you with your comment, just in case you are the lucky winner! For extra entries, you can spread the word about this release on Facebook, Twitter or Instagram using #mycreativetime!  Good luck!!


Tuesday, April 2, 2019

Your Next Stamp New Release Preview!!

Hello, friends!!  I'm so excited to be a guest for Your Next Stamp for their upcoming release!!  This is another amazing release, you will not be disappointed!!

For my card today, I used the new Fishy Background Stamp.  This is the most adorable stamp and will lend itself to a variety of techniques!


Of course, I just had to white heat emboss it and colour it in with my Tombow Dual Brush Pens for a simple watercolour look!


Aren't those rainbow fish so sweet??  The sentiment comes from the Snorkel Fun Fishy Stamp Set which is older but works perfectly on this card!!  I did some partial die cutting of one of the Scrapworks-Strips Dies to make a label for the sentiment.

And that's my little peak at just one of the sets being released TOMORROW!! Make sure you head to the YNS Blog for a look at all the design team and guest creations featuring goodies from this release!!

See you tomorrow for the big reveal and blog hop to celebrate!!

Laurie


Wednesday, February 6, 2019

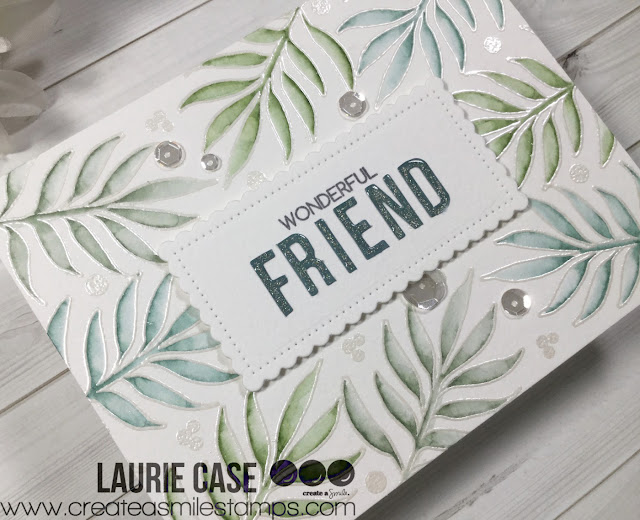
Create A Smile Challenge...Friendship!!

Hello and welcome back to another Create A Smile Stamps Challenge!!  This one is an easy one.  It's all about friendship. Friendship cards are a favourite of mine to make because you can use so many different styles of stamps. Critters, florals, graphic...anything goes!

For my card today, I combined an older CAS set along with a new release set.  I heat embossed one of the leaf images from the new Fine Ferns Stamp Set.  I used Silver Pearl embossing powder for this.  This is one of my most loved embossing powder!  Because I used watercolour paper, the images are a light shimmery colour without being stark white.


I used my Misti for the stamping as it's super easy to create a mirror image.  To colour, I chose 3 different greens from my set of Tombow Dual Brush Pens.  I swiped some colour inside each leaf and blended it out with water.


For the sentiment, I used the Alphabet Sticker Set in the colour of Deep Sea.  This was my first time using these stickers and I love them!!  I stuck them onto a piece of the same watercolour paper cut with a Cool Cuts Scalloped Rectangle Die.


The small "wonderful" word comes from the All About You Stamp Set. The stamp actually says "are wonderful", but I masked off the "are" before stamping.


I added some glitter and Nuvo Crystal Glaze to the letter stickers, adhered that panel with foam adhesive and added a few clear sequins.  The entire panel was glued onto a white card base.

I hope you enjoyed my project for today and I encourage you to play along!!  Create A Smile Stamps has wonderful products you are sure to love!!

All the details are on the Challenge Blog but here is what you're playing for:

Thank you for stopping by today!!  See you soon!!

Laurie


Wednesday, December 19, 2018

My Creative Time 86th Edition Sneak Peek Day One!!

Hello, my friends and welcome to the first day of sneak peeks for the 86th Edition release for My Creative Time!! This is a tiny release but it is SO beautiful!!


We are showing you a little look at the new "Amazing" Stamp and Die Set. This is a lovely floral image set that will be the perfect addition to your MCT stash!


This card came together so quickly!!  I stamped the large flower and leaves with Versamark Onyx Black Ink onto some watercolour paper.  I did mask the flower before stamping the leaves!  To keep things simple, I decided to do a wash of colour on the outside of the image. This really makes that flower pop!!  


I was going to leave it completely white inside the lines but in the end, I added a VERY light wash but took no time to shade or blend!!  To jazz it up a bit, I added a ton of clear sparkle pen!

The sentiment is from the stamp set as well and was also stamped in the Versafine ink.  I die cut the panel using the largest rectangle from the Scalloped Stitched Rectangular Dies and added a bit of black and white bakers twine.

The card base was made using the largest scalloped rectangle die from the same set. Because this is quite a flat card front, I used foam adhesive to adhere it to the card base.


And a few sparkling, clear sequins finish this quick and easy card!!


***Sneak Peek giveaway!***
We will be giving away the sets we are showcasing each day to ONE lucky winner! For example, the set we are showcasing on Wednesday, Emma will announce the winner of that on Thursday & the sets we are showcasing on Thursday, Emma will announce that winner on Friday on my blog! ALL you have to do is leave a comment on each of our blogs! You are NOT required to comment on EVERY SINGLE blog, but the more you comment on, the more chances you have for winning! VERY IMPORTANT, PLEASE leave a way for us to contact you w/your comment just in case "YOU" are the lucky winner! For EXTRA entries, you can spread the word about this release on Facebook, tweet about it OR even instagram it! #mycreativetime! GOOD LUCK EVERYONE & let's start spreading the word!;)
Before I go, I want to mention that there are several new Overstock and Retired items on sale!! It's totally worth a look!!
Laurie


Tuesday, August 21, 2018

Dimensional Window Card

Hi friends and welcome to another post featuring My Creative Time products!  I have very dimension window card to share with you. This is really easy to make and I hope my photos will help if you want to recreate this card.

I started by white heat embossing the Grainy Wood Background Stamp onto some Bristol paper. I decided to do a bit of loose watercolour but I didn't want the texture of a watercolour paper.


I chose three colours of Distress Oxide Inks: Broken China, Peacock Feathers and Cracked Pistachio. I did a wet on dry technique because the Bristol paper can only handle so much water. I basically just slapped some colour down with no rhyme or reason, haha!


I trimmed around the stamped image. The measurements are are just shy of 3.25inches and 5.25 inches. This will be the size of my finished card, as well!  Before cutting the "window" in this panel, I adhered some craft foam to the back. By doing this step first, you can be sure all the openings will line up. I chose one of the circle dies from the Bunch of Fun Circles Die Set.


It was no problem for my Big Shot to cut this. Next, it's time to cut the window in the card base itself.      I simply lined up the painted panel to the card base and traced around the cut out circle. REMEMBER: I cut the card base to fit the background panel!


Make sure your card base is open when you die cut this circle :)!  Now all you have to do is adhere the pretty front panel to the base!

For the sentiment, I used the Lower Case Fun Dies dies to spell out "hi". I cut these out of the positive we had left over from the watercolored panel. This already had craft foam on the back so that step is done!!


I glued the letters on the inside of the card so they were seen through the circle window. The dimension of everything looks awesome!!


The word "friend" comes from the Light the Candles Stamp and Die Set and was stamped in the Peacock Feathers Distress Oxide Ink.  Because my placement of the sentiment was slightly "off", I die cut all three leaves from the Stitched Leaves Dies and coloured them Crushed Olive and Mowed Lawn Distress Oxide Inks. I also added a spritz of shimmer spray to them (mixture of Perfect Pearls and water).


I LOVE all the dimension on this card!!


Another great part of this design is that I have the positive circle with the negative space of the letters for another card!!!  

Thank you so much for dropping by today, much appreciated!!

Stay Crafty and See You Soon!!!

Laurie


Thursday, July 5, 2018

One Stamp, Two Ways with Scrap 'N Stamp Canada!

Hello and happy Thursday!! Welcome back to my little blog:).  Todays post features a beautiful stamp from Taylored Expressions called Mandala Background 2.  Mandala designs are very trendy right now. The designs are gorgeous and lend themselves well to many techniques or even colouring!

For both cards today, I did a watercolored emboss resist technique using two different mediums. Let's take a look, shall we?

For the first card, I used the textured side of a piece of watercolour paper. I used Versamark Ink and white embossing powder. By the way, this stamp fits perfectly in the Mini Misti!


I decided to use Ken Oliver Color Bursts in Caribbean Brights for this card.  I haven't used these awesome powders in a long time!  If you've never tried a watercolour in powder form, they're really fun!  However, if you like a more controlled look or don't like inky fingers, these may not be for you..they can be a bit messy.


I used three colours from the set:  Chartreuse, Fuchsia and and Turquoise. I sprinkled the powder on lightly except for that big blob at the top. The turquoise colour came out much easier than the others.

I sprayed it generously with water, sorry I didn't get a photo of that. But the paper was VERY wet.  After it was dry, and I did use my heat tool, I sprayed it again with a mixture of Perfect Pearls and water. This gave it a beautiful shimmer!


I fussy cut around the stamped image but made it easier on myself by not cutting around each scallop on the edge, I simply cut them off. Instead of using the image as a whole, I cut it in half so I would have a couple of options for layout.


I added some foam tape and adhered each piece to the front of an A2 side fold card base.  For the sentiment, I used the Choose Happy stamp set from Penny Black. I love this set! It's full of amazing, uplifting sentiments.


I embossed the sentiment with white onto a black strip of cardstock which happened to fit perfectly between the mandala image!


I decided to add a bit of white gel pen detail and a few clear sequins. Overall, I really like how this one turned out but if I were to do it again, I would have probably stamped on the smooth side of the paper.

Now onto the second card and my favourite! This time I stamped on the smooth side of the watercolour paper and used gold embossing powder.


And my watercolour medium of choice was Picked Raspberry, Squeezed Lemonade, Peacock Feathers and Seedless Preserves Distress Oxide Inks. 


I used the very fancy technique called Ink Smooshing.  Just press down your ink pads onto a slick surface, spray with water and smoosh down your paper.  With Oxide Inks, you get a much better result by drying in between layers, which I did here.


I LOVE the way this turned out!!  For the sentiment, I used the Just Because Sugar Script Die from Birch Press Designs. This die is such a great size and the font is awesome.  I cut it 4 times from white cardstock and adhered it onto the panel.


I thought it needed a little heart, too! That was cut using a very old die from an unknown company but any heart die would work!  I foam mounted the panel onto a white card base and that was it!  I tossed the idea around of adding sparkle to the sentiment but decided to leave it as is.


Like I said, this card is my favourite but I really like the first one, too!  Which one is your favourite? I'd love to know!!


Thanks for stopping by today!!  I hope you enjoyed the process and can try something like this soon!!

Until next time...stay crafty!!

Laurie

Please note:  I use affiliate links for the products used. This means that if you make a purchase using one of these links, I will receive a small commission with no cost to you.  Thank you if you do buy yourself something nice:)


Featured Post

A Simple Thanks Card

Well, well, well. Look who decided to show up...me! It's been an awful long time yet again. I seriously thought I'd be well out of t...