Friday, March 6, 2020

"Stencil Us In' Blog Hop for Scrap N Stamp Canada

Welcome to another fun blog hop hosted by Scrap N Stamp Canada!  This month we're using stencils. Stencils are so versatile and also very affordable. I had a lot of fun with this one so let's get started!


I used the Scattered Floral Stencil from Taylored Expressions for my card today. This is a very pretty stencil. I decided to do try out some watercoloring using a regular pencil and some Tombow Dual Brush Pens. After attaching the stencil to a piece of Strathmore Mixed Media paper, I lightly traced around each flower.
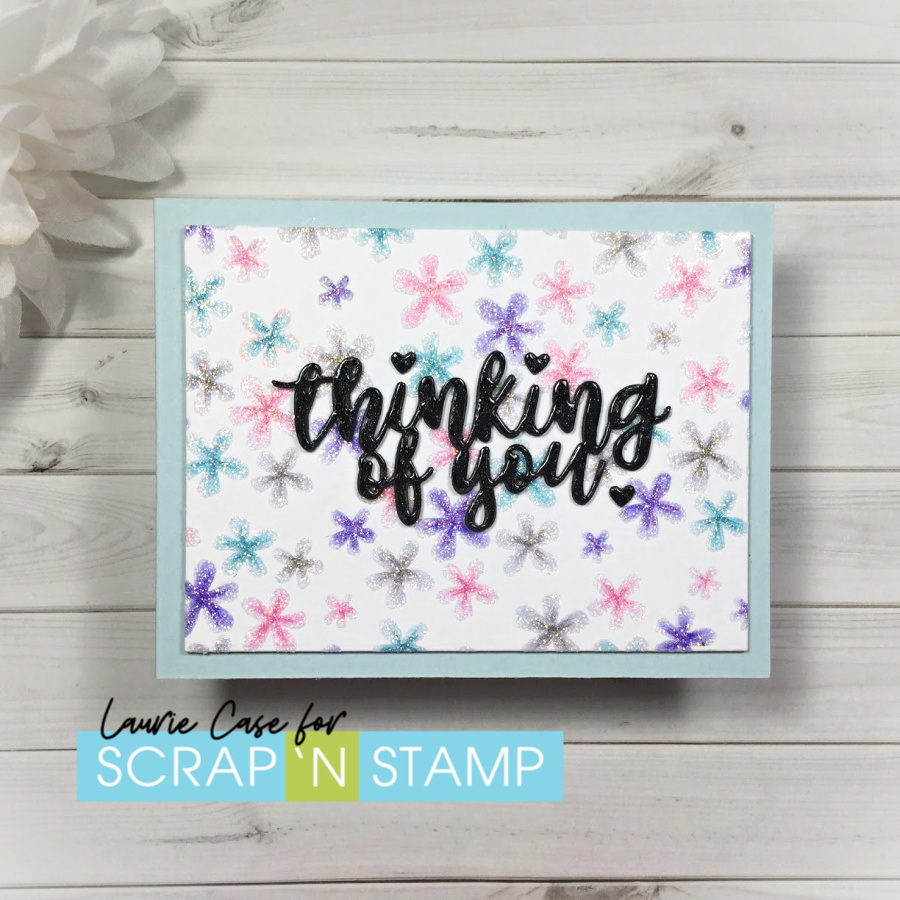

I removed the stencil and added a bit of the marker to the centre of each flower and blended it out with water. I made sure to keep the colour inside the pencil lines as the pencil would be trapped under the colour!!  After hitting it with my heat tool to make sure it was completely dry, I used an eraser to erase the traced lines. I wasn't super impressed, haha. It was just too bland. I took out my coloured pencils and chose a shade darker than the watercolour. I added some simple flicks and this gave it a lot more character!


Aaaand, I just could stop playing around with this background so I lined up the stencil again and added a layer of Nuvo Moonstone Glimmer Paste. Now this really jazzed things up! I set that aside to dry (which didn't take that long!) and worked on my sentiment.

I used the Fabulous Phrases Dies from Concord & 9th. I love this set!  I cut the "thinking of you" four times from black cardstock and adhered them all together to create a nice, think embellishment. Instead of dotting the "i's", I used the heart die that is included in this set. I added some Nuvo Glitter Gloss Pen as well as Nuvo Crystal Glaze to the sentiment.


I foam mounted the stencilled background onto a light blue cardbase. I'm pretty happy with the way this card turned out. Super sparkly and shiny!!!

If you'd like to see how this card actually came together, I have a VIDEO up on my YouTube Channel which you can find HERE!!

PRIZES:

There will be one $50 gift certificate to one lucky commenter. The winner will be announced on March 24, 2020 on the SNS Blog!! Also, all stencils will be 20% off!!

Thank you for hopping along with us!! I hope you found inspiration here today! Here's the complete hop lineup...enjoy!!!

Thursday, March 5, 2020

Woodland Whimsy...Gina K Designs

Hello!! Today I'm sharing my second card using the new Woodland Whimsy Stamp Set from the latest release from Gina K Designs.  This gorgeous set was designed by Lisa Hetrick and is just beautiful! You can check out all of Lisa designs, here!

I did one of my favourite techniques on this card, Copic colouring with heat embossing on kraft cardstock.


I first stamped that beautiful cluster of flowers onto a piece of kraft cardstock using a light, copic friendly ink. In the case, Memento Desert Sand. NOTE: A stamp positioning tool is key here as you need to restamp in precisely the right spot after the colouring is done!! I used some pinks and purples to colour the flowers and a couple greens for the stems. What I love about this technique is that you don't have to worry about the details. Because you'll be adding all those back when you heat emboss! When the colouring was done, I popped the panel back into my Misti, inked up the stamp with Versamark Ink and added the gold embossing powder. 


I used a rectangle die and did a bit of partial die cutting. I wanted the petals of the one flower to overhang slightly. This was easy to do. I lined up the die and only put the top cutting plate where I wanted it to cut. I used my Fiskars trimmer (with the guide wire) to line up the top and bottom cuts then trimmed around the flower with my scissors.


I heat embossed the sentiment in the same gold, embossing powder, foam mounted the panel on to an ivory, top fold card base and added a few sequins for a finishing touch. I love the subtle shades the markers give on kraft cardstock.

I hope you enjoyed today's clean and simple project using the new Woodland Whimsy Stamp Set from Gina K and Lisa Hetrick!

I have one more card to share using the amazing set so be sure to visit again!!

Laurie


Thursday, February 27, 2020

Gina K Designs February 2020 Release...Guest!

Hello, my friends and welcome back! I'm super excited (and honoured) to be a part of the Gina K Designs February release!  All the amazing new products are available now and you can find them here!!

I've used the new Woodland Whimsy Stamp Set which was illustrated by the oh-so-talented Lisa Hetrick. If you're not familiar with her stamp sets, you can find them all right here!  Her style is so unique and so beautiful!

I've created three different cards using the set and will share them over the next few weeks! Today, we'll start with this one:


 I chose one of the flower stamps as well as one solid leaf and one open leaf leaves images. Using Fog Ink from Simon Says Stamp, I stamped a random pattern onto a white panel. I decided to add some dots to fill in the pattern even more so I used the Lots of Dots Stamp Set from Simon. Once the stamping was done, I used a rectangle die to cut out the middle portion.

I have to admit, I didn't really think this plan through too well. My intention was NOT to do no-line colouring. I should have used a darker ink. But, at this point, I thought I'd see where this ended up! On the centre portion, I coloured up all the open images with alcohol markers. I did not take my time with this. As I laid the colours down, the basic shape of the flower appeared. No two are coloured the same. I actually love the way it turned!


I stamped the large sentiment right over top of the colouring using a darker shade of grey ink. I adhered the uncoloured, frame portion to a white, A2 cardbase and popped up the inner portion with some craft foam.


I added a few clear gems and called this card done!  I really hope you like it!

Thank you so much for stopping by! Be sure to visit again, as I'll have more to show you using the stamp set!

Please visit the Gina K Designs shop to check out all the fab, new products!

See you soon!

Laurie


Monday, February 17, 2020

February Pinkfresh Studio Challenge!

Hey, hi, hello there and welcome back! Today, I'm sharing a card I made for the current challenge over on the Pinkfresh Studio Challenge Blog.


I received some brand new items from their January release and was dying to have a play with them! Speaking of a new release, they are releasing a bunch of gorgeous background stamps today! They have some very unique designs and I may just have to "take a look" aka "add to cart".

Okay, let's have a look at the card I made! It's very clean and simple but I've added a few, subtle details to step it up a notch.


I just had to use the new Curvy Floral Vine Stamp Set. This is a simple layering set that is just beautiful. TIP: I die cut first, then stamped. I don't usually do it this way but I was having some issues having the die fit properly after I stamped the image. **This is NOT a flaw with the products! Photopolymer stamps are flexible so sometimes while placing it on your block or in your MISTI, it can shift slightly. And while it's easy to manipulate the stamps to line up, if you're off just by a little, the die will not line up.**

I used the smaller banner shape from the Essentials: Ornate Banner Die Set on a piece of white cardstock. I have a homemade stencil that easily lets me ink blend a heart shape. I used a light yellow ink.  To add a bit more detail to the banner, I flipped it over and using my scoring board, added score lines every 1/4 inch.


To add a bit more detail to flowers and leaves, I took a slightly darker shade of pencil crayon and added some simple flicks. This made quite a difference!  I used the Curvy Floral Vine die and cut it from white cardstock 3 more times. I adhered all those layers together including the stamped image. This created some nice dimension. For putting everything together, I stamped the sentiment in the middle of the heart using a dark, grey ink.  This sentiment comes from the new Leafy Decor Set. This stamp set is packed with awesome sentiments!!


I adhered the florals to encircle the heart. I foam mounted the focal banner onto an ivory card base that measures 3.75 X 5.25 inches.  I added a few pink jewels from my stash to add a bit of sparkle.

And that's it!  I hope you enjoyed my little process today!

Thanks so much for stopping by!

Laurie


Friday, February 7, 2020

"Galentines" Blog Hop for Scrap N Stamp Canada!

Hi and welcome to the Scrap N Stamp monthly blog hop! We are celebrating "Galentines Day". This is a fun take on Valentines where you make cards for your girlfriends!  Valentines Day can be a rough day for some people so this is a great way to spread some cheer.  What's really nice about this theme is that is doesn't necessarily have to love. It can be a simple "thinking about you", "thank you" or "hello"!


I've made a couple of cards using the Friendship Bloom Stamp Set. This is a collaboration set with Hero Arts and Gina K Designs. I highly recommend this set if you like florals. The main image is massive and the sentiments are amazing.


I white heat embossed the entire image onto a piece of Bristol Smooth paper.  For the colouring, I actually used some GinaK Designs. These are dye inks that come in beautiful colours! I used the Autumn and Summer Assortment set of ink cubes. 


When the colouring was done, I cut the image in half and trimmed the pieces down to fit 2 cards. This purple is my favourite!


But this pink is pretty fabulous, too!


I foam mounted each floral piece with foam tape. Each of the sentiments come from the You Get Me Stamp Set, also from Gina K.  This is a small, affordable set that has THE best sentiments that would make any girlfriend smile!


To finish each card off, I added a few colour co-ordinated sequins from my stash.

PRIZES:

There will be one lucky winner of a $50 gift certificate to the Scrap N Stamp Online Store. All you have to do is leave a comment on each stop of the hop for your chance to win! The winner will be announced on the SNS Blog on February 18th, 2020!

FACEBOOK CHALLENGE:

For another chance to win, you can upload a creation with this months theme to the SNS Facebook Challenge Page. Use #SNSCHALLENGE.

BLOG HOP LINEUP:

Laurie (that's me!)
Deb

Thanks for hopping along with us! Thank you in advance for all your lovely comments!

Laurie


Sunday, January 26, 2020

Pinkfresh Studio January 2020 Challenge

Welcome back! Today, I've joined in the first challenge of 2020 over at Pinkfresh Studio and it's a super fun one!  For this challenge, you can choose any of the challenge themes from 2019, fun right?

I chose October's theme...Circle Elements.


Now, I currently don't own much Pinkfresh Studio but let me tell you that I have remedied that!  I've recently placed a couple orders to beef up my stash! And I'm so excited!! I've really been loving Pinkfresh for awhile and can't wait to get all my goodies!  But enough rambling, let's have a look at what I've made!


I used the Braided Circles Die set to be the focal point on this birthday card. I coloured and fussy cut a couple of images from the Party Animals Stamp Set. This is an older set that has been discontinued.

The "hooray" comes from the Essentials Classic Words Die Set. If you're looking for a set of word dies, I highly recommend this set. It comes with any sentiment you'll ever need. Plus, the font is beautiful and there's a shadow die for each word! It's an amazing set! I used Picked Raspberry Distress Ink to add colour!


One of the first PF sets I got was the Dainty Botanicals Set. I love this set as it is filled with lovely, filler images that are great for almost any card! I thought the greenery would fill in this circe nicely.

Before adhering all the bits and pieces, I added a little blue ink to the top of the circle for a bit of contrast.  I used liquid adhesive for the greenery and foam adhesive for the critters.  I die cut the "hooray" 3 times from scrap, white cardstock and adhered them all together to give the die cut some dimension.


The sub sentiment comes from the Playful Animals 1 Set. This was another great set and I'm sad it's no longer available.  I used an embossing folder from my stash on the front of the card base and foam mounted the focal circle.

A few sequins finish this card and I love the way it turned out.

Thank you so much for stopping by! See you soon!

Laurie


Friday, January 3, 2020

Snarky New Year Blog Hop ft. Taylored Expressions!

Hello, friends and welcome back to our monthly blog hop for Scrap N Stamp Canada! This month we have a fun one..snarky/sarcastic cards!


I've used a bunch of Taylored Expressions goodies on my project. This brand has some of the best (and cutest) stamps and dies out there...in my humble opinion:).

When creating a card with a snarky or sarcastic sentiment, I always like to pair it with super cute critter images or florals. I think this combination works well and adds to the humour of the card.


I white heat embossed the Rainbow Waves Background onto a piece of white cardstock. I made my own stencil by using a Stencil material I found on Amazon along with a heart die set.  Taylored Expressions has a new, amazing line of masking stencils like the Oval Set but I really wanted a heart shape!

I lined up my homemade stencil over the heat embossed panel and using sponge daubers, I added a rainbow of colours. I used:  Picked Raspberry, Spiced Marmalade, Mustard Seed, Twisted Citron, Peacock Feathers and Seedless Preserves Distress Inks. After pulling off the stencil, it revealed this gorgeous heart rainbow!!

The super cute pegasus (I think) image is also from a stamp and die set from Taylored Expressions called Dreamer. I coloured that sweet thing with Copic markers.


I used one of the awesome sentiments from the TE stamp set called Shenanigans. This little set has some of the best sarcastic sentiments in it!! This particular sentiment is one stamp but I was easily able to trim it into small strips. It was a toss up on white on black or black on white but this won out in the end!

I trimmed the inked panel down before foam mounting the critter and the sentiment strips. I used a grey card base and added some Nuvo Glitter Pen and Crystal Glaze to portions of the pegasus!


I had so much fun with this card that I made a VIDEO!!  You can watch it HERE!!

Thanks for joining us! If you'd like to play along with the Snarky New Year Challenge, please visit our Facebook Page to enter your creation! We love to see what you come up with!

This month's prize is one $50 gift certificate to SNS online store. All you have to do is leave a comment on each stop of the hop for a chance to win! The winner will be announced on January 21st on the SNS Blog. Also, we have New Year's coupon code that is good until Sunday, January 5th and gives you $20 off any purchase of $75 or more!! Use code SNY20 at checkout.

Here is the complete blog hop lineup:

Laurie (that's me!)


See you soon!

Laurie


Featured Post

A Simple Thanks Card

Well, well, well. Look who decided to show up...me! It's been an awful long time yet again. I seriously thought I'd be well out of t...