Showing posts with label stencil. Show all posts

Tuesday, October 20, 2020

Tweet! Tweet! (Create A Smile Stamps)

 Hello and welcome! Today I've got a fun card to share with you featuring some masking, colouring and stencilling!


This card features three of the adorable bird images from the From My Nest Stamp Set. I started by stamping the little bird, masking him off, then stamping the larger two birds beside him. After removing the mask, I appears that the little guy is standing in front! Oh, the magic of masks:)

I coloured the image with Copic markers. The birds turned out a little darker than I wanted but I just went with it.


To create the small background, I used the largest oval in the Basic Ovals Stencil. I positioned it onto a white card panel that was trimmed slightly smaller than an A2 card base. 

I used a light blue ink to add the "sky". I made sure to use heavier pressure on the outer edges and lightening things up towards the centre. With the oval stencil still in place, I added a snowfall stencil that I had in my stash and applied embossing paste over top.

When both stencils are removed, you have a perfectly ink blended, snowfall oval!!  I had some die cut leaves in branches in my "unused die cut container" so I decided to add them here for a bit of interest.


I stamped the sentiment (from the same set), foam mounted the birdies and then foam mounted the panel onto a white card base. I was going to add details like shimmer and white gel pen, but for some reason decided against it.

Thank you so much for stopping by! See you soon!

Laurie


Thursday, August 6, 2020

AHOY!! with Create A Smile Stamps!

Hello friends and welcome back! I'm sharing a card with you featuring stamps and stencil from Create A Smile Stamps.


I've used the older stamp set called Underwater Love. This is a nautical/sea themed set and is just the cutest. I paired it up with the Bubble Rays stencil, which I used in a slightly different way.

I inked up the stencil as usual but instead of stopping there, I decided to fussy cut around the entire stencil! This gave almost a cover die appearance!  I knew I was going to place a circle in the middle so I only cut as far as necessary.

I coloured the cute submarine with Copics and foam mounted it onto the circle die cut, which I had lightly inked up in blue and heat embossed some "bubbles".


I added some sparkle pen, white gel pen and Nuvo Crystal Glaze details to finish this card off!

Thanks so much for stopping by! See you soon!

Laurie

Monday, July 20, 2020

Masking Stencils with Create A Smile Stamps!

Hello and welcome! I have this fun card to share with you today featuring stamps and stencils from Create A Smile Stamps.


I started by choosing the size of circle I wanted on the Basic Circles Stencil. With ink, a blending brush and a light hand, I added the colour. This layer needs to be a bit lighter. With the circle stencil still in place, I laid the Heart Rays Stencil over top and tried to centre the hearts the best I could. I used the same ink colour and a heavier hand when applying the ink. This creates a lovely two toned effect.


The cute little elf is actually from the Christmas set called Clumsy Santa. I did a bit of altering to the facial expression by fluffing up the eyebrows and adding a couple of eyelashes. By colouring the image using the same colour palette as the background, it doesn't look like a Christmas image at all!

To ground the elf, I used one of the Scalloped Rectangles Dies and trimmed off the top. The sentiment comes from the A Little Treat Stamp Set

I added a few white gel pen details to finish the panel off. I created a white card base to match the size of the panel. I inked the edges of the card base with the same blue ink I used before and adhered the stencilled panel on top.

And that's it! Thanks for joining me today! See you soon.

Laurie


Tuesday, May 19, 2020

Create A Smile Stamps Card Share!

Welcome!! I'm dropping in to share a card I made using products from Create A Smile Stamps! I've just recently joined the design team and am over the moon to be a part of this amazing group!

For this card, I've mixed a few stamp sets, old and new!


CAS Products used on this card:

Uplifting Stamp Set: helicopter, clouds
Best Bugs Stamp Set: tiny flower
Ting-a-Ling Stamp Set:  kitty cat

I'll be sharing Create A Smile Stamps cards here once a week so stay tuned!

Thanks for stopping by! See you soon!

Laurie

Friday, March 6, 2020

"Stencil Us In' Blog Hop for Scrap N Stamp Canada

Welcome to another fun blog hop hosted by Scrap N Stamp Canada!  This month we're using stencils. Stencils are so versatile and also very affordable. I had a lot of fun with this one so let's get started!


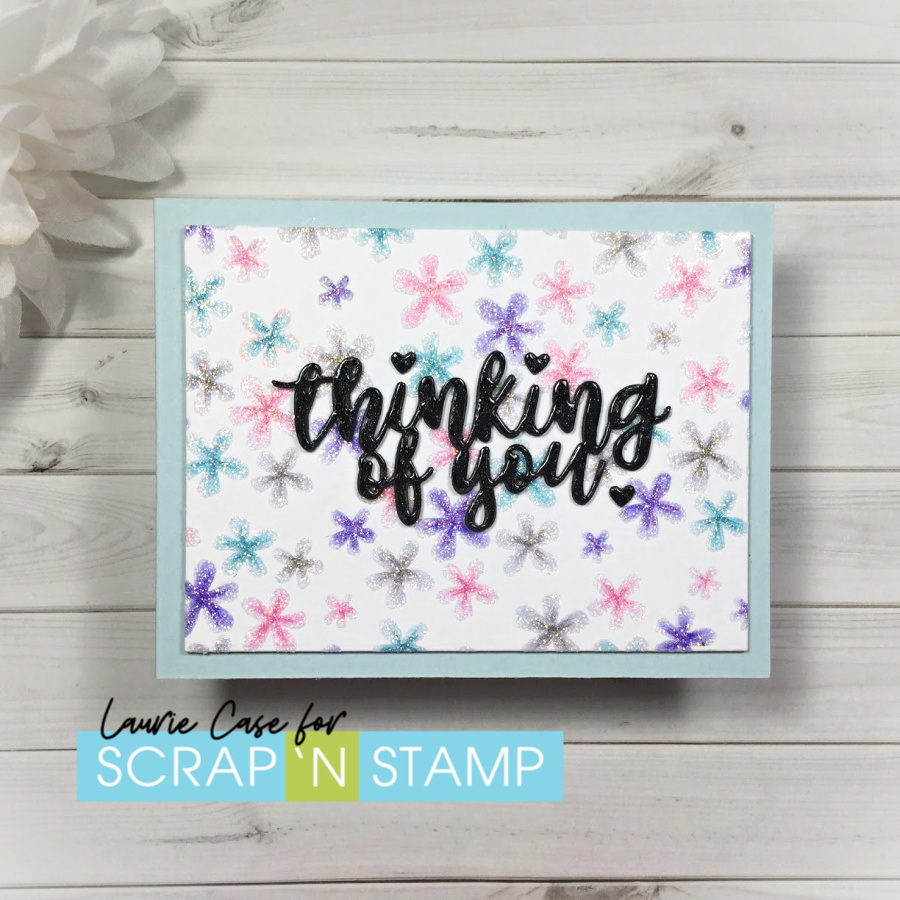
I used the Scattered Floral Stencil from Taylored Expressions for my card today. This is a very pretty stencil. I decided to do try out some watercoloring using a regular pencil and some Tombow Dual Brush Pens. After attaching the stencil to a piece of Strathmore Mixed Media paper, I lightly traced around each flower.


I removed the stencil and added a bit of the marker to the centre of each flower and blended it out with water. I made sure to keep the colour inside the pencil lines as the pencil would be trapped under the colour!!  After hitting it with my heat tool to make sure it was completely dry, I used an eraser to erase the traced lines. I wasn't super impressed, haha. It was just too bland. I took out my coloured pencils and chose a shade darker than the watercolour. I added some simple flicks and this gave it a lot more character!


Aaaand, I just could stop playing around with this background so I lined up the stencil again and added a layer of Nuvo Moonstone Glimmer Paste. Now this really jazzed things up! I set that aside to dry (which didn't take that long!) and worked on my sentiment.

I used the Fabulous Phrases Dies from Concord & 9th. I love this set!  I cut the "thinking of you" four times from black cardstock and adhered them all together to create a nice, think embellishment. Instead of dotting the "i's", I used the heart die that is included in this set. I added some Nuvo Glitter Gloss Pen as well as Nuvo Crystal Glaze to the sentiment.


I foam mounted the stencilled background onto a light blue cardbase. I'm pretty happy with the way this card turned out. Super sparkly and shiny!!!

If you'd like to see how this card actually came together, I have a VIDEO up on my YouTube Channel which you can find HERE!!

PRIZES:

There will be one $50 gift certificate to one lucky commenter. The winner will be announced on March 24, 2020 on the SNS Blog!! Also, all stencils will be 20% off!!

Thank you for hopping along with us!! I hope you found inspiration here today! Here's the complete hop lineup...enjoy!!!

Friday, January 3, 2020

Snarky New Year Blog Hop ft. Taylored Expressions!

Hello, friends and welcome back to our monthly blog hop for Scrap N Stamp Canada! This month we have a fun one..snarky/sarcastic cards!


I've used a bunch of Taylored Expressions goodies on my project. This brand has some of the best (and cutest) stamps and dies out there...in my humble opinion:).

When creating a card with a snarky or sarcastic sentiment, I always like to pair it with super cute critter images or florals. I think this combination works well and adds to the humour of the card.


I white heat embossed the Rainbow Waves Background onto a piece of white cardstock. I made my own stencil by using a Stencil material I found on Amazon along with a heart die set.  Taylored Expressions has a new, amazing line of masking stencils like the Oval Set but I really wanted a heart shape!

I lined up my homemade stencil over the heat embossed panel and using sponge daubers, I added a rainbow of colours. I used:  Picked Raspberry, Spiced Marmalade, Mustard Seed, Twisted Citron, Peacock Feathers and Seedless Preserves Distress Inks. After pulling off the stencil, it revealed this gorgeous heart rainbow!!

The super cute pegasus (I think) image is also from a stamp and die set from Taylored Expressions called Dreamer. I coloured that sweet thing with Copic markers.


I used one of the awesome sentiments from the TE stamp set called Shenanigans. This little set has some of the best sarcastic sentiments in it!! This particular sentiment is one stamp but I was easily able to trim it into small strips. It was a toss up on white on black or black on white but this won out in the end!

I trimmed the inked panel down before foam mounting the critter and the sentiment strips. I used a grey card base and added some Nuvo Glitter Pen and Crystal Glaze to portions of the pegasus!


I had so much fun with this card that I made a VIDEO!!  You can watch it HERE!!

Thanks for joining us! If you'd like to play along with the Snarky New Year Challenge, please visit our Facebook Page to enter your creation! We love to see what you come up with!

This month's prize is one $50 gift certificate to SNS online store. All you have to do is leave a comment on each stop of the hop for a chance to win! The winner will be announced on January 21st on the SNS Blog. Also, we have New Year's coupon code that is good until Sunday, January 5th and gives you $20 off any purchase of $75 or more!! Use code SNY20 at checkout.

Here is the complete blog hop lineup:

Laurie (that's me!)


See you soon!

Laurie


Wednesday, August 21, 2019

Mood Board Challenge with Create a Smile Stamps

Hi everyone and welcome back! It's that time where we introduce you to a new challenge over at Create A Smile Stamps! This two week challenge is a...Mood Board!


The inspiration for my project came from the lower right image along with the colours.


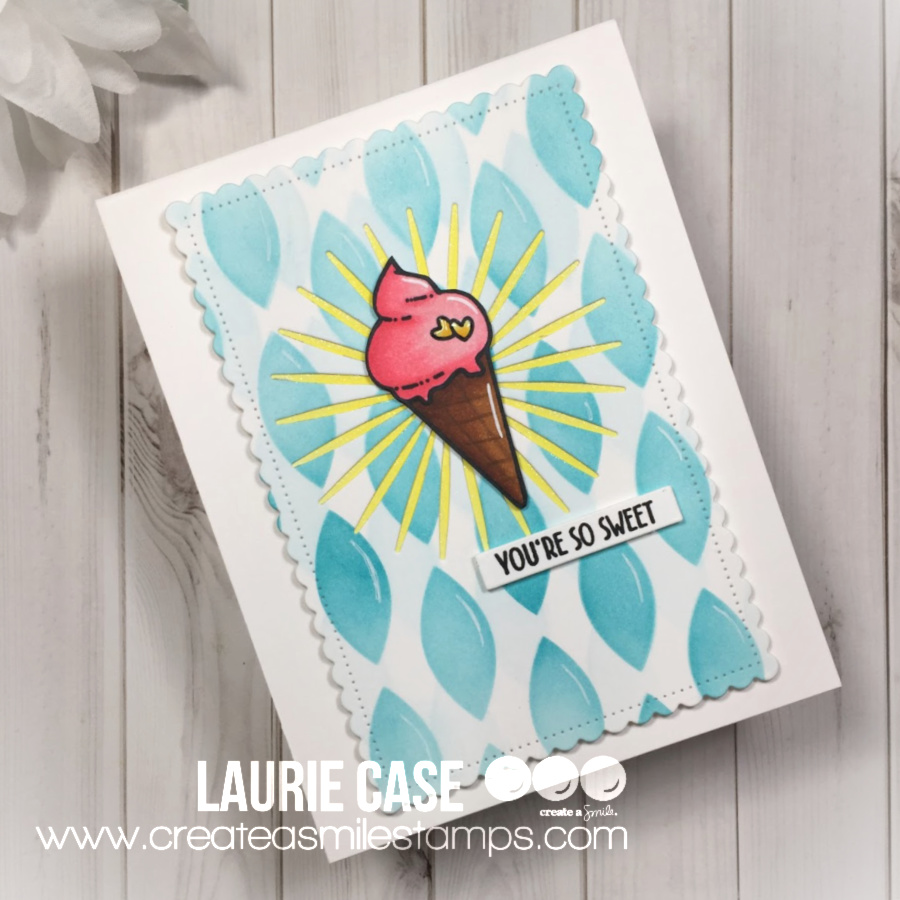
I used the Petals Stencil along with Peacock Feathers and Tumbled Glass Distress Inks to create the background. It may be hard to tell but there is two layers of ink. I inked Tumbled Glass first, shifted the stencil slightly then used the Peacock Feathers Ink. I then cut the panel down using the 2nd largest Scalloped Rectangle Die.

I coloured up that adorable ice cream cone from the A Little Treat Stamp Set and fussy cut it out. To bring in a bit more yellow, I die cut the centre of the ink blended panel with the Focal Die. I quickly added some yellow ink to a scrap piece of paper to layer behind.

I foam mounted the ice cream onto the die cut panel, foam mounted the panel to a white card base and added the sentiment, which is also from the A Little Treat set.


I hope you'll join us!! Remember there's a €25 gift certificate up for grabs!!

Thanks for stopping by!

Laurie


Tuesday, August 13, 2019

Wild About You with Pink & Main!!

Hello, friends! Welcome back! While the Pink&Main Blog is getting an exciting new look, I'm sharing my latest creation here!


I used the fun, new set called Toucan Do It stamp set and co-ordinating dies for this card along with some fun ink blending.

I started by die cutting a white panel of cardstock using the largest of the Stitched Rectangles Set 2.  I used Peacock Feathers Distress Ink to add some base colour. I focused on the bottom left portion. I then placed the Puffy Hearts Stencil over top and used the same ink, with a harder pressure. This creates such a beautiful look!


I stamped that adorable alligator with Memento Tuxedo Black Ink and used my Copic markers to colour it in.  I cut the image out with the co-ordinating die.


I adhered the heart panel onto a white card base and used foam adhesive to adhere the alligator.  I stamped the sentiment in Versafine Onyx Black ink.  I decided to leave it as it was and not add any sort of embellishment...which is hard for me, haha! I really wanted that background to shine!


Thank you for stopping by today!! I hope you have some time to check out some of these new (and older) products in the Pink & Main Shop!!


Wednesday, April 17, 2019

Create A Smile Challenge...CIRCLES!!

Hello friends and welcome back to another challenge for Create A Smile Stamps!!  It's all about circles. Who doesn't love a basic shape?  Especially, circles!!

I used a bunch of CAS products on this card. I basically went through every stamp set I have and looked for circles.  But real basis for this card comes from the Huge Polka Dots Stencil.  I used Catherine Pooler Inks in the colours Sweet Sixteen, Aquatini and Lime Rickey.  I used a Life Changing Blending Brush from Picket Fence Studio for the blending.


When the ink was dry, I heat embossed a bunch of circle images in silver.  The two largest circles come from the Hocus Focus set and all the other circles come from the Fine Ferns Stamp Set. I trimmed the panel down and adhered it to a light grey panel cut with a stitched rectangle die.


For the sentiment, I die cut the "you" from the You Twice Cool Cuts and used the Sweet Sixteen ink to give it some ombre style colour.  I took a co-ordinating sentiment from the All About You Stamp Set.  I heat embossed it onto a circle cut from a piece of polka dot vellum (from PaperTrey Ink, years ago!).  I simply manipulated the stamp to fit the circular shape.  I did layer the vellum onto a white circle die cut as well.  The sentiment just got lost without it.  I cut the "you" out of white craft foam for some dimension and added it to the circle.


I did adhere the sentiment circle with foam tape to separate it from the stencilled and embossed background!!

I hope you can play along with us!! I love seeing all creativity!!  Visit the Create A Smile Stamps Challenge Blog to enter!!

Thanks for stopping by! See you soon!!

Laurie


Wednesday, April 3, 2019

Create A Smile Challenge...Crafty Friends!

Welcome back to another Challenge for Create A Smile Stamps!!  It's a fun one this week and one we can all appreciate...Crafty Friends!  So get those CAS stamps out and start getting crafty!!

Create A Smile has a must have set in the store called Stamping Friends.  This set is perfect for creating something special for one (or all) of your paper loving buddies!  I used a couple of images from this set and combined them with a couple older stamp sets.


I started by gold heat embossing the gorgeous sentiment from the Happy to Call You My Friend Stamp Set.  I used the Heart Rays Stencil along with Seedless Preserves and Dusty Concord Distress Inks right over top of the sentiment.  I tried to centre it the best I could.  I cut down the inked panel using the second largest die from the Scalloped Rectangles Cool Cuts Set.

I stamped the ink blending tool and a few sequins from the Stamping Friends set.  The sequins were gold heat embossed right off the start and colour was added with the same Distress Inks.  I stamped the blending tool in a light Copic safe ink, coloured it and then added the embossing.  Jury still seems to be out on whether the embossing ruins your marker tips so I played it safe! Everything was fussy cut.


I foam mounted the images and it was at this point I decided to add the "creative" to the card.  This comes from the Same Frequency Stamp Set (which also contains some crafty images!). I simply masked off a portion of the stamp, inked and fussy cut around it.  I adhered the focal panel to an ivory card base...I am loving the white and ivory combination!!


To have the heat embossed sentiment stand out a bit more, I CAREFULLY added a drop shadow using some cool grey markers.  And that's it!!  

Can't wait to see what crafty creation you come up with!!  Please visit the Create A Smile Challenge Blog for more details but in the meantime, this is what you'll be playing for!

Thank you so much for stopping by today!!  See you soon!

Laurie


Wednesday, January 23, 2019

Create A Smile Stamps Challenge.."L is for..."

Welcome back, my friends!! Today is the start of another challenge over on the Create A Smile Stamps Blog!!  The theme is "L is for...", which could mean love, laugh, lost etc.  But because we are approaching the Valentines season, I went with a love themed card!


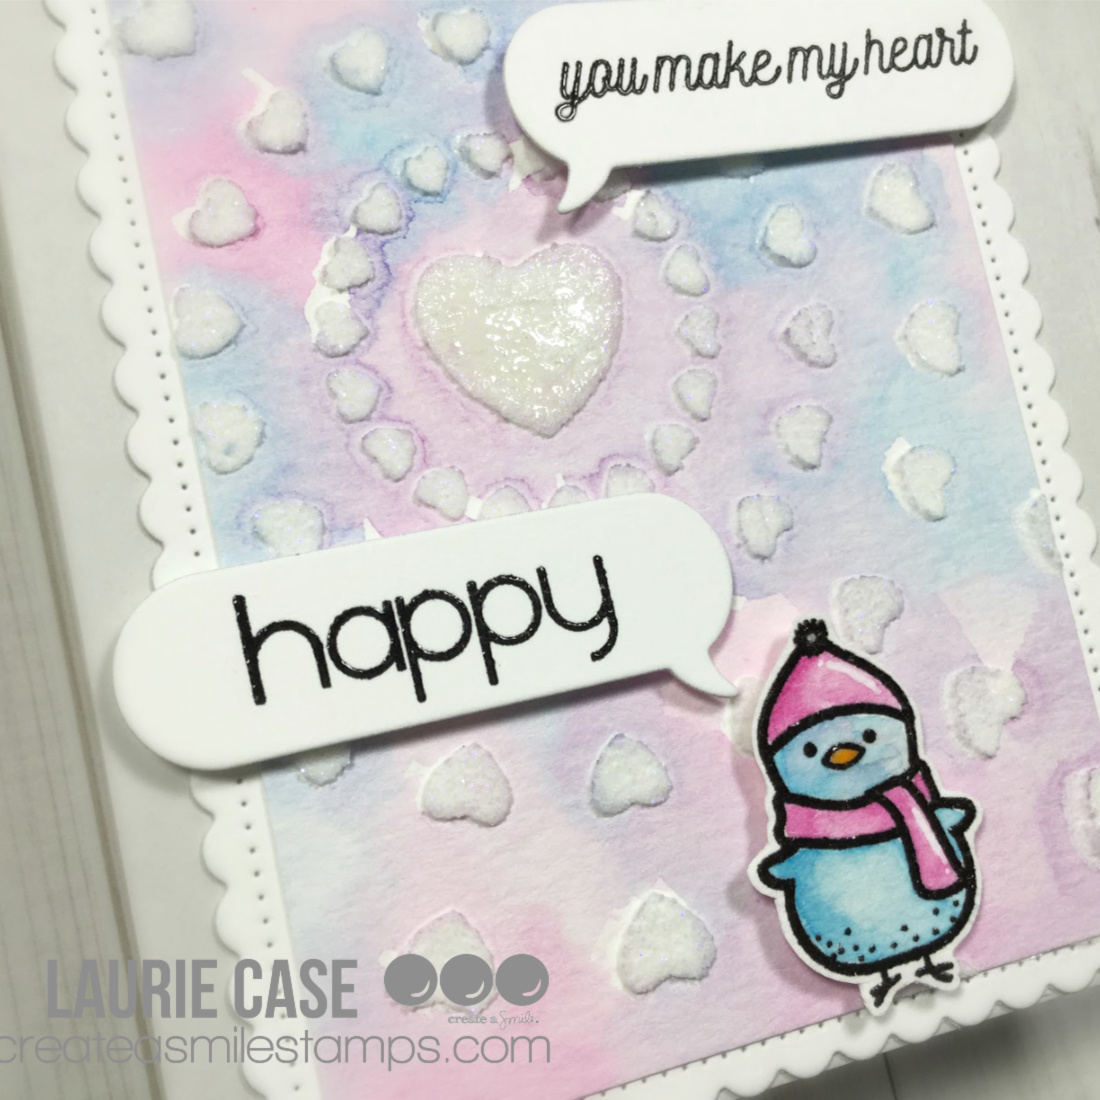
I actually tried a bit of a "technique" on this card! Well, experiment really.  First, I mixed some irridescent glitter and white embossing paste. I don't any glitter paste so I tried to make my own.  It worked fairly well but I wish I had used more glitter.


I applied the mixture through the Heart Rays Stencil onto watercolour paper.  The texture is awesome but like I said, I should have added more glitter!  I actually used my heat tool to dry the paste and had no issues with it bubbling up.  After it was dried, I added Mermaid Lagoon, Picked Raspberry and Dusty Concord Distress Inks to my surface and added a generous amount of water.  I used a paint brush to drop in the colours randomly.  I wasn't sure how the paste was going to react with the water but it held up surprisingly well!!  It did soften if there was a little too much water but it hardened up again fairly quickly!!


What was the most interesting was the fact that I could add a bit of water to each heart, dab with a paper towel, and a lot of the ink that was on top lifted...I was really quite amazed!!

I trimmed the stencilled piece down so it would fit into the second largest Scalloped Rectangle Dies
(I wanted the cute dot detail to show). I didn't really want to cover too much of the background, so I chose the tiny bird from the brand new From My Nest Stamp Set, used the same Distress Ink colours to colour and fussy cut him/her out!


For the sentiment, I used the Colour Your Heart Out Stamp Set along with the new Speech Bubble Cool Cuts.  These speech bubbles are a must have!  There are so many different sizes and they all face a different way so they're very versatile!!  I used foam tape to pop up the bird and bubbles and adhered the scalloped panel onto a 3.75 X 5 inch card base!  And that called it finished!!

I hope you'll play along with us!! I love visiting your blogs and feeds to see what you've created!!  And remember, you're playing for a €25 gift card to the Create A Smile Stamps Shop!!  Please visit the Challenge Blog for all the details!

Thank you so much for stopping by!! See you soon!

Laurie


Sunday, April 29, 2018

Anything Goes with Stencils with Craftin Desert Divas!

Hello crafty friends and welcome back!! I'm here to share a couple of projects featuring two ways to use a stencil and embossing paste.  This was the first time I tried either of these techniques and it was so easy and super fun!!

I started by die cutting two panels using the largest scalloped die in the Fancy Frames Die Set out of Strathmore Mixed Media paper.  This paper has become one of my favourites for all ink blending and watercolour techniques.  It isn't quite as heavy weight as your typical watercolour paper but it is bright white, stands up to water well and inks blend beautifully on it.


I chose the new Star Galaxy stencil and three Distress Oxide Inks in the colours Picked Raspberry, Peacock Feathers and Wilted Violet.  For my first technique, I decided to colour my white Texture Paste with the inks.


Basically, just smoosh some ink onto a slick surface, drop a blob of texture/embossing paste into and mix with a spatula. A plastic knife or old credit card would work as well!  I laid the stencil over the die cut panel and added the paste.  I mixed up all three colours and overlapped them on the stencil.


Looks pretty awful, doesn't it??  When the stencil is pulled off, the result is fantastic!


I did have a couple of areas that I pressed too hard with the spatula which resulted in a couple of "smoothy" areas but I was okay with this :)

For my next background, I decided to add colour to the panel first.  I used the same colours and wasn't too worried about getting a smooth blend.  I added a lot of water splatters to give a bit more interest.


I placed the stencil over top and applied the white texture/embossing paste.  


As you can see, these are two completely different looks!


I noticed that because the inks were still wet when I applied the embossing paste to the ink blended background, the white areas started to wick some of the colour. If you think this might bother you, I would recommend waiting for the inks to dry!

I chose the Magical Unicorn set for my images because I thought they work work perfectly with these backgrounds.  I stamped a few images, coloured them with my alcohol markers and fussy cut them out.


I ended up only using the two unicorns but I love that rainbow image!!  I used the unicorn on a cloud image for the coloured embossing paste background.  I embossed the "Make a Wish" sentiment from the same stamp set onto black cardstock using white embossing powder.


I used foam adhesive to adhere both the sentiment and the focal image.


To finish the card off, I used some Clear Wink of Stella on the mane, Glossy Accents on the horn and picked a few of the tiny hearts out of the Lady Bug Sequins pack.


The other background was finished in a similar manner. 


I used a combination of liquid glue and foam adhesive to adhere the images and sentiment.


I also used the small cloud die (which was a free with purchase die) to create a puffy place for the unicorn to sit. A bit of glitter pen, Glossy Accents and a few silver sequins complete this card!


Thanks for hanging around to the end of this long and "photo heavy" post!  I appreciate you stopping by today and hope you got inspired to try these easy techniques!!

Here's a list of CDD supplies used:


Featured Post

A Simple Thanks Card

Well, well, well. Look who decided to show up...me! It's been an awful long time yet again. I seriously thought I'd be well out of t...