Showing posts with label Rainbow. Show all posts

Friday, October 28, 2022

Rainbow "HI" Card

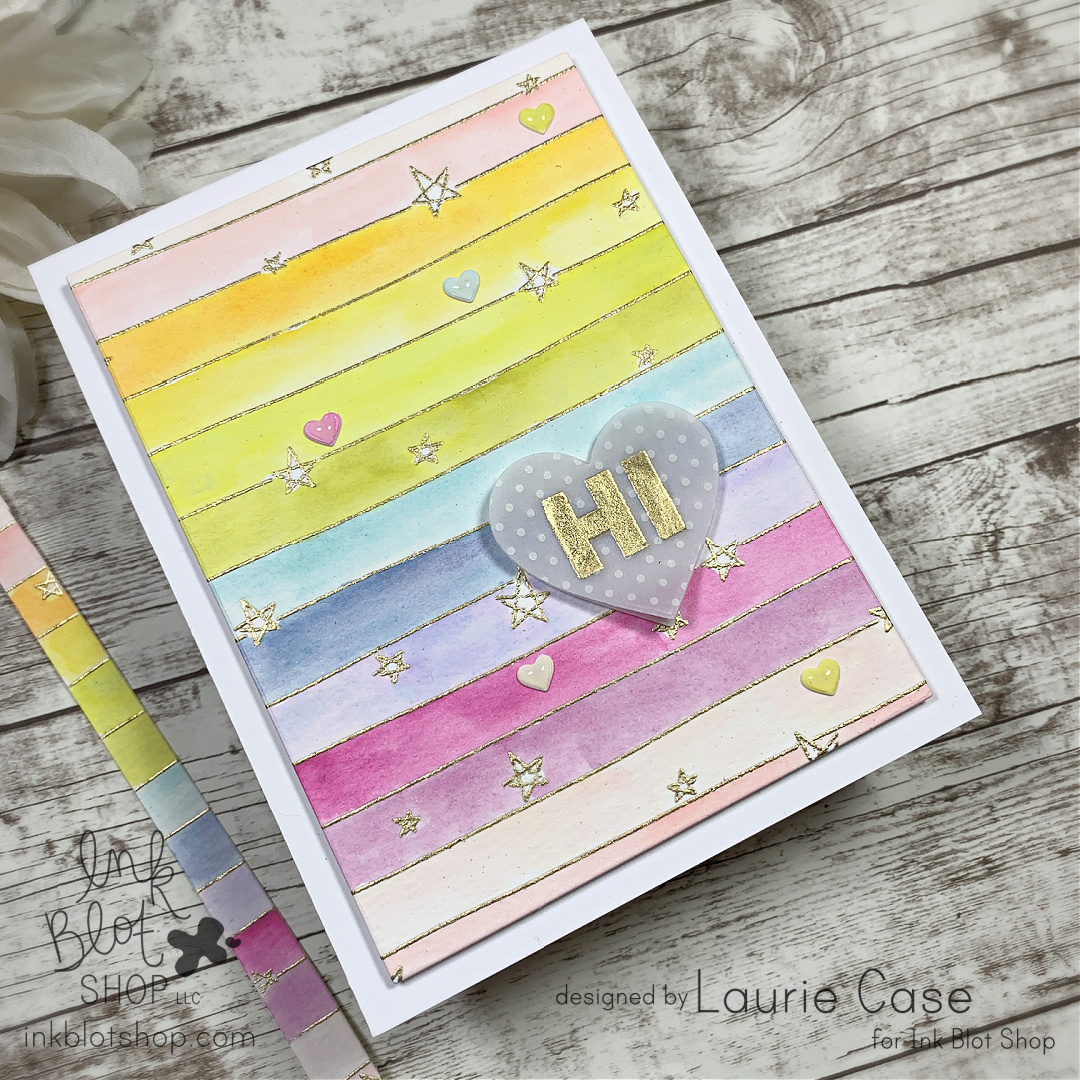
 Hi friends and welcome back! I'm sharing an easy and fun card featuring stamps from Ink Blot Shop! This card features simple watercolour and heat embossing.


I heat embossed the Stars and Stripes Background onto a piece of watercolour paper in Gold. Using a rainbow selection of Ranger Distress Oxide Inks, I quickly coloured in each stripe.


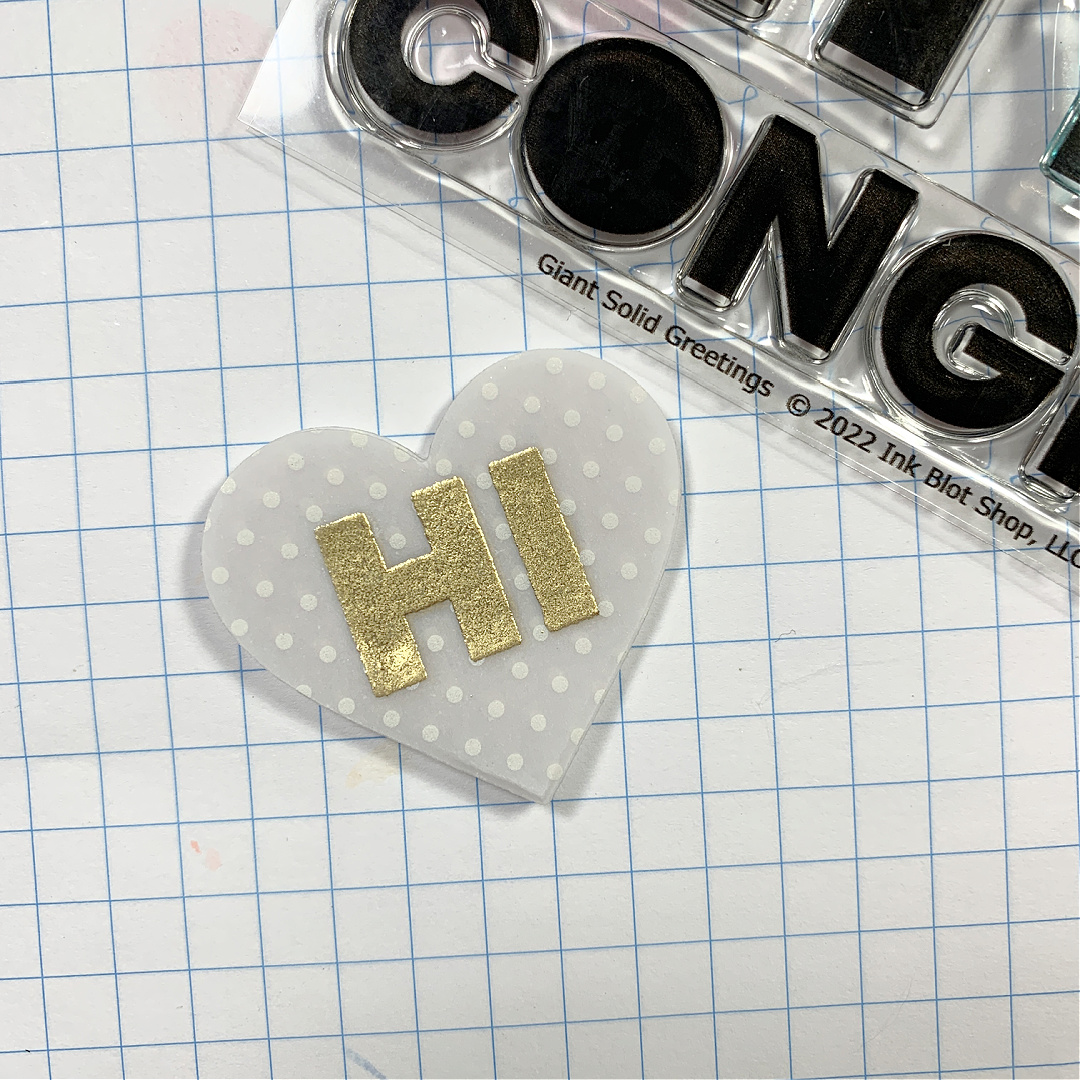
I found a piece of patterned vellum in my stash and decided to gold heat emboss the "HI" from the Giant Solid Greetings Stamp Set. 


I used a simple heart die to cut out the sentiment. I decided to use one of the leftover strips from the focal panel. I used a teeny-tiny heart die and cut out a few different colours. I added these as small embellishments.


I foam mounted the rainbow panel onto an A2 card base, foam mounted the vellum sentiment and used liquid glue on the tiny, embellishment hearts.

And the card is done!


And I still have the pretty little rainbow strip left over!

Thanks for dropping by! Have a great day!

Laurie


Tuesday, July 14, 2020

Rainbow Thinking of You Card with Create A Smile Stamps!

Hello friends and welcome!  Today, I made a rainbow "thinking of you" card featuring stamps and dies from Create a Smile Stamps.


I started by taking one of the banner dies from the Useful Banner Die Set and cut rainbow strips of card stock. I adhered the banners one by one onto a scrap piece of cardstock so it became one piece and easy to move around.

To add a bit of texture and interest, I chose a few of the solid images from the Wildflowers Stamp Set and heat embossed them with clear embossing powder. I love this look. It lets the background show through yet it also darkens the cardstock where it's embossed!


After a dry run of panel placement, I decided to clear heat emboss directly onto the card base as well. Hard to see but the texture is awesome!!

I used fun foam to adhere the rainbow panel. The sentiment is a combination of the You Twice Die and the All About You Stamp Set. In retrospect, I wish I had white heat embossed the "thinking of" but I'm still happy with the way this turned out!

Thanks so much for dropping by! See you soon!

Laurie


Friday, June 5, 2020

Perfect Pearls...A Blog Hop!

Hello all and welcome back! Today we're having a blog hop brought to you by Scrap N Stamp Canada! From the title of this post, you've probably guessed that we are featuring Perfect Pearls, remember those?!


I've had a few pots of these kicking around my craft room for quite some time. I do have have some of the Perfect Pearls colour mixed up with some water (homemade shimmer spray) but I hardly ever use that! So, this was definitely a great challenge because it made me use some much neglected supplies!

There are many different techniques that involve Perfect Pearls but I tried something new. Well, new to me but maybe this technique is "out there"...let me know!


These are the colours I had on hand: Pewter, Heirloom Gold, Perfect Gold, Perfect Bronze and Perfect Copper. Sorry about the washed out photo but you can faintly see a die cut rainbow at the bottom..


Instead of using a binding agent like Versamark or the Perfect Medium, I wanted to see if double sided adhesive would work. Spoiler Alert:  It did!!  I die cut the Rainbow Whimsy Die from MFT out of white cardstock which I placed the Stick It Adhesive to.

I removed the backing from the adhesive and using a fluffy brush, liberally applied the Perfect Pearls. I started with the Perfect Copper shade for the largest arch of the rainbow.


The key to this is to make sure the entire surface is covered, including the edges. I found that the Perfect Pearls adhered very well and removed any sickness of the adhesive. 


As you can see, my rainbow isn't in the typical colours but I think it turned out beautiful as well as quirky!

I die cut the rainbow 3 more times out of scrap, white cardstock and layered them all together. Now, it's time to put this onto a card!


 I used the Cloud Stencil from MFT and a blue ink to create a sky directly onto the front of the card base.  I thought this card needed a few raindrops. I used the Colour Drops Die Set (MFT) and die cut 3 of the smallest die. I used the same adhesive covered cardstock. After removing the backing, I added the Perfect Pearls and the Pewter shades. It's so easy to blend different powders! I also stacked the drops onto scrap card stock.


As you can see, white gel pen works beautifully over top of this medium. I may have gone over board on that.  The sentiment come from the Essential Sentiments Stamp Set (older but must have set from MFT) which I stamped onto a strip of white cardstock and snipped into 3 pieces.  I popped those up as well because why stop with the dimension, right?


I hope you enjoyed my take on the Perfect Pearls! This is such an under used medium and I encourage you to give them a try!

BLOG HOP LINEUP:


PRIZE AND SALE!!

There will be one $50 gift certificate given away to one lucky commenter! So make sure to leave a comment at each stop to increase your chances of winning! The winner will be announced on the SNS Blog on 

For this weekend only, all Perfect Pearls will be 10% off so now is a perfect time to stock up!!

**Some affiliate links used. Thank you so much if you make a purchase through one of these links**

Thanks for stopping by!

Laurie


Friday, January 3, 2020

Snarky New Year Blog Hop ft. Taylored Expressions!

Hello, friends and welcome back to our monthly blog hop for Scrap N Stamp Canada! This month we have a fun one..snarky/sarcastic cards!


I've used a bunch of Taylored Expressions goodies on my project. This brand has some of the best (and cutest) stamps and dies out there...in my humble opinion:).

When creating a card with a snarky or sarcastic sentiment, I always like to pair it with super cute critter images or florals. I think this combination works well and adds to the humour of the card.


I white heat embossed the Rainbow Waves Background onto a piece of white cardstock. I made my own stencil by using a Stencil material I found on Amazon along with a heart die set.  Taylored Expressions has a new, amazing line of masking stencils like the Oval Set but I really wanted a heart shape!

I lined up my homemade stencil over the heat embossed panel and using sponge daubers, I added a rainbow of colours. I used:  Picked Raspberry, Spiced Marmalade, Mustard Seed, Twisted Citron, Peacock Feathers and Seedless Preserves Distress Inks. After pulling off the stencil, it revealed this gorgeous heart rainbow!!

The super cute pegasus (I think) image is also from a stamp and die set from Taylored Expressions called Dreamer. I coloured that sweet thing with Copic markers.


I used one of the awesome sentiments from the TE stamp set called Shenanigans. This little set has some of the best sarcastic sentiments in it!! This particular sentiment is one stamp but I was easily able to trim it into small strips. It was a toss up on white on black or black on white but this won out in the end!

I trimmed the inked panel down before foam mounting the critter and the sentiment strips. I used a grey card base and added some Nuvo Glitter Pen and Crystal Glaze to portions of the pegasus!


I had so much fun with this card that I made a VIDEO!!  You can watch it HERE!!

Thanks for joining us! If you'd like to play along with the Snarky New Year Challenge, please visit our Facebook Page to enter your creation! We love to see what you come up with!

This month's prize is one $50 gift certificate to SNS online store. All you have to do is leave a comment on each stop of the hop for a chance to win! The winner will be announced on January 21st on the SNS Blog. Also, we have New Year's coupon code that is good until Sunday, January 5th and gives you $20 off any purchase of $75 or more!! Use code SNY20 at checkout.

Here is the complete blog hop lineup:

Laurie (that's me!)


See you soon!

Laurie


Wednesday, July 10, 2019

Create A Smile Sketch Challenge!

Welcome back to another challenge hosted by Create A Smile Stamps!  We have a Sketch Challenge for you this time around!


I love sketch challenges. They always seem to get the creative juices flowing. What's nice about them is that they can be taken literally or you can put your own spin on them!  Wherever the idea takes you is okay!!

I made a very bright card for this challenge! Like most of us, I have a stash of patterned paper that I rarely use. But I thought some of it would go great with the rainbow colouring I did on this card.


I stamped out those gorgeous hearts from the Colour Your Heart Out stamp Set, coloured them rainbow style and fussy cut each one. I used the second largest of the Scalloped Rectangles Dies on white cardstock and arranged all those hearts according to the sketch. 


I foam mounted the rainbow hearts and used glue to adhere the two smaller hearts.  Something else I rarely do is stamp the sentiment in anything but black, brown or grey. I used a yellow ink here and love the way it looks!

The rectangle panel was foam mounted to the card base, which I covered in the yellow polka dot paper. I added 3 clear sequins to finish the card off.


Thank you for stopping by today!  I cannot wait to see your take on this sketch!  

Remember to link up your projects on the Create A Smile Challenge Blog for a chance to win a €25 gift certificate to the CAS Store!!

Laurie


Monday, April 15, 2019

My Creative Time 90th Edition Sneak Peek Day One!!

Hello, crafty friends!! Are you all ready for another AMAZING release from My Creative Time?!!  Today, we're taking a look at two different products which work VERY well together!

First is the Hello Gorgeous Stamp & Die Set.  This is a beautiful stamp set featuring two flamingo images and includes some of the best sentiments, EVER!!  Here's a look at what I made using the set.


I created a little circle scene using the Bunch of Fun Circles Dies, the Floating Clouds Dies and the greenery dies that are included in the Summer Vibes Stamp & Die Set.  I coloured everything with Distress Inks which was quick and easy.  I layered the circle scene onto the largest die in the Bunch of Fun Circles set and before adding that to the card base, I used a leaf embossing folder on the front panel.


I stamped the sentiment onto one of the new Strip Sentiment Dies. You are going to love these dies! They are so cute and not mention versatile. I even have a bonus project featuring these dies for you today! 


I finished this card off with a bit Nuvo Crystal Glaze and some clear sequins.  Let's have a look at my bonus card!


The sentiment strip dies come attached and for this project, that came in handy.  When ran the dies through my die cutting machine using cardstock first, then a scrap piece of paper.  The scrap provides a template which make it really easy to line the die cuts up on the card front.

I white heat embossed different sentiment on the labels then used a rainbow colours of Distress Inks to blend over top.


I did cut craft foam using the dies as well, for perfect dimension.  Then added some co-ordinating rainbow confetti to each sentiment strip. And that call that card, done!! This is a super clean and simple card, but so much fun!!

I hope you enjoyed today's sneak peek!! You won't want to miss tomorrow :)

Sneak Peek Giveaway:

We will be giving away the sets we are showcasing each day to ONE lucky winner! For example, the set we are Wednesday, Emma will announce the winner of that on Thursday and the set we are showcasing on Thursday, Emma will announce that winner on Friday (on the MCT Blog).  All you have to do is leave a comment on each of our blogs. You are not required to comment on on every single blog, but the more you comment, the more chances you have to win! VERY IMPORTANT: Please leave a way for us to contact you when leaving your comment, just in case you are the lucky winner!!  For extra entries, you can spread the word about this release by sharing it on Facebook, Tweeting about it or sharing on Instagram!  Use the hashtag #mycreativetime.  GOOD LUCK!!

Laurie 


Thursday, July 19, 2018

Challenge #204..Rainbows and Butterflies with CAS-ual Fridays!

Hi everyone and welcome back to our next Friday Challenge for CAS-ual Fridays Stamps!! This is another fun one..


Rainbows and Butterflies!!! Yay!!  This just screams pretty, bright and cheerful projects!! First off, let me tell you that I do not own a CAS-ual Fridays stamp or die set that has a butterfly in it. But no worries! I'll show you how I overcame that little obstacle.


I created a panel using the second largest Bubble Box Fri-Die. I created a mask by running that same die as well as one size smaller together through my die cutting machine. This created a frame mask.  I used Tattered Rose Distress Ink to add some colour to the background.  I stamped that gorgeous floral image from the Truth Is Stamp set. Once directly onto the panel and once onto some white cardstock where I could colour and use the co-ordinating Fri-Dies to cut the flowers out. That's where I incorporated the "rainbow".

I adhered the flowers by using the dies and fun foam. I didn't want any of the stamped image underneath showing which is why I didn't use foam tape.


To create the butterflies, I used the hearts from the Fun-Fetti Fri-Dies set. I coloured each heart and adhered them together to form the shape of a butterfly. I drew on the bodies and the antennae as well as a few dots and dashes.  


I glued the Bubble Box panel directly onto a light pink cardbase, added a bit of sparkle and called this one done!!  I hope you found a little inspiration :)

To play along, simply upload your creations over at the Fridays Challenge Blog. You could win a $25 gift certificate to CAS-Fridays Stamps! But if you use CAS-Fridays products on your creation, that amount doubles..wow, $50!!!


Have fun with this challenge! I can't wait to see all your amazing creations!

Until next time...stay crafty!!

Laurie


Featured Post

A Simple Thanks Card

Well, well, well. Look who decided to show up...me! It's been an awful long time yet again. I seriously thought I'd be well out of t...