Showing posts with label guest designer. Show all posts

Thursday, March 12, 2020

Woodland Whimsy with Gina K Designs!

Welcome back to another look at the Woodland Whimsy Stamp Set! This set is part of the newest release from Gina K Designs and was illustrated by the talented Lisa Hetrick!

Today's card features some Copic colouring and fussy cutting!  I wanted the card to be bright and cheerful and to put a smile on someone's face!


I started by stamping and colouring a couple of the flowers, leaves and that awesome hanging branch!   I kept the colours light! I fussy cut each image out. I was a little worried about the branch but it was actually very easy to cut out!. I simply used a craft knife to make an "x" in the centre of the ropes, took my scissors and removed enough of the card stock to maneuver my scissors inside!

I used Wild Dandelion ink to blend a small area on a white panel. To add a bit of interest, I used a polka dot embossing folder. I used foam adhesive to adhere all the elements to the embossed panel.


I added some sparkle pen to the flowers and a few iridescent pearls, then foam mounted the sentiment underneath.


I foam mounted the panel onto an ivory card base and called it done!!

Thank you so much for stopping by and thank you to Gina K for letting me be a part of this fab release!

Laurie


Thursday, March 5, 2020

Woodland Whimsy...Gina K Designs

Hello!! Today I'm sharing my second card using the new Woodland Whimsy Stamp Set from the latest release from Gina K Designs.  This gorgeous set was designed by Lisa Hetrick and is just beautiful! You can check out all of Lisa designs, here!

I did one of my favourite techniques on this card, Copic colouring with heat embossing on kraft cardstock.


I first stamped that beautiful cluster of flowers onto a piece of kraft cardstock using a light, copic friendly ink. In the case, Memento Desert Sand. NOTE: A stamp positioning tool is key here as you need to restamp in precisely the right spot after the colouring is done!! I used some pinks and purples to colour the flowers and a couple greens for the stems. What I love about this technique is that you don't have to worry about the details. Because you'll be adding all those back when you heat emboss! When the colouring was done, I popped the panel back into my Misti, inked up the stamp with Versamark Ink and added the gold embossing powder. 


I used a rectangle die and did a bit of partial die cutting. I wanted the petals of the one flower to overhang slightly. This was easy to do. I lined up the die and only put the top cutting plate where I wanted it to cut. I used my Fiskars trimmer (with the guide wire) to line up the top and bottom cuts then trimmed around the flower with my scissors.


I heat embossed the sentiment in the same gold, embossing powder, foam mounted the panel on to an ivory, top fold card base and added a few sequins for a finishing touch. I love the subtle shades the markers give on kraft cardstock.

I hope you enjoyed today's clean and simple project using the new Woodland Whimsy Stamp Set from Gina K and Lisa Hetrick!

I have one more card to share using the amazing set so be sure to visit again!!

Laurie


Thursday, February 27, 2020

Gina K Designs February 2020 Release...Guest!

Hello, my friends and welcome back! I'm super excited (and honoured) to be a part of the Gina K Designs February release!  All the amazing new products are available now and you can find them here!!

I've used the new Woodland Whimsy Stamp Set which was illustrated by the oh-so-talented Lisa Hetrick. If you're not familiar with her stamp sets, you can find them all right here!  Her style is so unique and so beautiful!

I've created three different cards using the set and will share them over the next few weeks! Today, we'll start with this one:


 I chose one of the flower stamps as well as one solid leaf and one open leaf leaves images. Using Fog Ink from Simon Says Stamp, I stamped a random pattern onto a white panel. I decided to add some dots to fill in the pattern even more so I used the Lots of Dots Stamp Set from Simon. Once the stamping was done, I used a rectangle die to cut out the middle portion.

I have to admit, I didn't really think this plan through too well. My intention was NOT to do no-line colouring. I should have used a darker ink. But, at this point, I thought I'd see where this ended up! On the centre portion, I coloured up all the open images with alcohol markers. I did not take my time with this. As I laid the colours down, the basic shape of the flower appeared. No two are coloured the same. I actually love the way it turned!


I stamped the large sentiment right over top of the colouring using a darker shade of grey ink. I adhered the uncoloured, frame portion to a white, A2 cardbase and popped up the inner portion with some craft foam.


I added a few clear gems and called this card done!  I really hope you like it!

Thank you so much for stopping by! Be sure to visit again, as I'll have more to show you using the stamp set!

Please visit the Gina K Designs shop to check out all the fab, new products!

See you soon!

Laurie


Thursday, September 5, 2019

Your Next Stamp Preview!!!

Hello, friends and welcome back! Today I have the pleasure of giving you a little preview of one of the new stamp sets from Your Next Stamp!  YNS is one of my favourite companies and the fact that they're Canadian makes me love them more!!


We're having a look at the super cute set called Birthday Song. This little set features two critters singing their hearts out!


I coloured these cuties up with alcohol markers and used the co-ordinating dies to cut them out. I used a confetti-like stencil and a few Catherine Pooler inks to ink up a simple background.  


The sentiment was stamped onto a speech bubble die cut (which came from an older die set from YNS). I used a die to create the stitched frame which I adhered to the inked background.  The critters and the sentiment were foam mounted.

I placed the panel a little crooked on the card base for a bit of added interest. Of course, I had to add some music notes, which are also included in the Birthday Song set, as well as a few clear sequins!


This set is so darned cute and bound to put a smile on someones face!

Please visit the Your Next Stamp Blog where you'll find ALL the previews for today!  Also, check out YNS on Instagram!! One random comment from each preview day will win that days product! All comments must be left by September 15, 2017 with the winners being announced on September 17th, 2019 on the YNS Blog!!

All products will be available for purchase on September 12th, 2019 at 11am EST!!

Thanks for stopping in today!! I'll be back in a few days with another preview!!

Laurie


Sunday, June 9, 2019

Cat Lover Card with Paper Nest Dolls!

Hello, friends! Welcome back, so glad you're here.  Today, I have the pleasure to show you a card made using a new stamp from Paper Nest Dolls!  Christine was so kind to send me the Cat Lover Emma Stamp (in digital form).  This image in right up my alley, as I'm what you'd call a "crazy cat lady".  I love cats!!


I coloured this amazing image up with my Copic Markers.  I have to admit that colouring animals is not my forte, but I did my best!  I encourage you to check out the Paper Nest Dolls website or blog, the talent of that design team is incredible!!!!


This image was very easy to fussy cut. I did take an X-acto knife to remove one of the inner portions. I did add a few white gel pen details to some portions of the image.

For the card base, I used a light pink cardstock. I stamped a paw print image repeatedly in a light pink ink and coloured them in with white pencil...not that you can tell, haha!  


I foam mounted that cat lady and added a sentiment from an older, discontinued set from Concord and 9th.


I'm quite pleased with how this card turned out and have the perfect recipient in mind!!

A big thank you to Christine for letting me have a play with this fabulous new stamp and thank you so much for stopping by!

Until next time...stay crafty!

Laurie


Tuesday, April 16, 2019

Wishing Wells with Your Next Stamp!!

Welcome back, friends!!  Today, is my final guest post for Your Next Stamp.  I've had an absolute blast creating with some of the newest release!  I hope you've had a chance to check out all the amazing inspiration from the YNS design team...they are amazing!  I also hope you were able to get some of these goodies for your craft room :)

For my card today, I used the new Wishing Wells and Wishing Well Fairy Stamp Sets along with their co-ordinating dies.


I had so much fun colouring up these images!  Aren't they beautiful and sweet?  I created a frame using the Reverse Scallop with Optional Stripes Die.  I used the positive portion to ink blend some clouds using a stencil and Peacock Feathers Distress Ink.

On the card base itself, I used a sunray stencil with some Spun Sugar Distress Ink to add a bit of interest.  I used the Misti Stamping Tool to stamp the "wishing" multiple times with the same ink. We all know that Distress Inks don't work so well for stamping but the Misti solves that problem!


I foam mounted the frame and used liquid adhesive for the cloud background. I love that there is a die that cuts out the "Wishing" word!!  I added foam adhesive to the word die as well as all the images.  I love dimension on my cards!


And that's my finished card for today!  I want to thank Karen and Julie for having me this month. I enjoyed my time with you so much!!

And thank YOU for stopping in today. I love when you visit!!

Until next time...

Laurie


Tuesday, April 2, 2019

Your Next Stamp New Release Preview!!

Hello, friends!!  I'm so excited to be a guest for Your Next Stamp for their upcoming release!!  This is another amazing release, you will not be disappointed!!

For my card today, I used the new Fishy Background Stamp.  This is the most adorable stamp and will lend itself to a variety of techniques!


Of course, I just had to white heat emboss it and colour it in with my Tombow Dual Brush Pens for a simple watercolour look!


Aren't those rainbow fish so sweet??  The sentiment comes from the Snorkel Fun Fishy Stamp Set which is older but works perfectly on this card!!  I did some partial die cutting of one of the Scrapworks-Strips Dies to make a label for the sentiment.

And that's my little peak at just one of the sets being released TOMORROW!! Make sure you head to the YNS Blog for a look at all the design team and guest creations featuring goodies from this release!!

See you tomorrow for the big reveal and blog hop to celebrate!!

Laurie


Thursday, July 26, 2018

Your Next Stamp Challenge #94!

Welcome back, crafty friends! Are you ready for another Your Next Stamp Challenge?! Both the sketch and the colours are pretty awesome but I went for the colours (of course)!

Here are the colours. Such an array of soft shades.


And here's the sketch!


You can choose the sketch, the colours or mix things up and combine both!! You're playing to win a $15 gift certificate from the Your Next Stamp shop BUT if you use YNS products on your creation, the dollar amount increases to $20!!

I used the Fall of Colour Stamp Set along with the co-ordinating dies for my card today. This is an adorable set that has both outline and solid images and dies to cut to everything!  I chose Copic in yellow, green, pink and orange. To incorporate the last colour I used ivory cardstock.


I know summer is still here but I really wanted to colour up this set! And I adore those acorns!!


I thought I'd dress up the inner sentiment with a little selective inking, ombre stamping on the word "color".


A few white gel pen detail, glitter pen and Glossy Accents add some pizazz to the acorns and leaves. And because I can't leave well enough alone, I added the hand drawn border!

I hope you found a little inspiration here today!  

Remember to link up your creation on the YNS BLOG! Have fun and good luck!

See you again real soon!!

Laurie


Saturday, July 21, 2018

Your Next Stamp Feature Day!!

Welcome to the Your Next Stamp Feature Day where the theme in "Christmas in July"!!  I am not even close to thinking about winter or Christmas but I must admit, it is nice to mix things up through out the year!  It was actually fun to dig through my seasonal stamps and have a play!

I own a few Christmas themed sets from YNS and did use one. But the main focal point comes from a non-Christmas stamp set. Did you know you could make a Christmas card out of ANY set you own? Just use traditional Christmas colours and sentiment and any image you use becomes festive!! Or, you can use a Christmas set in non-traditional colours...I love doing that!

Anyway, enough chatter. Let's take a look at what I made.


I stamped two To-Go Cups from the Thanks A Latte Stamp Set and coloured them in warm greys, green and red. This is the VERY FIRST stamp and die set I purchased from YNS...it's a classic!!  I used the co-ordinating dies to cut them out. The die set has super cute "sleeves" and other shapes to decorate your cups. I chose green and red papers to match the lids.


I stamped, coloured and die cut a few images from the Deck the Halls Stamp Set and foam mounted them to the cups. The greeting also comes from this set.  I foam mounted almost everything to an embossed, white card panel and added plenty of shimmer and shine with Glossy Accents and a sparkle pen.


I added a strip of red cardstock and silver glitter paper to the right side of the cardbase before adding the panel. The heart steam was an afterthought as I felt the top part of the card was a little too bare.

And that, my friends, is my first Christmas card of 2018!!!  I hope you enjoyed!  Now for the fun stuff...

Please go to the Your Next Stamp Blog and comment for a chance to win a stamp set of your choice!! One comment left on the blog will win.  You have until July 24th at 12:00 EST to leave a comment and the winner will be announced on the YNS blog on Jul 26th!!  Good luck!

Have a fabulous day!!

Laurie


Thursday, July 12, 2018

Your Next Stamp Sketch and Colour Challenge #93

Hello friends and welcome back!! Today is the start of a new sketch/colour challenge for Your Next Stamp. You can choose the sketch, the colours or mix things up and combine both!!!  You're playing to win a $15 gift certificate from the Your Next Stamp shop BUT if you use YNS products on your creation, the dollar amount increases to $20!!!

You can find all the details on the challenge and the link-up here!!  Here's a look at both the sketch and the colours:


Confession: I don't usually go for a sketch challenge!!  I'm not sure why but my creative juices stop flowing when I see a sketch, haha! So, of course I went with the colours!


I used the I used the Little Notes stamp set and its co-ordinating dies to create this card. This is the most adorable set and one of my favourites!  I used all the colours in the photo to colour the images with copic markers. I added a bit of patterned paper that was cut with the Curved Scallop Edge Die to add a bit more interest and colour.  In retrospect, I think I would have used a navy shade instead to help bring out the colours of the umbrella.. :(


Lots of glitter pen and Nuvo Crystal Glaze was added to give the sparkle and shine that I adore on cards!


I hope you all have a chance to play along! I had so much fun with these products and colours!  

Remember, all the details can be found over at the Your Next Stamp Blog!!

Thank you so much for stopping by today!!  See you soon!

Laurie


Tuesday, July 10, 2018

Your Next Stamp DT Dare...Pop It Up!!

It's time for the DT Dare on Your Next Stamp and the "dare" is to pop it up!!  This comes pretty easy to me as I LOVE dimension on my cards! Stay tuned to the end of this post for details on how you can win a stamp set of your choice from YNS!!!

For this project I used the brand new Strike Up Some Fun stamp set. This is the funniest set with awesome images and sentiments.  Perfect for all the bowlers you may have in your life.


I stamped, coloured and fussy cut the single bowling pin as well as the group of pins.  I added a double layer of foam adhesive to the group and a single layer to the single pin.


I added them to a layer of red cardstock which was also popped up on the card base using fun foam.  To add a bit of interest to the base of the card, I used the Star Ink Splatter stamp and a light grey ink.  I love every single one of the Ink Splatter stamps.  It's a quick and easy way to add something extra to your card without a lot of effort.

The sentiment comes from the same stamp set. I coloured it up with some Copics and fussy cut around it.  And of course, more foam tape was used to pop it up!


I added a white gel pen stitching line around the red panel and Glossy Accented to the eyes of the pins and the sentiment!  

For a chance to win a stamp set of your choice from the YNS shop, all you have to do is leave a comment on the YNS BLOG!!!  Comment must be left by July 13th at midnight. Winner will be announced on July 15th!!  

Good luck and thank you so much for stopping by...much appreciated!

Until next time....

Laurie


Saturday, July 7, 2018

Your Next Stamp July Release Blog Hop!!

Welcome to the YNS July Release Blog Hop!!  I'm so grateful to be joining this hop with the talented team from Your Next Stamp! Today we're showing you some of the amazing new stamps and dies from this month's release!


This blog hop runs until July 10 at midnight (EST).  All you have to do is leave a little love on each stop of the hop and you could win a $25 gift certificate to the YNS shop!! Remember, the more stops you make and the more love you leave increases your chances of winning! Winners will be announced on the YNS Blog on July 12th!!

In my Preview post earlier today, you got to sneak a peek at the new Hedgehugs stamp set and co-ordinating dies.  Tonight, it's all about clinking those glasses and making a toast! Or just maybe kickin' back with a cold one.

I used the new Happy Hour Stamp Set and its co-ordinating dies for this fun card.


Instantly, I thought about a tropical vacation and all the yummy drinks to be had while lying beneath a palm tree!  


I adore all the accessories that come in this set. And each one has a die!!!!  These beverages fit perfectly on the smallest of the Ripped Rectangle Dies. Instead of using the sentiment the way it was intended, I decided to "stretch" it out by snipping it apart...don't scream!! I rarely do this but if it gives me a little more mileage out my stamps, I'll break down and perform the surgery.


The sentiment just happens to fit perfectly onto the smallest of the Scrapworks-Strips Die Set.  And to finish it off, a few lime green Gumdrops from the Tropical Paradise pack!!


Hmmm, maybe Happy Hour does start now because this fantastic new release is available NOW!!! And did I mention SALE????


Thanks for joining us and remember to leave all these talented ladies some love for your chance to win!!


Friday, July 6, 2018

Your Next Stamp July Release Preview!!

Hello and welcome!!  Today's the day where we get to show you a little peek at whats to come in this months release for Your Next Stamp!!  There is so much fun and cuteness in this release and I had a blast using these new products as a guest designer this month!  Let's have a little look at one of the stamp sets being released.


This gorgeous wreath is from the new Hedgehugs stamp set. That's just a little clue that there is so much more to this set than just this wreath!


This image also pairs perfectly with the Scalloped Circle Die Set...just sayin' :)

Please remember to stop by the YNS Blog to see more fabulous projects from the design team!  And don't forget that tonight we are having a blog hop showcasing this awesome release!!  Stay tuned!!

See you very soon!!

Laurie


Sunday, July 1, 2018

Your Next Stamp Guest Designer!

Hi friends!!  I'm so happy to be guesting for Your Next Stamp for the month of July!!  This has been one of my favourite companies since I began this awesome hobby!! Not only because it's a Canadian company but the designs of the stamps and dies are so incredibly cute and unique!!

I made a card to celebrate using one of my favourite stamp sets and die sets!


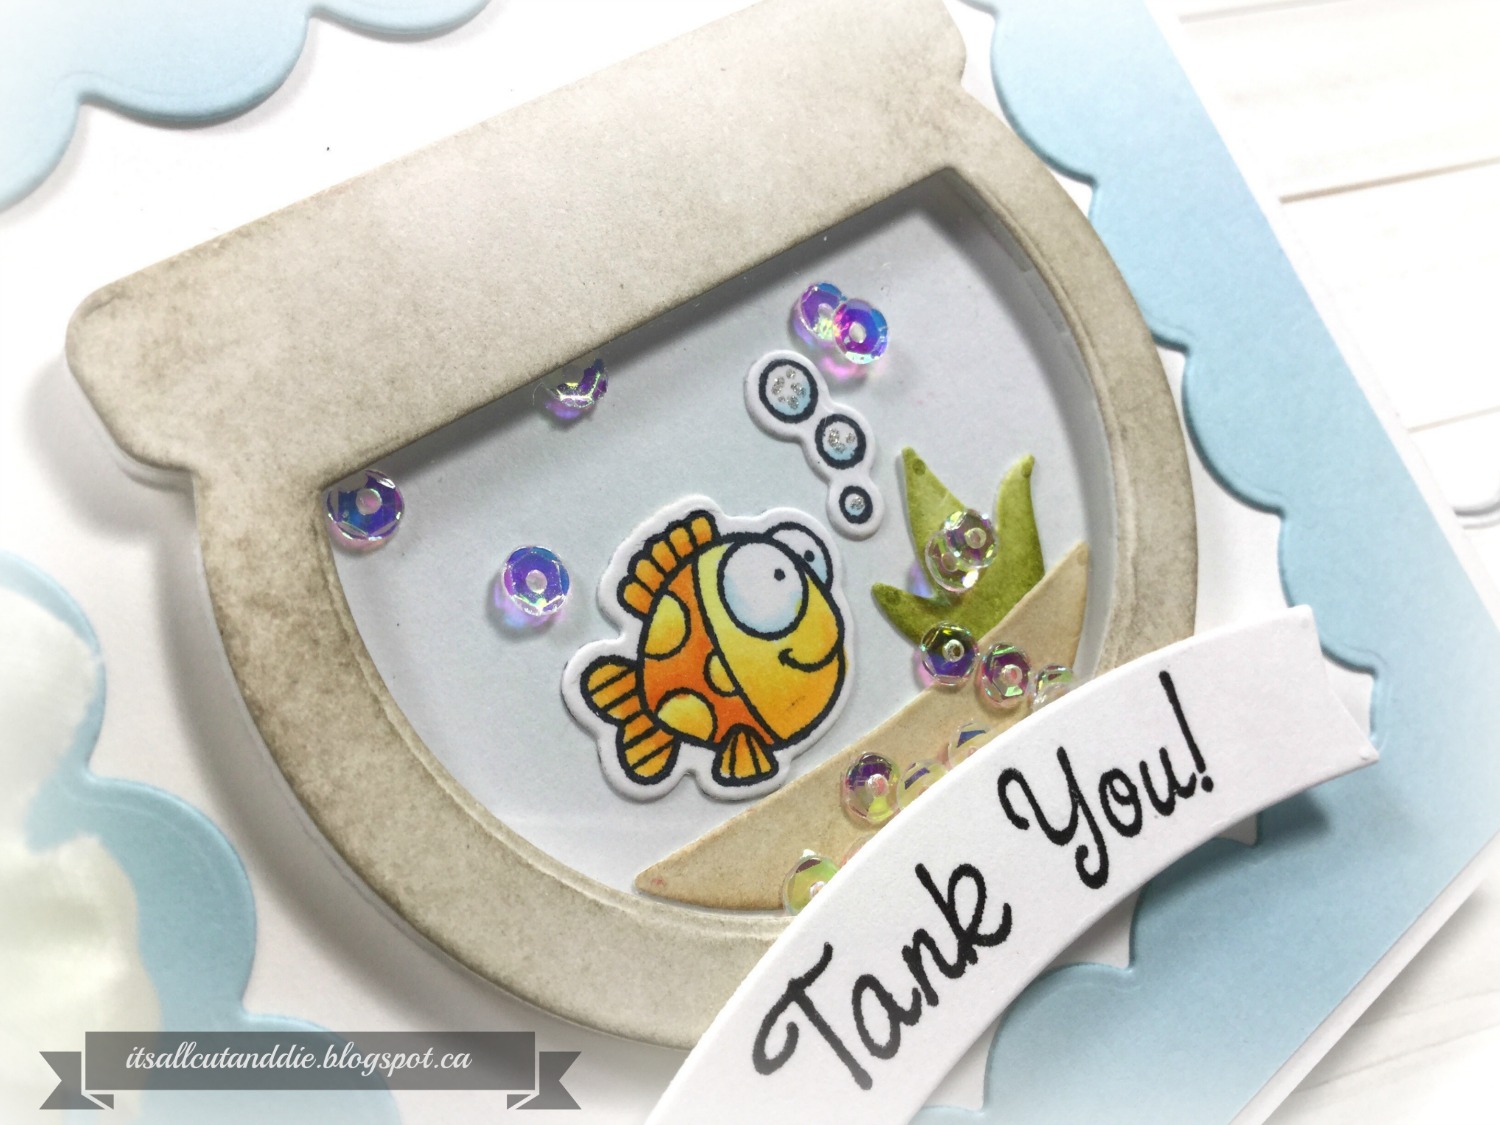
I don't make many shaker cards but this is a very special occasion and the Fish Bowl Shaker Die Set makes it so easy!!  I used the Aquarium Antics stamps and dies to create this cute "tank you" card.

One of my all time fave dies is the Reverse Scallop with Optional Stripes Die Set! This is one of the most unique dies and I hope someday there will be more released!!!


The sentiment was stamped on the banner die that is included in the Cool Tag One Die Set.


I had so much fun making this card!

 I hope you'll join me this month as I play along with all the challenges and also the JULY RELEASE for Your Next Stamp!!  

Thank you so much for stopping in today!! Much appreciated!

I'll be back real soon.  Until then...stay crafty!!

Laurie

Featured Post

A Simple Thanks Card

Well, well, well. Look who decided to show up...me! It's been an awful long time yet again. I seriously thought I'd be well out of t...