Friday, March 31, 2017

Honey Bee Stamps Collaboration with Misti!!!!!

HELLO ALL!!!! Today, the design team from Honey Bee Stamps is having a blog hop along with My Sweet Petunia to celebrate the Most Incredible Stamp Tool Invented...the MISTI!!!!


 I hope you hop along with us as there are going to be fabulous projects and amazing tips on the tool.  Oh ya, and PRIZES!! Stay tuned until the end of this post for a complete list of blogs and the one rule you must follow to be eligible to win!

When the Misti first appeared on the market, I didn't think I needed one.  But after watching numerous videos of stampers using this product, I took the plunge and never looked back.  Today, I can honestly say that I CANNOT live without this tool!!

I started with the Original Misti.  I love the size of this one because it has the room for you to move your card panel or base to help place larger stamps.  Also, love it for background stamps!!
I was then lucky enough to win a Mini Misti.  This size is perfect for stamping multiple images or sentiments.  I would have to say that I use the Mini more but am so happy to have the Original!!

Apart from stamping multiple images at once, double or triple stamping and getting perfect placement, I'm going to show you four ways I use this fantastic tool.  So let's get started!!

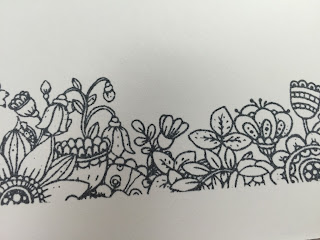
I started by placing a 4.25 X 5.5 inch card panel into my Mini Misti.  I lined up the large border stamp from the Zen Floral stamp set a half of an inch towards the middle of the panel.


This is so easy to do because of the measurements on the Misti itself combined with the grid paper.  I stamped the image with Memento Grey Flannel Ink.  This is the first stamping;


It stamped pretty good the first time but I decided to ink it up once more for an even bolder image.


To create a border to frame my sentiment, I simply rotated the paper 180 degrees (I did not move the stamp).  This allows for perfect measurements on either side of the card panel.


I inked up the stamp, closed the door and voila!!


You can see that there is exactly the same amount of white space on either side of the panel.  Yes, this is possible to do with a block or stamp press but there is NO second guessing your placement with the Misti!!

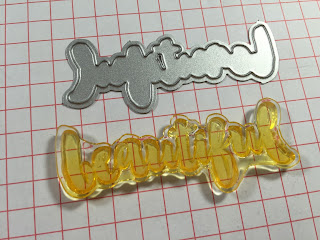
The second tip is using solid dies.  I prefer open dies but sometimes you just don't have that luxury.  I am terrible at lining up stamps to their die cuts.  I always end up with more white space on one side. Here's how I solve this problem.  I start by cutting the die out of the cardstock I want to stamp on.  I place the negative space (the paper with the cut out, not the die cut piece itself) into the Misti.  In this case I used the "beautiful" die from the Beautiful Life Honey Cuts.


I line the Matching Stamp up in the negative space. Before placing the die cut, I ink up my stamp and do a test run right onto the grid paper.  This allows me to see if any adjustments are needed.  Now that the stamp is in the perfect place, I place the actual die cut into the negative space and stamp.  This brings us to the third tip...ombre stamping!!  Oh, how I love the look of ombre.  I chose three shades of purple for my sentiment, a light, medium and dark.  I inked up the entire word in the lightest shade.


It turned out a little splotchy but that ok because we're adding more layers!  I then used the medium shade and inked up the lower half of the stamp.  To make sure you don't get a harsh line, just dab a bit of the ink away with your finger before closing the door.  Next, add the darkest shade to only the lower bits of the stamp, dabbing away the harsh line.  You could stop there but I like to clean off the stamp and ink it up with the lightest colour again and stamp.  The blend is beautiful!  I loved it so much I stamped and ombre heart as well.


Now, its time to add some details to my panel.  I took the Zen Floral Honey Cuts and instead of cutting the floral borders out, I used the die to emboss.  After placing the die over the image, use rubber embossing mats and your embossing sandwich and run through your die cut machine.


It creates a nice subtle texture.  I trimmed my panel down to be slightly smaller than an A2 sized card base.  It's now time for the fourth tip!  I am quite awful with lining up my panels straight on the card base.  So I used the Misti to help.  I place a tiny bit of dot adhesive to the inside of the base (to keep it from popping open) and line it up in the Misti. You can see I leave a quarter of an inch on either side.


Then using the measurements and the grid paper, I can line my panel up straight!


I used foam tape to adhere the panel to the cardbase and also to mount my word die and heart.  I added a bit of colour to a few of the florals by using the same purple inks and a blender pen.


To add a little sparkle, I added a few Diamonds, Clear Wink of Stella and some Glossy Accents!!


I hope I was able to give you some ideas on how to use the Misti!  If you don't yet have one, I encourage you to try one out.  They are truly worth the investment.  


Now, onto the prizes!!  Up for grabs is: 
1.  Your choice of an Original Misti or a Mini Misti from the My Sweet Petunia Store 
2.  $45.00 Gift Certificate to Honey Bee Stamps!!!  
All you have to do is leave a little love on each blog on the hop, that's it!!  Winner of the Misti will be announced on April 7, 2017 HERE.
Winner of the Honey Bee Stamps Gift Certificate will be announced


Here's the entire hop:

Laurie Case   (YOU ARE HERE)

Thank so much for taking the time to join us today!!  Have a great day!!


Thursday, March 30, 2017

National Craft Month Celebration Blog Hop with Right at Home Stamps!!

Hello and welcome!!  Today on the Right at Home Blog we are celebrating National Craft Month!!  Wow, a month dedicated to the love of crafting! Nicole has an awesome giveaway so stay tuned to the end of the post for all the details!


I love all things crafty. And all things DIY, which I think is kind of the same thing.  I love painting (walls, that is. I only wish I could actually paint landscapes or florals!), cross-stitch and I occasionally dabble in a bit of sewing, VERY BASIC sewing!!  But my crafty addiction is paper crafts.  Especially stamping and card making.  So it's no surprise that I made a card today!

I used the fabulous new stamp set made especially to celebrate our love of crafting!  This set is going to be one of my all time favorites, I just know it!  I started by stamping a bunch of the images onto Bristol Smooth Cardstock with a waterproof black ink.  I tried something a bit different in the way of colouring today.  I used my Tombow Dual Brush Pens but instead of blending them out with water I used a Dove Blender Pen.  It gives quite a different result.  I then fussy cut them out.

For my card panel, I used the smallest rectangle die from the Find the Beauty Die Set and white cardstock.  For my card base, I used grey cardstock, stamped the Watercolored Background Stamp in Versamark Ink and used Hologram Sparkle Embossing powder from Wow.  It is so sparkly!!


As you can see, this set is full of crafting or hobby images, it is so fun! And the sentiments are amazing. For the sentiment strip, I combined two dies from the Folded Gift Tag Die Set.  This was an experiment and it worked.  Love the way the scallops look underneath the fishtail banner!


I added a ton of Clear Wink of Stella and Glossy Accents to certain parts of each image.  Before adhering the buttons and sentiment, I balled up some silver thread and placed it underneath each so the foam tape could adhere it down.


I hope you like what I've created today because it was sure fun to make!!  Now, who's ready for a giveaway???  For a chance to win this stamp, all you have to do is leave a lovely comment on each stop of the hop. Easy, right?


Here is the full list of lovelies participating in the hop:


Wednesday, March 29, 2017

Simple Square Card with Honey Bee Stamps

Good morning everyone!!  I'm on the Honey Bee Stamps Blog with this sweet little card.  It's tiny, cute and oh, so quick to make!!


I hope you are able to stop by their blog for all the little details!!

See you soon!!

Laurie

Thursday, March 23, 2017

Hello with Right At Home Stamps

Hi all!! I'm back with a card made with products from Right at Home.  I'm enjoying my gig as a guest designer SO MUCH!!  Have you seen Nicole's latest release?? It will knock your socks off!! It's a combination of cute, classy and inspirational.

For today's card, I used the previously released Cloud Background Stamp.  I used my Misti because I wanted to get an ombre look to the clouds.  Starting with Lake shores Ink from Simon Says Stamp, I inked the entire background. I then used Soft Pool Ink from Hero Arts and inked halfway up each cloud and finally Pool Ink, also from Hero Arts, to ink up only the bottom portion of the clouds.  I should mention that these were done in separate steps, not all at once.


I used the largest rectangle die from the Find the Beauty Die Set to cut down my panel.  I lightly inked the edges with the Lake Shores Ink.  My plan was to do some inlaid die cutting so I got the heart die from the Folded Sweetheart Die Set and the brand new hello die from the Script Greeting Die Set.  I played around with the layout before committing!!


I first cut the scripty part of the sentiment directly from the panel. Next, came the heart.  I thought I was done there but decided to used the outline part of the sentiment as well, which I cut from the panel.

For dimension, I used White Fun Foam.  I cut the heart and the outline portion of the hello die.  After adhering my panel to a white cardbase, my layers went like this:  fun foam heart with cardstock cut out, fun foam hello outline with cardstock cut out, then the scripty portion of the hello into the negative space on the outline die...does that make any sense at all???  Here's a close up to help!!


The different layers add so much dimension and help the sentiment pop!!  To make the hello stand out a bit more, I added some Sakura Stardust Clear Sparkle Pen.  And for embellishments, I used some Clear Heart Drops and Clear Round Drops both from Studio Katia.


I just love how this card came out! I hope you do, too!!  Thank you so much for stopping by today!  Have a great day!!

Laurie


Wednesday, March 22, 2017

Big Thanks with Honey Bee Stamps!

Hi everyone!!  Just wanted to quickly stop in and tell you I'm on the Honey Bee Stamps Blog with this card today!  I used a bunch of different products, new and old, to create this card.  I hope you have a chance to drop in and check out all the details!!


See you really soon!!! :)

Laurie

Monday, March 20, 2017

Thank You Card with Studio Katia!

Hello and Happy Monday!!  I'm back to share a very simple card using mostly die cutting.  Studio Katia has amazing dies, from stitched dies to my favourite, the dotted detail dies!

I started by using the largest frame die from the The Darling Ribbon and Dotted Frames Die Set to cut a panel of white cardstock. I then took the middle die from the Elongated Dotted Hexagons to cut a "window" in the centre of this panel.  To create a frame for my window, I nested the middle and the largest of those same dies, taped them together and ran them through my die cutting machine with some light grey cardstock.

I traced the opening with pencil onto my cardbase so I knew where to stamp the sentiment.  The "thank you" comes from the newly released Thank You So Much Stamp Set.  Using my Mini Misti, I lined up the sentiment and stamped in black ink.


To show the recipient a lot of love, I plastered the front of the card with die cut hearts using the stitched heart die from the Stitched Notebook Die Set.  This helped me use up some of my scraps!

And to make this sparkle, I used a combination of the Majestic Sequin Fusion and Space Silver Fusion Sequins.  


Thanks for taking the time to stop by!!  Have a fabulous week and see you soon!!


Monday, March 13, 2017

Hello Friend Floral Card

Hello, everyone!! I'm here to share a pretty in pink card using stamps from the latest Studio Katia release!  For the main element of this card I used the large blossom from the Thank You So Much stamp set.  This flower is large!!!  It will definitely be the star of the show! The leaves are from the new Together We Bloom stamp set.

I decided to heat emboss the flower in gold.  To colour I used my Tombow Dual Brush Markers.  This way of colouring is so simple!!  I just use one colour, adding it to where the darkest part of the image will be and simply drag out the colour using a water brush.  And these particular markers have some beautiful and vibrant colours!  If you follow me on Instagram, you know that I actually coloured two of these gorgeous flowers, one in a light pink and one in a darker pink.  For todays project, I decided to use the lighter flower.


After the colouring, I fussy cut everything out.  For my cardbase, I embossed the front using the largest panel die from the Darling Ribbon and Dotted Frames Die Set.  This gives nice texture and dimension without adding any extra bulk.  I used the middle die from the Stitched Nested Creative Squares Die Set to die cut a piece of Woodgrain Cardstock to house my sentiment.   I stamped the "hello friend" in Versamark and heat embossed it in gold again.  Note:  because this is textured cardstock, I double stamped the sentiment before applying embossing powder...thank goodness for the Misti!!!


After everything was adhered with a combination of foam adhesive and liquid glue.  I embellished the card with one of my favourite sequin fusions, Pink Lemonade.  I added a dot of Crystal Stickles to each sequin and a few drops scattered on the leaves and the flower.


Thursday, March 9, 2017

Studio Katia with Hero Arts!!

Hello and Happy Thursday!!!  I'm so excited because all this month we are collaborating with A Blog Named Hero!!!  What that means is the design teams for Studio Katia and A Blog Named Hero are coming together and using products from both Studio Katia and Hero Arts to create some amazing projects!!
And this month it's all about EMBELLISHMENTS!!!  Now, when it comes to embellishments, no one beats Studio Katia!  There is so much bling in that shop, it would make Tiffany's jealous!!

I created two cards for this collab.  Here is the first one..


I used the Sparkle Borders stamp set from Hero Arts to stamp my background.  I coloured in all the "bulbs" with a purple, green, and turquoise marker.  Then added some sparkle with a Sakura Stardust Pen.  Next, of course, came the Glossy Accents!!  While waiting for that to dry I stamped 3 presents from the Birthday Lions stamp set from Studio Katia and coloured them with the same 3 shades.  I also added some sparkle pen and Glossy Accents to the bow of the presents.  For the embellishments, I used the Crystal Clear Sequins Fusion and some Silver Stars Confetti. ( Just a note on the Silver Stars, this is a discontinued item so it is ON SALE for $1.00!!!!).  I then added a drop of Crystal Stickles to the centre of each sequin.


For my next card, I had to go with a shaker!! Now the products I used for this card were made for each other!!  I started by stamping out the flamingo from the Layering Flamingo stamp set with May's Shades of Pink ink cubes from HA.  I use these A LOT!! They are my "go-to" pinks!! I then die-cut the flamingo with its co-ordinating die.


For the shaker window, I used the Darling Ribbon and Dotted Frames Dies from SK to cut the centre of a white cardstock panel.  Now here is where it gets really fun!!  The sentiment is a combination of stamps from SK.  The sweet "wishing you a pink" come from the Pink Winter set (which also features a flamingo) and the rest comes from the Duo Talk set, including the stars and hearts that are stamped!  For the goodies inside, I used Fruit PunchPink Lemonade FusionPink Winter Mix (minus the snowflakes) and Gold Foil Seed Beads.


I had so much fun making these cards!!  I hope you have a chance to play along with this super fun, sparkly challenge!!  And I should mention that Studio Katia is giving away a gift certificate to the lucky winner of this challenge!! Good luck and have fun!!!

Laurie


Hoppy Easter for Right at Home Stamps

Hi everyone!!  I'm so excited to announce  that I will be a guest designer for Right at Home!!!  This is so awesome because I am somewhat of a super-fan. Nicole's stamps are so unique and fun!  Thank you Nicole for having me!!

I used a few RAH stamps for this card.  Please check out theRight at Home Blog for all the details and links to the products I've used!


Thanks for stopping by!!

Laurie

Wednesday, March 8, 2017

FRIENDS

Hi everyone!!  I'm up on the Honey Bee Stamps Blog where, this week, we are honouring Kathy Racoosin from The Daily Marker!  She hosts the 30 Day Colouring Challenge which is just fantastic and I encourage you to check out her blog for all the details!!

For my post I'm highlighting watercolour with Stabilo 68 pens.  Love this medium for watercolour as it always gives such great results with little effort :)


Please head on over to Honey Bee for all the details and a full pic of the finished product!!

Thanks for stopping by!

Laurie

Monday, March 6, 2017

Together We Bloom

Hello all and Happy Monday!!  I'm back to share a card with you today made with the latest release!! This release has some awesome floral sets and that is exactly what I used for my project today.

I'm using the new Together We Bloom stamp set.  This set is beautiful!! Full of hand drawn flowers and a big, bold sentiment.  I started out by stamping a couple of the flowers in Memento Tuxedo Black ink onto some white cardstock.  I coloured the flowers with my ProMarkers by Windsor and Newton.

I wanted to make a shaped card and the dies from Studio Katia make this easy and fun!!  I used the Stitched Nested Creative Rectangles Dies.  I die cut two of the larger dies and scored one of them 1/4" from the top.  I used Scor-Tape to adhere the two panels together, and there you go, a shaped card!!  I die cut one of the smaller dies in the set for my sentiment.


I fussy cut the florals and adhered them to my sentiment panel.  A nice coating of Clear Wink of Stella to these images gave them an extra pop!!  Now for the embellishments!!  In this release there are these super cool crystals!  The look like diamonds except for the pointed tip, they are flat.  This makes is so easy to adhere them to your projects.  And boy, do they sparkle!!  Next to the Crystal Rainbow Fusion Sequins, these are my next favourite embellishments.


Thank you for stopping by today.  Have an incredible week!!

Laurie


Featured Post

A Simple Thanks Card

Well, well, well. Look who decided to show up...me! It's been an awful long time yet again. I seriously thought I'd be well out of t...