Wednesday, April 18, 2018

My Creative Time 78th Edition Sneak Peek Day 2

Welcome back, friends!  Today is day 2 of sneak peeks for My Creative Time!  Today we're showing off a fantastic stamp and die set called Have a Super day and the Super Tag Dies.


This set comes with a female and a male "superhero" dies.  The stamp set is full of "super" sentiments for almost every occasion.  I used the lady hero and gave her a gold glitter cape, of course:)  I used the Super Tag Dies with some pink ink blending to make her stand out and gold embossed the sentiment on that super cool bam bubble. I don't know if that's what it's called but we'll just go with that.


My next card used the male superhero figure.


This will obviously be a Father's Day card for my dad!  I love his silver cape!


I hope you enjoyed todays peek!!  I hope you'll return tomorrow for one last sneak!!

***Sneak Peek giveaway!***
We will be giving away the sets we are showcasing each day to ONE lucky winner! For example, the set we are showcasing on Wednesday, Emma will announce the winner of that on Thursday & the sets we are showcasing on Thursday, Emma will announce that winner on Friday on my blog! ALL you have to do is leave a comment on each of our blogs!You are NOT required to comment on EVERY SINGLE blog, but the more you comment on, the more chances you have for winning! VERY IMPORTANT, PLEASE leave a way for us to contact you w/your comment just in case "YOU" are the lucky winner! For EXTRA entries, you can spread the word about this release on Facebook, tweet about it OR even instagram it! #mycreativetime! GOOD LUCK EVERYONE & let's start spreading the word!;)

Thank you for stopping by!!

Laurie


Tuesday, April 17, 2018

My Creative Time 78th Edition Sneak Peek Day One!!

Hello, crafty friends! Welcome to the first day of the 78th Edition Sneak Peeks for My Creative Time. This release is fantastic and I know you're going to love!

Today we're taking a little look at the new You're All Write stamp and die kit.  This set is perfect for encouraging students and thanking teachers.

I made a couple of projects with this set.  The first is a really cute, really simple bookmark.


How cute is this??  

Next, of course, I made a card!!


This would make such a cute encouragement card!


I hope you enjoyed todays sneak and return tomorrow for another!!

***Sneak Peek giveaway!***
We will be giving away the sets we are showcasing each day to ONE lucky winner! For example, the set we are showcasing on Wednesday, Emma will announce the winner of that on Thursday & the sets we are showcasing on Thursday, Emma will announce that winner on Friday on my blog! ALL you have to do is leave a comment on each of our blogs! You are NOT required to comment on EVERY SINGLE blog, but the more you comment on, the more chances you have for winning! VERY IMPORTANT, PLEASE leave a way for us to contact you w/your comment just in case "YOU" are the lucky winner! For EXTRA entries, you can spread the word about this release on Facebook, tweet about it OR even instagram it! #mycreativetime! GOOD LUCK EVERYONE & let's start spreading the word!;)


Thanks for stopping by!!  See you soon!

Laurie


Sunday, April 15, 2018

Using Small Stamps with Craftin Desert Divas!

Good morning friends and welcome back!  I'm back to share a cute and fun card that makes use of all those tiny stamps that you may have!  I'll also show you a simple yet very effective masking technique!

In almost every stamp set, there comes a variety of tiny images that are there to help you create scenes or backgrounds. I call them "filler" images. Just like the way extra sprigs, leaves and baby's breath fill out and complete a bouquet of flowers, these tiny stamps act much the same way.

I started by creating a simple mask using the middle heart from the Nested Hearts Die Set and a piece of 4.25 X 5.5 inch copy paper.  I wanted the mask to be the same size as my card front to make lining things up easier!


I adhered the mask to the white panel using a dot adhesive and removing some of the stick with my fingers. I don't have any removable tape so this worked well!

I went through all my CDD stamps and choose some of the small images with the same theme. In this case, bugs!


The Ladybug Garden and Garden Bugs sets were perfect! I started by stamping the largest of the images I had chosen in the centre of the heart.  I wanted to make sure I had enough room for this image and also for it to be the focal point.


When stamping inside a mask, you want to be sure that some of the images are stamped "outside". This is maintain the shape you are going for.  I ended up needing a couple of more images to fill in more of the heart.  I found the cutest flowers in the Twinkle Toes stamp set and a tiny heart in the Magical Unicorn set. These finished the stamping off perfectly!! Next, I removed the mask.


I coloured all these cuties with my alcohol markers.


To emphasize the heart shape a little more, I decided to add colour around and behind the images with a light grey markers.


I trimmed this panel using the medium rectangle die from the Fancy Frames Dies.  I actually didn't get it centred so to fix this I added some twine along the right side of the panel.


The sentiment is from the Ladybug Garden set and stamped on a banner from the Flag Banner Die Set.  I adhered this panel to a piece of beige/pink cardstock cut from the largest die from Fancy Frames.


To finish off, I added a few Shimmer Sequins, some glitter pen and Glossy Accents!


I hope you enjoyed my project today and maybe found a little inspiration!  I encourage you to take a look at your stamp sets and get some use out of these itty bitty images!

Thank you for stopping by!!  You'll find a list of all products used below!!


Monday, April 9, 2018

Manly Monday with My Creative Time

Hello and welcome back! Yay, it's Monday...said no one ever!  How about we kick off the week with a masculine card?

I struggle with masculine cards but luckily MCT has stamps and dies for everyone and every occasion!  I firmly believe that everyone should have at least one alphabet die set in their stash.  They are super useful and versatile. From creating your own sentiments, easily personalizing a project or creating interesting backgrounds, they are a must!

I used the Lowercase Fun Dies on my project today.  I love the clean and simple typewriter font of these dies.


I used kraft cardstock today but to give the letters a little something extra, I used the Grainy Wood Background Stamp before die cutting.  Gives a more "manly feel", doesn't it :)?  I also cut 3 each of the letters to give a lot of dimension.

The cute little fox, leaves and sentiment come from the Fall Friends Stamp and Die set. I added the sentiment onto the smallest of the Stitched Decorative Banner Dies in an ink that kind of matched the cardstock.  


Because I had die cut many layers and stacked them together, no foam adhesive was necessary.  I glued everything to the second largest die in the Scalloped Stitched Rectangular Die Set which I embossed using an embossing folder from We R Memory Keepers.

A few matte brown enamel dots finish the card!!


Thank you popping in today, I really appreciate it!!  I hope you enjoyed my cute masculine card :)

Until next time...stay crafty!

Laurie


Thursday, April 5, 2018

Throwback Thursday with My Creative Time!

Hello and happy Thursday!!  We're kickin' it old school today at My Creative Time by using older stamps and dies to create our projects!  I love this theme as it gives me chance to give some attention to my older sets!

I used the Way To Go Stamp and Die set as the focal point for my card. The bicycle is just so cute!


I created the scene by using a couple of dies from the More Stitched Edges Set. One to create a stencil for the background clouds and another to cut the grassy hill.  Everything was adhered to the largest of the rounded rectangles in the Scalloped Stitched Rectangular Dies.  The clouds are from the  Stitched Cartoon Cloud Dies and the sweet butterflies are from the Mini Butterfly Dies. 

Of course, I had the entire card assembled and had no room for the sentiment, which I seem to do almost every time!!!  I solved this little problem by die cutting one more cloud, stamping the sentiment and gluing it directly on top of one that I had adhered already!


I felt like a few of the pieces needed some sparkle and shine, so out came the Clear Sparkle Pen and Glossy Accents!


Thank you so much for stopping in today!  I hope you have a chance to give love to some of your older stamps and dies!!

Until next...stay crafty!!

Laurie


Wednesday, April 4, 2018

3-D Wednesday with My Creative Time!

Hello and welcome back!! Today it's all about creating a non-card. This was a bit of a challenge for me as I primarily make cards, but challenge accepted!

I wracked my brain trying to come up with good idea. Should I make a treat holder? A gift box? And then it came to me...how about a little DIY home decor?!!  Besides a few card panel scattered about my craft room, I don't really have any handmade decoration. So this is what I set out to create.

I went through my MCT stash and picked out a WHOLE BUNCH of dies!! This project has absolutely no stamping. Sad, I know, but sometimes you just gotta die cut:)

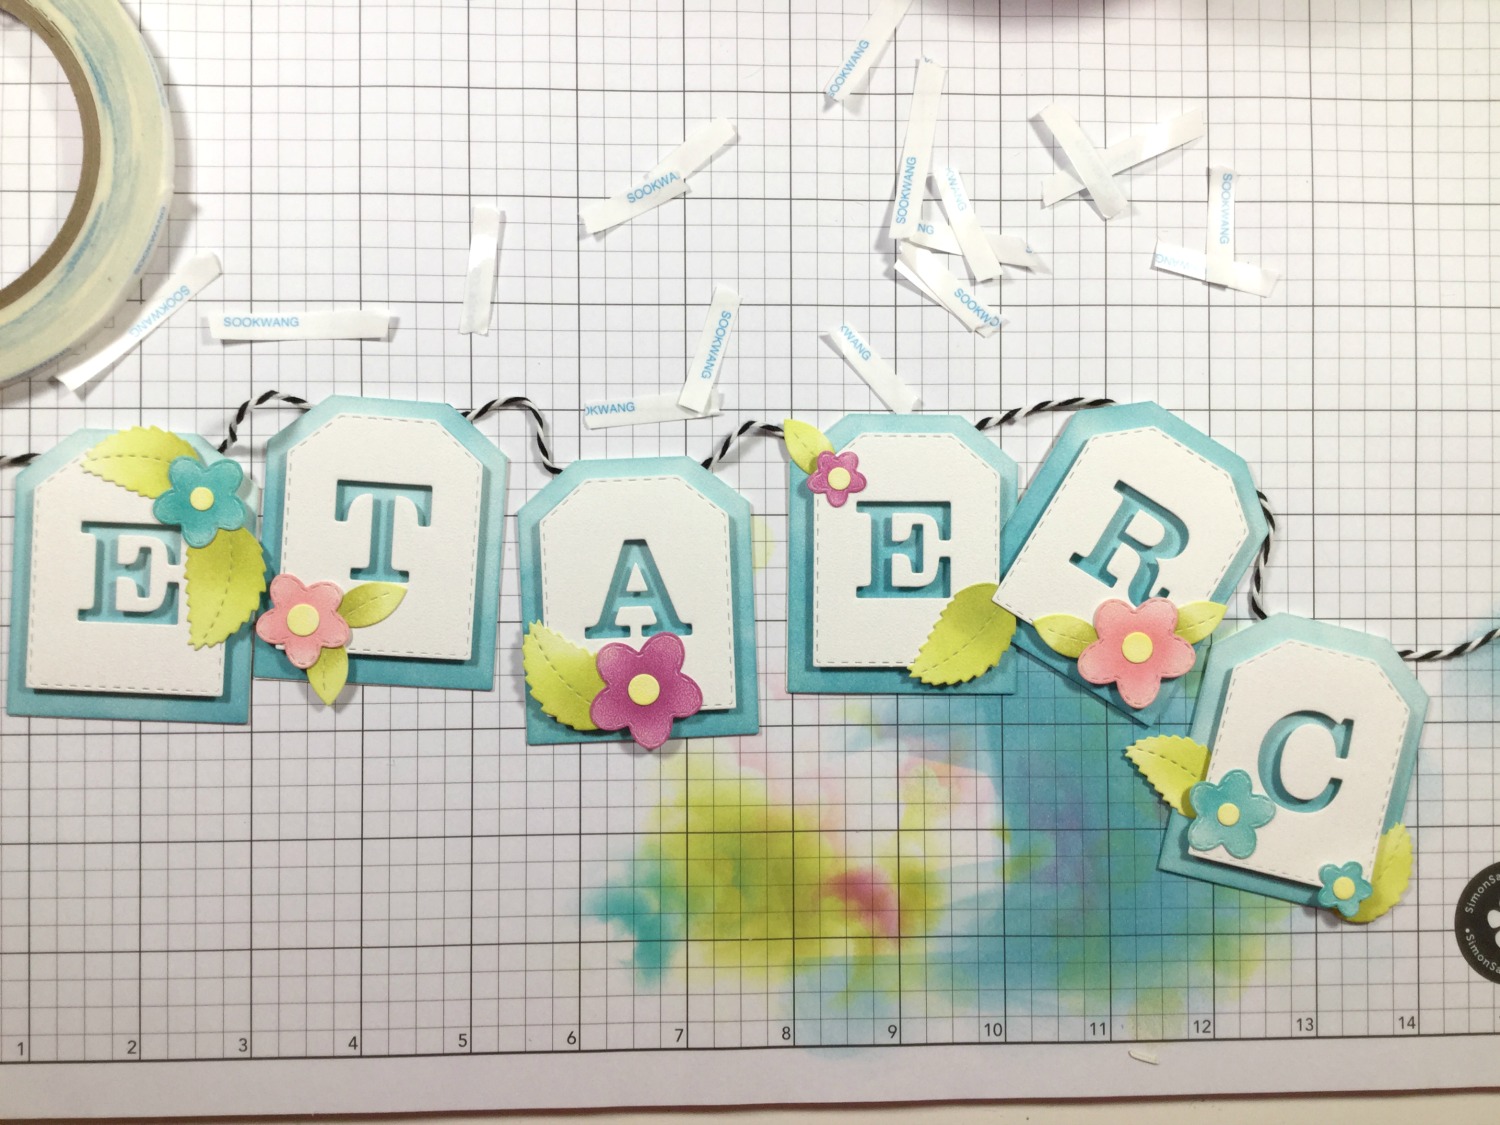
I started by die cutting 6 (second from the largest) Chunky Stitched Tag Dies along with the smaller stitched version that layers nicely on it. I die cut some leaves from the Stitched Leaves Dies and some flowers and leaves from the Stitched Pretty Flower and Leaves Dies.


I chose a pretty palette of Distress Oxide Inks,


and did some simple ink blending on my die cuts.


I guess I never made it clear what I'm making!! I decided to make a little banner that says "create". I decided instead of adhering the die cut letters directly to the top layer of the tag, I would die cut them from that layer.


So for contrast, I used Broken China Distress Oxide and inked the base layer tag. Here's a look:


I foam mounted the die cut tags with foam adhesive onto the bases. I took the flowers and leaves and tried to randomly place them on each tag. I wanted them to have more of a "scattered" look. 

I struggled with how to place the twin to each tag.  The way I had placed the upper layer, didn't leave a lot of room to punch holes and at this point, I didn't really want to risk ruining one the tags.  It's funny that I say this because my final plan almost ended in disaster!!! Read on...

I decided to die cut 6 more of the larger tags and adhere them to the back using Scor-Tape. On the top strip of tape, I will adhere the twine, just like so:


Now this is where my near disaster occurred. Check out what I did!!


That's right!! I adhered them backwards! I could not believe it. I sat there is stunned silence for a couple of minutes thinking I would have to start over. Luckily, I was able to carefully open each tag at the top.


I rearranged my word, added a bit more tape to the top of each tag and slid the twine back in..phew!!

In the end, I'm really quite happy with the way it turned out.  I have it hanging over my desk right now!!


Here's a closer look:


I hope you enjoyed todays project and found just a little inspiration!!


Thank you so much for stopping by today!!

Until next time, stay crafty!

Laurie


Monday, April 2, 2018

Watercolouring The Ton Stamps with Colleen!!

Hi friends!!  Today I have a rather special post!  My friend Colleen from Maple Syrup Designs and I are teaming up to showcase stamps and dies from The Ton Stamps.  If you don't already know this, Colleen is the only Canadian retailer of this fab company!!

We will be posting twice a month using a particular company and try to incorporate a technique in there as well!!  We started this little collaboration to: a) Get some use out of products that may have not seen much love lately, b) show you some simple techniques and c) maybe introduce you to products that you have not used before!!

We are keeping this simple. We hope that you'll be inspired by something that you see here! There will be a giveaway too, so stay tuned to the end for the details!

For our first post, we decided to do some watercolouring!! I am no expert in this field and I don't watercolour for realism. I colour for fun!!  I think this is important to remember...have fun. Whatever you do will be beautiful!!

Let's take a look at what I made!!  I used the gorgeous Summer Blooms Stamp Set and heat embossed it with Liquid Platinum Embossing Powder from Ranger onto watercolour paper.


I actually embossed it 3 times to get this super puffy look!  On the third go, my paper shifted slightly and the stamping was off.  You can see this in the lower right leaf. I didn't think it was a huge deal so I just went with it!

I used an inexpensive set of Meeden pan watercolours from Amazon Canada. I usually use some sort of marker or pencils for my colouring so getting used to this type is a bit of a learning curve!


After the watercolour was done, I risked it by adding a few splatters with some diluted black paint and a Perfect Pearls mixture. Thankfully, it turned out ok!  I trimmed the panel using a stitched rectangle die and foam mounted it to a very light pink cardstock.  Note: this cardstock came from Micheals and is gorgeous! It's 110lb weight and comes in 3 shades of pink. This is the lightest of the shades and is almost a flesh tone. I'm addicted to it right now and already fear me running out!!

I partially stamped one of the sentiments from the set onto a tiny strip and heat embossed it using the same powder.  I strategically adhered it over a boo-boo:)


A few clear sequins finish this card!!!  

Thank you for joining us today.  Remember, our only wish is for you to hopefully get inspired!! I did link products to her shop but please note that these are NOT affiliate links. I just want to let you know that she has a beautiful shop with amazing customer service and carries some awesome products!!

GIVEAWAY ALERT:  Colleen is generously giving away a prize in honour of our little collaboration!  She will be giving away the Large Peony 5 stamp set and co-ordinating dies...WOW!! All you have to do is leave a little love on each of our posts and you'll be entered to win!  
The winner will be announced on April 23rd. This will also be our next blog post:)!


Please visit her blog HERE!! Also, if you are on Instagram, check out the hashtag #maplesyrupmonday. Even better, if you make a project with todays theme, show us! We'd love to see  it AND it will also give you an extra chance to win :)

Until next time, my friends...stay crafty!

Laurie


Featured Post

A Simple Thanks Card

Well, well, well. Look who decided to show up...me! It's been an awful long time yet again. I seriously thought I'd be well out of t...