Tuesday, April 21, 2020

Pinkfresh Studio Sketch Challenge

Welcome back! Today I've decided to participate in the current challenge over at Pinkfresh Studio Blog. This month they have a sketch to play along with.


Sketch challenges always get my creative juices flowing. Sometimes, I will follow it to a tee, other times I'll try to put a little spin on it.  This is what I came up with:


I started by doing some no-line colouring of the Leafy Decor Stamp with my Derwent Inktense Pencils. I haven't used these in ages! I used the co-ordinating die to cut the image out.

I actually had the Essential Braided Tag Die already cut out and just sitting on my desk. So, I layered my coloured florals onto one edge of it. I took a piece of white cardstock and used a stitched rectangle die to cut it out. I used some Peacock Feather Distress Ink around the edges as the white on white on white was a bit too....white.


Before adhering the die cut sentiment, I used the same Peacock Feather Ink to add a few splatters.
The sentiment is from the Classic Words Die Set. Again, I inked it up with the same distress ink.

I adhered everything to a white card base and added a few sequins. It was at this point, I decided to add the sub sentiment which come from the Leafy Decor set.


Thank you for stopping by! I hope you enjoyed my creation for today!

See you soon!

Laurie


Friday, April 17, 2020

Spread Joy not Germs Blog Hop!!!


Hello and welcome!! I'm so happy to be participating in the #spreadjoynotgerms blog hop which was put together by our friends at Catherine Pooler Designs and Hedgehog Hollow. We're coming together to make some Happy cards which we encourage you to send out during this uncertain time.
We are all experiencing something different and out of the norm. There is no better time to send out some happiness, whether it be across the globe or across the street. Let's create a card and make the world smile!

This is a MASSIVE blog hop with TONS of prizes. There are 31 sponsors who have generously donated more than 50 prizes. Please remember that these small businesses are struggling right now and still donated to this hop. Let's help them out a bit:) More details will be provided at the end of the post!


I'm using products from Pink & Main which is generously offering a $25 gift certificate to the online shop! Let's have a look at what I've created!


I went with a clean and simple design. This card could easily be massed produced. I started by cutting a white panel with the largest of the Stitched Rectangles Set 2 dies. I then placed the Mask It Circle Stencil towards the left centre of the panel. Using the Ergonomic Blending Brush, I blended some All That Jazz ink. I repeated the process by adding 2 more circles on the right side of the panel.


Using the stencil, I cut a mask out of typing paper so I could cover the lower half of the circle before stamping the florals.  These come from a fab set called Gorgeous Vases. I chose 3 different bouquets and using Versafine Black Onyx Ink stamped them inside the circles.

The sentiment comes from the Just Because Stamp Set and was stamped onto a Sentiment Strip Die. I originally had the sentiment on just a white banner but decided to add the same blue ink to make it pop of the white background.


I added a few pencil details to one of the flowers in each bouquet but this step could easily be skipped. After adding the panel to a grey card base (yes, it has white heat embossing on it) that I just happened to have in my stash, I added a few black gems and called the card done!  I think this card could be fun to send to a friend, sibling or even a neighbour. Who would you send this card to?

The next stop on this creative journey is : KAREN B.


To be eligible to win, all you need to do is leave a little love at each stop of the hop. This is a large hop and we appreciate you taking the time to comment! You don't have to comment on each stop, but your chances of winning increase with each comment you leave! I suggest maybe grabbing a coffee/tea/glass of wine to keep you company on this journey :)
Deadline to enter is April 24, 2020!!

Winners will be announced on April 27th, 2020 on both Catherine Pooler's Blog and the Hedgehog Hollow Blog!

For more information on all the prizes being offered or if you'd like to see the full list of hoppers, please visit:

or

Thank you so much for stopping by! Have fun hopping and good luck!!

Be well, my friends!

Laurie


Saturday, April 11, 2020

Spring Fling Challenge with Gina K Designs!

Hello and welcome back! Having a lot more time on my hands means being able to participate in card challenges!  I'm finding that being stuck at home has really hindered my creativity and these challenges are an awesome way to fire that mojo back up!

I'm playing along with the Spring Fling Challenge over on the Gina K Designs blog. You really need to check out the inspiration on that page...incredible!


I used the Bold and Blooming Stamp Set for my card today. This is the very first Gina K stamp set I ever got and was hooked ever since! 


I die cut a circle out of Strathmore Mixed Media Paper and lined one of the images along the edge to get just a partial image. I moved the stamp slightly and stamped once more. I made sure not to get the same part of the stamp! I used Versamark Ink and gold embossing powder.

It's been awhile since I used my Zig Clean Colour Real Brush markers so I whipped those out. This is such an easy way to watercolour. And fast!! Because the image is heat embossed, you don't have to worry about going out of the lines.


Once everything was dry, I gold heat embossed the "hello" which is also from the same set.  I layered the painted circle onto a Scalloped Circle Die from Lawn Fawn cut out of kraft cardstock. I love the way gold and kraft look together!

I popped the circles onto a 4.25 X 4.25 white card base and added a few clear sequins to finish it off!


Thank you so much for dropping by this morning! Be well and be safe!

Happy Easter!

Laurie


Friday, April 3, 2020

Sending Paper Hugs Blog Hop with Scrap N Stamp Canada!

Welcome to our monthly blog hop for Scrap n' Stamp Canada. It's such a crazy time in our world right now and we thought it would be fun to make cards with the theme "paper hug". In this particular point in time, this is the safest hug we can give!


I've used a combination of stamps and dies from different companies. But really, the star of the show is the Tall Type Alphabet from Concord & 9th!! I love this die set. I know the price can be a little daunting but it really is worth every penny. From creating custom sentiments to personalization on your cards or scrapbook layouts, a good alpha bet die is great to have.  This one, in particular is a great size. Not too big,  not too small.


I started by die cutting the "paper hugs" out of white cardstock and set them aside. The big florals are the Stitched Flower Frame and Outside In Stitched Flower Die Sets. I cut all the pieces from scrap cardstock. 

After adhering the flower pieces to the outer edges of a white card base, I decided to add some pattern to the die cut letters. I used the Playful Patterns Stamp set, also from Concord & 9th, which co-ordinates with the Tall Type Alphabet Dies. I used the Tranquil Teal Gina K Ink from the 2018 Assortment Ink Cubes to add the pattern, which just happened to match the leaves perfectly!!


I cut the letters again but this time from craft foam. I wanted to add some dimension but couldn't imagine cutting foam squares that tiny or repeatedly cutting from scrap cardstock! I adhered the letters together and down on the card using Nuvo Deluxe Adhesive.

The sentiment looked good but not exactly "finished". I went through my stash of stamps and found a sentiment in the Love Bugs Stamp Set from MFT that said "sending a smile your way". I stamped it out in the same Tropical Teal ink then trimmed around and removed the "smile" portion.


I popped up the sub sentiments well. After looking at the card, I decided to add some light grey shading with a copic marker around the flowers to try to add some faux dimension (it's very hard to see).  I used a white gel pen to add some details to the flowers and leaves and also added some white pearl accents.

I hope you enjoyed my project for today and I encourage you to create and send a "Paper Hug" to someone special!

(**affiliate links used at no cost to you. If you order through any of the links, I receive a small commission which I'm very grateful for so, thank you!

PRIZE ALERT:

One lucky commenter will win a $50 gift certificate to the SNS shop! So, please leave a little love at each stop to increase your chances of winning!  Good luck! You have until April to leave a comment and the winner will be announced on the SNS Blog. Along with the chance to win the gift certificate, every order placed this weekend will receive the Paper Hugs stamp set fromPicket Fence Studio for FREE (while supplies last).

FACEBOOK CHALLENGE:

You can also participate in the challenge on our Facebook Page which you can find HERE. We also have a fun, new challenge up on this page!! It's called the 30 Days of Cardness Challenge and we're hoping you'll play along! Everyday this month, we'll give you cue words to help fire up your mojo!!

BLOG HOP LINEUP:

Kia

See you soon!

Laurie

Thursday, March 12, 2020

Woodland Whimsy with Gina K Designs!

Welcome back to another look at the Woodland Whimsy Stamp Set! This set is part of the newest release from Gina K Designs and was illustrated by the talented Lisa Hetrick!

Today's card features some Copic colouring and fussy cutting!  I wanted the card to be bright and cheerful and to put a smile on someone's face!


I started by stamping and colouring a couple of the flowers, leaves and that awesome hanging branch!   I kept the colours light! I fussy cut each image out. I was a little worried about the branch but it was actually very easy to cut out!. I simply used a craft knife to make an "x" in the centre of the ropes, took my scissors and removed enough of the card stock to maneuver my scissors inside!

I used Wild Dandelion ink to blend a small area on a white panel. To add a bit of interest, I used a polka dot embossing folder. I used foam adhesive to adhere all the elements to the embossed panel.


I added some sparkle pen to the flowers and a few iridescent pearls, then foam mounted the sentiment underneath.


I foam mounted the panel onto an ivory card base and called it done!!

Thank you so much for stopping by and thank you to Gina K for letting me be a part of this fab release!

Laurie


Friday, March 6, 2020

"Stencil Us In' Blog Hop for Scrap N Stamp Canada

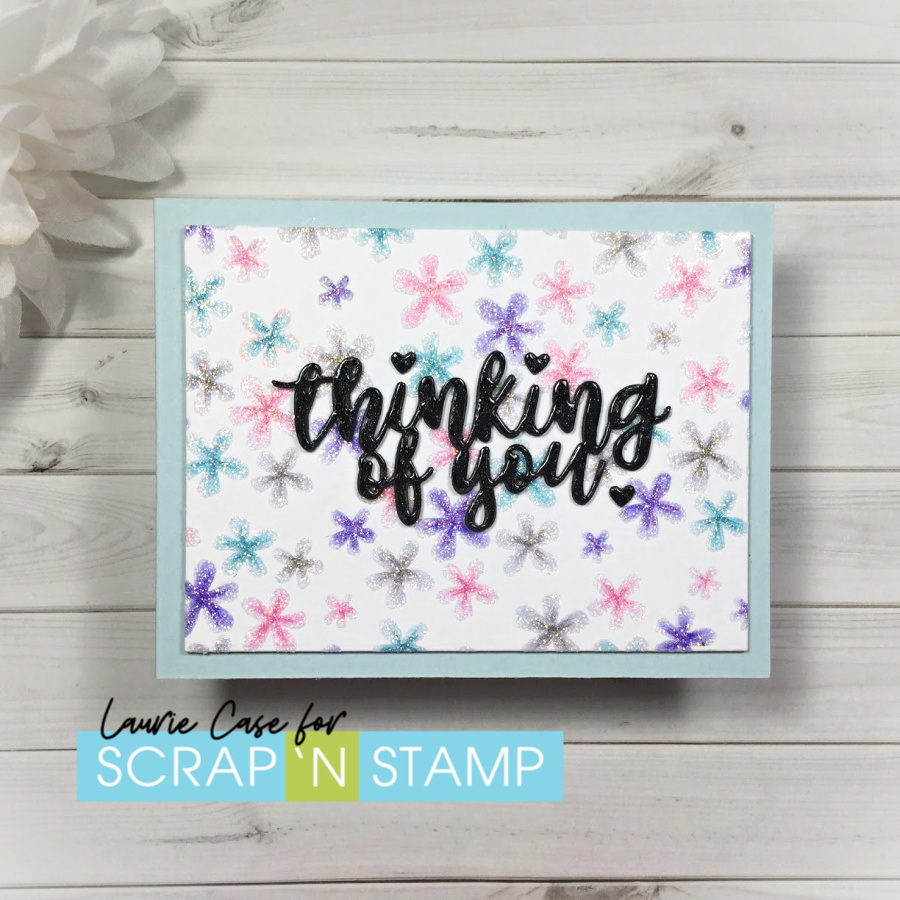
Welcome to another fun blog hop hosted by Scrap N Stamp Canada!  This month we're using stencils. Stencils are so versatile and also very affordable. I had a lot of fun with this one so let's get started!


I used the Scattered Floral Stencil from Taylored Expressions for my card today. This is a very pretty stencil. I decided to do try out some watercoloring using a regular pencil and some Tombow Dual Brush Pens. After attaching the stencil to a piece of Strathmore Mixed Media paper, I lightly traced around each flower.


I removed the stencil and added a bit of the marker to the centre of each flower and blended it out with water. I made sure to keep the colour inside the pencil lines as the pencil would be trapped under the colour!!  After hitting it with my heat tool to make sure it was completely dry, I used an eraser to erase the traced lines. I wasn't super impressed, haha. It was just too bland. I took out my coloured pencils and chose a shade darker than the watercolour. I added some simple flicks and this gave it a lot more character!


Aaaand, I just could stop playing around with this background so I lined up the stencil again and added a layer of Nuvo Moonstone Glimmer Paste. Now this really jazzed things up! I set that aside to dry (which didn't take that long!) and worked on my sentiment.

I used the Fabulous Phrases Dies from Concord & 9th. I love this set!  I cut the "thinking of you" four times from black cardstock and adhered them all together to create a nice, think embellishment. Instead of dotting the "i's", I used the heart die that is included in this set. I added some Nuvo Glitter Gloss Pen as well as Nuvo Crystal Glaze to the sentiment.


I foam mounted the stencilled background onto a light blue cardbase. I'm pretty happy with the way this card turned out. Super sparkly and shiny!!!

If you'd like to see how this card actually came together, I have a VIDEO up on my YouTube Channel which you can find HERE!!

PRIZES:

There will be one $50 gift certificate to one lucky commenter. The winner will be announced on March 24, 2020 on the SNS Blog!! Also, all stencils will be 20% off!!

Thank you for hopping along with us!! I hope you found inspiration here today! Here's the complete hop lineup...enjoy!!!

Thursday, March 5, 2020

Woodland Whimsy...Gina K Designs

Hello!! Today I'm sharing my second card using the new Woodland Whimsy Stamp Set from the latest release from Gina K Designs.  This gorgeous set was designed by Lisa Hetrick and is just beautiful! You can check out all of Lisa designs, here!

I did one of my favourite techniques on this card, Copic colouring with heat embossing on kraft cardstock.


I first stamped that beautiful cluster of flowers onto a piece of kraft cardstock using a light, copic friendly ink. In the case, Memento Desert Sand. NOTE: A stamp positioning tool is key here as you need to restamp in precisely the right spot after the colouring is done!! I used some pinks and purples to colour the flowers and a couple greens for the stems. What I love about this technique is that you don't have to worry about the details. Because you'll be adding all those back when you heat emboss! When the colouring was done, I popped the panel back into my Misti, inked up the stamp with Versamark Ink and added the gold embossing powder. 


I used a rectangle die and did a bit of partial die cutting. I wanted the petals of the one flower to overhang slightly. This was easy to do. I lined up the die and only put the top cutting plate where I wanted it to cut. I used my Fiskars trimmer (with the guide wire) to line up the top and bottom cuts then trimmed around the flower with my scissors.


I heat embossed the sentiment in the same gold, embossing powder, foam mounted the panel on to an ivory, top fold card base and added a few sequins for a finishing touch. I love the subtle shades the markers give on kraft cardstock.

I hope you enjoyed today's clean and simple project using the new Woodland Whimsy Stamp Set from Gina K and Lisa Hetrick!

I have one more card to share using the amazing set so be sure to visit again!!

Laurie


Featured Post

A Simple Thanks Card

Well, well, well. Look who decided to show up...me! It's been an awful long time yet again. I seriously thought I'd be well out of t...