Tuesday, April 16, 2019

Wishing Wells with Your Next Stamp!!

Welcome back, friends!!  Today, is my final guest post for Your Next Stamp.  I've had an absolute blast creating with some of the newest release!  I hope you've had a chance to check out all the amazing inspiration from the YNS design team...they are amazing!  I also hope you were able to get some of these goodies for your craft room :)

For my card today, I used the new Wishing Wells and Wishing Well Fairy Stamp Sets along with their co-ordinating dies.


I had so much fun colouring up these images!  Aren't they beautiful and sweet?  I created a frame using the Reverse Scallop with Optional Stripes Die.  I used the positive portion to ink blend some clouds using a stencil and Peacock Feathers Distress Ink.

On the card base itself, I used a sunray stencil with some Spun Sugar Distress Ink to add a bit of interest.  I used the Misti Stamping Tool to stamp the "wishing" multiple times with the same ink. We all know that Distress Inks don't work so well for stamping but the Misti solves that problem!


I foam mounted the frame and used liquid adhesive for the cloud background. I love that there is a die that cuts out the "Wishing" word!!  I added foam adhesive to the word die as well as all the images.  I love dimension on my cards!


And that's my finished card for today!  I want to thank Karen and Julie for having me this month. I enjoyed my time with you so much!!

And thank YOU for stopping in today. I love when you visit!!

Until next time...

Laurie


My Creative Time 90th Edition Sneak Peek Day Two!!

Are you ready for todays sneak?? Are you sure because it's going to knock your socks off?  Hold on tight, here we go...

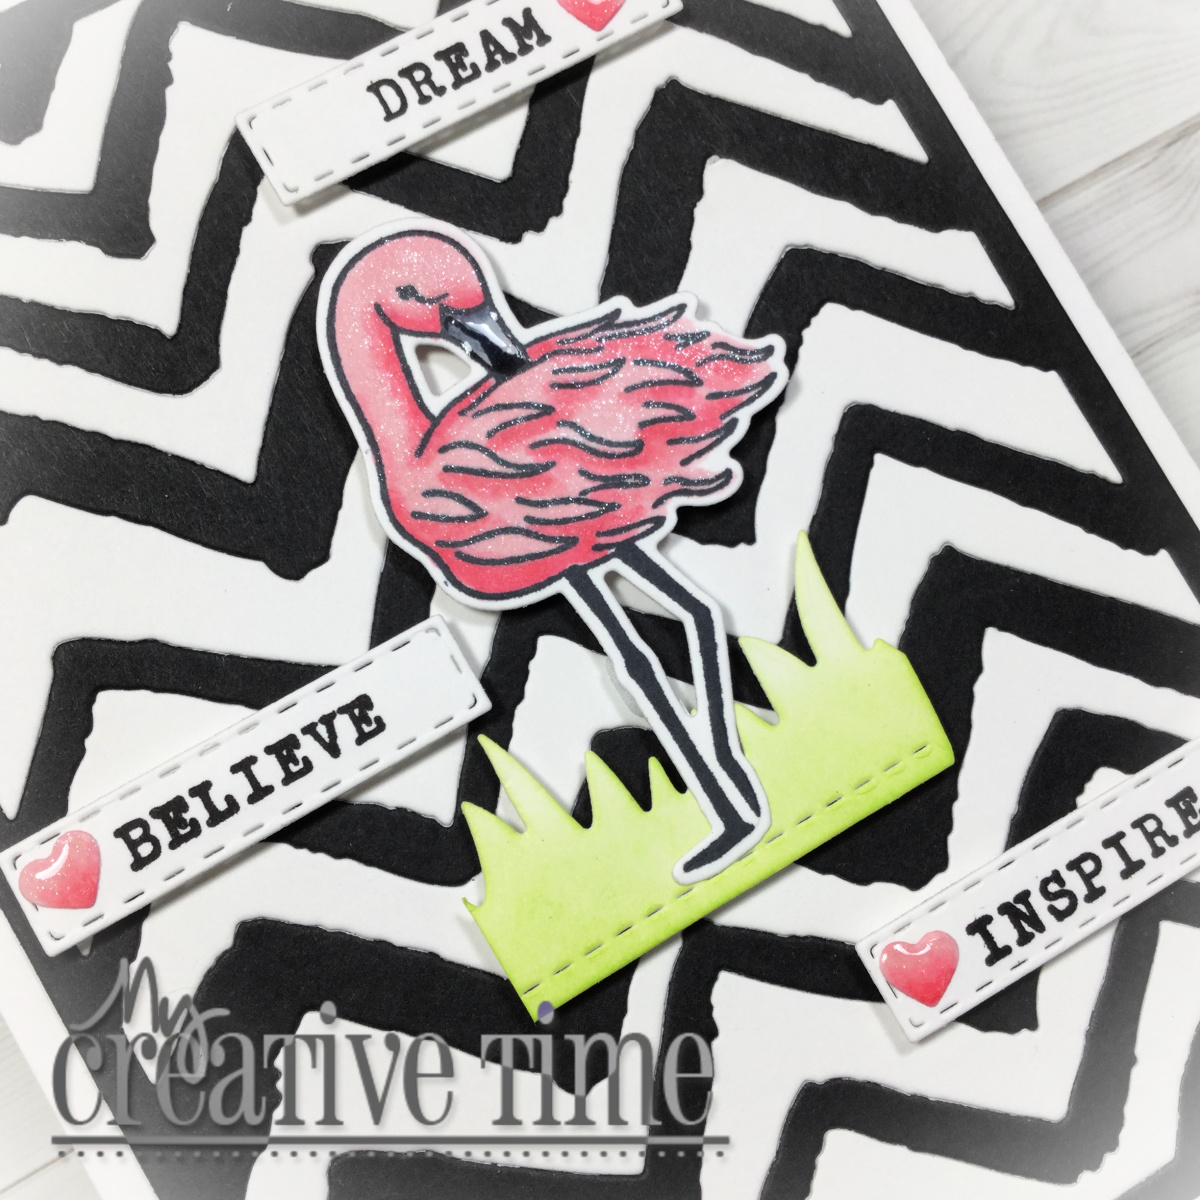
It's a COVER PLATE DIE!!!!  Yippee, I love those things and this one is beautiful and unique! I know I don't have anything quite like it!!  It's called the Zig Zag Background Die!  It's big, it's beautiful and it's bold!! So, without keeping you in suspense any longer, here is the card I created using this fantastic die!!


I cut the die once out of white and once out of black.  I wanted a smooth, graphic style of black and white.  You could easily just lay the black over white and vice versa but I love the look of in laid die cutting!! Plus, I got two backgrounds! This one and the other where the colours are reversed!  Stay tuned for that one :)


With a black and white background, I decided to add pink for a pop of colour.  I used one of the flamingos from yesterday's sneak and used alcohol markers to get some vivid colour.  To ground that beautiful, pink bird I used a portion of the Stitched Grass Die, coloured with Twisted Citron Distress Ink.  I used sentiments from the Never Stop Dreaming Stamp & Die Set and stamped them onto the smallest die from the brand new Strip Sentiment Dies.


The background was adhered flat to a top fold A2 card base while all the elements were popped up with foam adhesive.  I love how this card turned out and I SUPER LOVE this die!!  I hope you're all as excited as I am :)

Thank you so much for stopping by today! See you tomorrow for another awesome sneak peek!!

Sneak Peek Giveaway:

We will be giving away the sets we are showcasing each day to ONE lucky winner! For example, the set we are Wednesday, Emma will announce the winner of that on Thursday and the set we are showcasing on Thursday, Emma will announce that winner on Friday (on the MCT Blog).  All you have to do is leave a comment on each of our blogs. You are not required to comment on on every single blog, but the more you comment, the more chances you have to win! VERY IMPORTANT: Please leave a way for us to contact you when leaving your comment, just in case you are the lucky winner!!  For extra entries, you can spread the word about this release by sharing it on Facebook, Tweeting about it or sharing on Instagram!  Use the hashtag #mycreativetime.  GOOD LUCK!!

Laurie


Monday, April 15, 2019

My Creative Time 90th Edition Sneak Peek Day One!!

Hello, crafty friends!! Are you all ready for another AMAZING release from My Creative Time?!!  Today, we're taking a look at two different products which work VERY well together!

First is the Hello Gorgeous Stamp & Die Set.  This is a beautiful stamp set featuring two flamingo images and includes some of the best sentiments, EVER!!  Here's a look at what I made using the set.


I created a little circle scene using the Bunch of Fun Circles Dies, the Floating Clouds Dies and the greenery dies that are included in the Summer Vibes Stamp & Die Set.  I coloured everything with Distress Inks which was quick and easy.  I layered the circle scene onto the largest die in the Bunch of Fun Circles set and before adding that to the card base, I used a leaf embossing folder on the front panel.


I stamped the sentiment onto one of the new Strip Sentiment Dies. You are going to love these dies! They are so cute and not mention versatile. I even have a bonus project featuring these dies for you today! 


I finished this card off with a bit Nuvo Crystal Glaze and some clear sequins.  Let's have a look at my bonus card!


The sentiment strip dies come attached and for this project, that came in handy.  When ran the dies through my die cutting machine using cardstock first, then a scrap piece of paper.  The scrap provides a template which make it really easy to line the die cuts up on the card front.

I white heat embossed different sentiment on the labels then used a rainbow colours of Distress Inks to blend over top.


I did cut craft foam using the dies as well, for perfect dimension.  Then added some co-ordinating rainbow confetti to each sentiment strip. And that call that card, done!! This is a super clean and simple card, but so much fun!!

I hope you enjoyed today's sneak peek!! You won't want to miss tomorrow :)

Sneak Peek Giveaway:

We will be giving away the sets we are showcasing each day to ONE lucky winner! For example, the set we are Wednesday, Emma will announce the winner of that on Thursday and the set we are showcasing on Thursday, Emma will announce that winner on Friday (on the MCT Blog).  All you have to do is leave a comment on each of our blogs. You are not required to comment on on every single blog, but the more you comment, the more chances you have to win! VERY IMPORTANT: Please leave a way for us to contact you when leaving your comment, just in case you are the lucky winner!!  For extra entries, you can spread the word about this release by sharing it on Facebook, Tweeting about it or sharing on Instagram!  Use the hashtag #mycreativetime.  GOOD LUCK!!

Laurie 


Monday, April 8, 2019

Manly Monday with My Creative Time!!

Good morning, friends and welcome back!  Today, I'm sharing a masculine card featuring stamps and dies from My Creative Time.

I find the easiest thing to do when creating a masculine card is to start off with a colour palette.  Once I've found a good choice of colours, things usually fall into place. Next, I like to keep the design simple but graphic.

I used the Mad for Plaid Stamp Set to create a background panel for my card. I know I've used this set for other Manly Monday projects but it is SO versatile and works SO well for masculine cards!


I used Catherine Pooler Inks in the colours, Twilight, Lime Rickey, Aquatini and Orange Twist. You can really go all out and create an amazing plaid background with this set, but I kept it simple with diagonal lines.

I used the "you" from the You Dies #2 Set and partially inked up the "you are awesome" stamp from the Amazing Things Stamp and Die Set to create my sentiment.  For the extra pop of colour, I used the Orange Twist and Aquatini inks to blend colour onto the stars, which are from the 3 Star Stitched Dies.


I adhered everything onto a grey circle cut from one of the Bunch of Fun Circles Dies, then foam mounted it all at once onto the striped panel.  A bit of sparkle and Nuvo Crystal Glaze to the "you" and some white gel pen details, finish this card!!

I hope you enjoyed todays project and found a little inspiration!

Thank you so much for visiting today!!

Laurie


Friday, April 5, 2019

"Background Check" Challenge and Blog Hop for Scrap 'N Stamp Canada

Welcome back, friends!!  Today is the start of another challenge for Scrap 'N Stamp Canada!  It's all about backgrounds!  The door is pretty wide open here...you can use a background stamp, use multiple images to create a background, ink blend, watercolour or use a stencil. The sky's the limit on this one!!


For my project, I decided to create my own stencil using a cover die AND trying out my new Life Changing Blending Brushes from Picket Fence Studio!! I was so excited to see that the SNS Store started to carry this line of stamps and dies!  The process took a bit of a turn about halfway through this card so let's take a look!!

I started by stamping, colouring and fussy cutting a few images from the Stuck On You Stamp set from Concord & 9th.


I decided to create my own stencil for the background of my card.  I used the Polka Heart Background Die from Lawn Fawn.  I die cut it out of printer/typing paper.


Initially, I thought I wanted a green heart background to co-ordinate with the cacti so I used a medium blending brush along with Twisted Citron, Crushed Olive and Peeled Paint Distress Inks. These brushes work awesome with stencils!!  I did try to do some direct ink blending without a stencil, and I just couldn't get the hang of it with these brushes. I also noticed quite a bit of wrist fatigue as well :(.  At this point, I would highly recommend these brushes for stencilling and small areas but personally, I'll continue to use the Ranger Ink Blending Tool for full backgrounds. 


You can see the nice blend these brushes create! And I was surprised at how well the ink cleaned off! I simply rubbed it onto a paper towel before each colour change.  And I did change the colour theme here!!  I just flipped over my home made stencil and used Worn Lipstick Disress Ink.


After I was done with the ink blending, I used a Wonky Stitched Rectangle Die to cut down the panel. I love the way it turned out!


Now it was just a matter of putting all the elements together!!  I used foam adhesive to adhere all my potted cacti onto the panel.


I should mention that I did a bit of paper pieces on the flower pots using some scraps of patterned paper in my stash.


I wanted to keep the card fairly CAS so I didn't add much else to it.


I love the soft blend these brushes gave and would definitely recommend them!

Just so happens, that for this weekend only, Scrap 'N Stamp is offering 20% off the Picket Pence Brushes when you use the CODE: BRUSH20!!

PRIZES:

There will be eight (8) grab bags along with one (1) $50 gift certificate to the SNS Store!  Now, those are some awesome prizes!!  All you have to do is leave some love at each stop of the hop for your chance to win!

CHALLENGE BLOG:

Remember, to enter your project on the SNS Challenge Page for another chance to win!!

BLOG HOP LINEUP:

Laurie (that's me!)

Thanks for hopping along with us today!!

Laurie


Thursday, April 4, 2019

Your Next Stamp April Release Blog Hop!!


Welcome back!! Today is the day!! Your Next Stamp has another incredible release for you this month.  And today I've used my favourite... Just Keep Floating!!!

I am a cat lover so this set really spoke to me :).  I chose the donut floaty and the cat that's laying down...it seriously doesn't get any cuter than that!!

I wanted to make a small swimming pool for my kitty so in the end, my card ended up in a circle shape.


I created a background with the new Fishy Background as well. It's faint but you can definitely see it in real life!  Over the heat embossed background, I lightly inked some water ripples using a stencil and Faded Jeans Distress Ink.


This set has some of the cutest filler images. I added the flip flops, sunscreen and sunglasses on the edge of the "pool" and tucked the beach ball under the edge to make it look like it was floating in the pool as well.


You can see the little fishies in the background as I covered them in sparkle pen.  I added a bit of Nuvo Crystal Glaze to the beach ball, sunglasses and the nose and ears.  This set if FULL of the sweetest cat images and I can see myself using it again and again!!

Here's a look at the new products I used:


GIVEAWAY!!

You can win a $25 gift certificate to the Your Next Stamp Store!! Just hop along with us and leave some love at each stop.  The more blogs you comment on, the more chances you have to win! You have until April 7th, 2019 at 12:00AM EST to comment. The winner will be announced on the YNS Blog on April 9th, 2019.

And with 20% off, it's a great time shop!!!!


Thanks for stopping by today and enjoy the all inspiration of this hop!!

Laurie


Wednesday, April 3, 2019

Create A Smile Challenge...Crafty Friends!

Welcome back to another Challenge for Create A Smile Stamps!!  It's a fun one this week and one we can all appreciate...Crafty Friends!  So get those CAS stamps out and start getting crafty!!

Create A Smile has a must have set in the store called Stamping Friends.  This set is perfect for creating something special for one (or all) of your paper loving buddies!  I used a couple of images from this set and combined them with a couple older stamp sets.


I started by gold heat embossing the gorgeous sentiment from the Happy to Call You My Friend Stamp Set.  I used the Heart Rays Stencil along with Seedless Preserves and Dusty Concord Distress Inks right over top of the sentiment.  I tried to centre it the best I could.  I cut down the inked panel using the second largest die from the Scalloped Rectangles Cool Cuts Set.

I stamped the ink blending tool and a few sequins from the Stamping Friends set.  The sequins were gold heat embossed right off the start and colour was added with the same Distress Inks.  I stamped the blending tool in a light Copic safe ink, coloured it and then added the embossing.  Jury still seems to be out on whether the embossing ruins your marker tips so I played it safe! Everything was fussy cut.


I foam mounted the images and it was at this point I decided to add the "creative" to the card.  This comes from the Same Frequency Stamp Set (which also contains some crafty images!). I simply masked off a portion of the stamp, inked and fussy cut around it.  I adhered the focal panel to an ivory card base...I am loving the white and ivory combination!!


To have the heat embossed sentiment stand out a bit more, I CAREFULLY added a drop shadow using some cool grey markers.  And that's it!!  

Can't wait to see what crafty creation you come up with!!  Please visit the Create A Smile Challenge Blog for more details but in the meantime, this is what you'll be playing for!

Thank you so much for stopping by today!!  See you soon!

Laurie


Featured Post

A Simple Thanks Card

Well, well, well. Look who decided to show up...me! It's been an awful long time yet again. I seriously thought I'd be well out of t...