Tuesday, October 20, 2020

Tweet! Tweet! (Create A Smile Stamps)

 Hello and welcome! Today I've got a fun card to share with you featuring some masking, colouring and stencilling!


This card features three of the adorable bird images from the From My Nest Stamp Set. I started by stamping the little bird, masking him off, then stamping the larger two birds beside him. After removing the mask, I appears that the little guy is standing in front! Oh, the magic of masks:)

I coloured the image with Copic markers. The birds turned out a little darker than I wanted but I just went with it.


To create the small background, I used the largest oval in the Basic Ovals Stencil. I positioned it onto a white card panel that was trimmed slightly smaller than an A2 card base. 

I used a light blue ink to add the "sky". I made sure to use heavier pressure on the outer edges and lightening things up towards the centre. With the oval stencil still in place, I added a snowfall stencil that I had in my stash and applied embossing paste over top.

When both stencils are removed, you have a perfectly ink blended, snowfall oval!!  I had some die cut leaves in branches in my "unused die cut container" so I decided to add them here for a bit of interest.


I stamped the sentiment (from the same set), foam mounted the birdies and then foam mounted the panel onto a white card base. I was going to add details like shimmer and white gel pen, but for some reason decided against it.

Thank you so much for stopping by! See you soon!

Laurie


Monday, October 5, 2020

You Rock!! with Create A Smile Stamps

 Good morning and welcome! One of my favourite things to do is mix and match stamp sets. This gives you more bang for your buck! Today, I've mixed two image sets along with a sentiment set from Create a Smile Stamps.


I also attempted to colour a white flower! This beautiful bloom comes from the Doodle Flowers Set. It's a large image and the possibilities are endless when it comes to colouring it! I used 2 Copic markers: C1 and the colourless blender. I could've used a C2 as I did add a couple of layers to darken it up. I've never actually added the flicks of colour on the outer edges of the petals before, but I think it makes a huge difference in dimension!


The sweet bee is from the popular Best Bugs Set. I thought the sizes of each image went really well together.  Before adhering the images to the front of the card base, I used the Spring Garden Stencil along with a light grey ink just to add a bit of interest to the background.

For the sentiment I used the All About You Stamp Set along with the You Twice Cool Cuts.


To finish the card off, I found a small heart die in my stash and cut a few tiny, black hearts. I added some sparkle to the bees wings, some white gel pen details and touches of Nuvo Crystal Glaze for some added shine!

I hope you enjoyed my project for today! Thanks so much for dropping by!

Laurie


Wednesday, September 30, 2020

No Line Colouring with Create a Smile Stamps!

 Good morning and happy Wednesday! I'm back to share a card made using one of the newest stamp sets from Create a Smile Stamps! And I've also decided to do some no line colouring with my pencils!


This simple eucalyptus image is from the Breathe In, Breathe Out Stamp Set. This set has multiple images in different sizes. I used one of the smaller ones so as not to get overwhelmed while colouring.
I'm not an accomplished colourer. I don't really go for realism and my technique is my own. I do it purely for the fun of it. I just want good results that I'm happy with. This is the stress-free way!!


After colouring, I used the second largest die from the Stitched Circle Frames. This cuts the inner portion as well as the detailed frame. The coloured panel measures 3.75X3.75 inches. I adhered it to a 4X4 square card base. I glued the frame down, added a piece of fun foam (cut using the same die), then adhered the coloured portion on top!


The sentiment comes from the Small Sentiments Set. I resisted the urge to add any further embellishments, leaving it clean and simple.

Thanks for dropping by today! See you soon!

Laurie


Thursday, September 24, 2020

Altering Your Stamps and New Release!!

 Hello and welcome back! Today is an exciting day as it's time for a new release from Create A Smile Stamps!! This release is a mixture of cute and beautiful with images ranging from critters to stunning foliage.

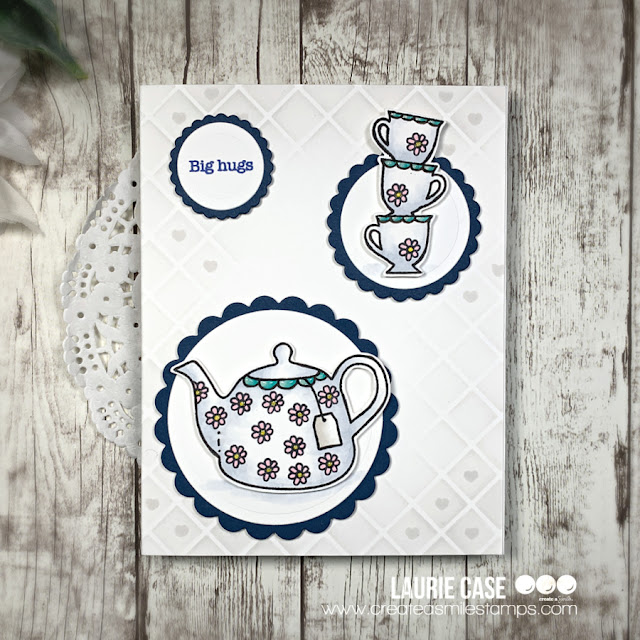
For my card today, I went with cute. I also altered the images a bit to create a whole new look with this stamp set which is called Tea Time.


I wanted to show you the stamp set first, then my card. You can see that each image has the cutest smiley face on it. For my project, I didn't want that.


Before stamping, I placed a small piece of tape over the face. This prevents the ink from touching this portion. Just remember to take the tape off before you stamp!! So instead of a smiling cup and tea kettle, I have space to add different details.


I first took a black pen and drew some scallops on the top of each cup and the teapot. To make my tea set flowery, I used a small stamp from the Best Bugs Stamp Set. The only bit of masking I had to do was on the spout. All I did was place a scrap piece of paper against the edge!  I did some simple masking again with the teacups to stack them on top of each other. Again, using just a scrap of paper to cover the top of each cup.

I die cut some white circles and some navy scalloped circles using dies from Lawn Fawn. I foam mounted each image onto the two larger circles and stamped the sentiment on the smallest. The sentiment comes from the From Afar (A8 size) Set.


Before adhering the circles to the card base, I used a light grey ink and the Diagonal Grid Stencil to add some interest. I found a tiny heart stamp and added few inside the squares.

To finish, I added some gold sparkle to the centres of the flowers and some Nuvo Crystal Glaze to the scallops on the tea set.

Thanks for stopping by and please check out the newest stamps from Create A Smile!!

Laurie


Thursday, September 17, 2020

Tags for your homemade goodies ft. Create a Smile Stamps!

 Hello!! Today I'm going to share a really cute way to dress up your homemade jams or jellies using a super cute stamp set from Create A Smile Stamps!


I used the Summer in a Jar Stamp Set for these tags. This is a sweet little set that has some really cute and rather large images!

I used the jar image along with a couple different berries. I used Copics to colour then fussy cut everything out.  The tag is a die from my stash which I dressed up a little using the Narrow Stripes Stencil and a light grey ink.


What's great about this set is that it comes with a bunch of sentiments that fit on the jar label!  I arranged the images on the tags with a combination of liquid glue and foam tape. And of course, added some black & white bakers twine!


I think these are so sweet and perfect for gift giving!

I hope you will check out this set and all the other amazing CAS stamps, dies and stencils!

Thanks for popping over today! See you soon!

Laurie


Friday, September 4, 2020

Scrap N Stamp Blog Hop: LIVE, LOVE, LAVINIA

 Welcome back to another fabulous monthly blog hop brought to you by Scrap N Stamp Canada! This month we are featuring stamps from Lavinia Stamps.


Lavinia Stamps is a new company for me. The images are very whimsical and quite beautiful. And they are perfect for art journaling so that's what I've created for you today!


I worked in my Travellers Notebook refill pages which you can find on Amazon. These are a fantastic way to start as they are inexpensive and the size is not too daunting! After covering the pages in Gesso, I picked out 3 Distress Oxide Inks: Speckled Egg, Pumice Stone and Fossilized Amber. I ADORE this colour combination!  I did some simple ink smooshing by using an acetate sheet.

I decided to try heat embossing on this page. I've never done it on a journal layout so wasn't sure how it would go. But it actually turned out not too bad! I used the Zen Leaf 2 stamp from Lavinia Stamps along with white embossing powder. I tried to stamp as randomly as possible.


To make the images pop a bit more, I added the same three ink colours inside some of the leaves as well as used a watersoluable pencil to create some shadows around each leaf.

Art journaling is all about adding layers and textures so I took the Mini Dots stamp (Lavinia) and some Black Archival Ink and did some random stamping. While I had that ink out, I used a Tim Holtz Stencil to add the circle patterns.


It was at this point that I wanted more black so I used a portion of the Mini Butterfly Collage Stencil with Black Embossing Paste to add not only more black but texture as well!

The sentiment comes from the Big Chat Sticker Book from Tim Holtz. I outlined each sticker with a white gel pen. To finish the page off, I used a black brush pen to draw a wonky border to frame it nicely. WAIT!! I thought I was finished at this point but I had one more stamp to use and that was the Flutterby Mini stamp.

I stamped it directly onto the page as well as a scrap of watercolour paper. I used Speckled Egg and Fossilized Amber inks to add a bit of colour to the wings. I fussy cut the wings only and added it to the stamped image on the page....now it's done!!


Thanks so much for stopping by and hopping along with us today! I hope we've inspired you to try out Lavinia Stamps if you're new to them!!

BLOG HOP LINEUP:

ME

PRIZES AND SALE

There are 3 prize packs from SNS up for grabs. Just leave a comment on each stop of the hop for a chance to win!  Also, Lavinia Stamp will be 20% off until Sunday, Sept 6th/2020 at 9pm PST.


Thursday, September 3, 2020

Dusting Off the Coloured Pencils ft. Create a Smile Stamps!

 Welcome back! I decided to dust of the pencil crayons and colour some gorgeous new images from Create A Smile Stamps!

Pencil crayons (that's what we call them here in Canada) is a tricky medium for me. I love the look but I'm not a fan of the amount of time it takes. I've watched probably hundreds of tutorials and they all say the same thing...light pressure and build up the colour. Well, I didn't do it that way. I laid it down heavy and in one layer. 


This floral images is from the Mallow Blossoms Set. You can really see here how thickly I applied the colour. I'm also going to point out that I thought the small, green piece was a leaf. In fact, it's a part of the blossom that I THOUGHT was a leaf. I'm clueless when it comes to flowers so please forgive me, haha!


To put this card together, I used the Petals Stencil on the card front with a light, pink ink. I used the second largest Scalloped Rectangle die to create a panel. I carried the stencilling to the inside of the circle. To create the kraft circle, I used one of the Postage Edge Circle Dies. I placed a smaller, plain circle die on the inside to create this ring.

I adhered the ring to the white panel and foam mounted the flowers. The sentiment (from the Mallow Blossoms) was stamped onto one of the Useful Banners Dies and was also popped up. I added a few sequins for a bit of sparkle.

Thanks for dropping in! See you soon!

Laurie


Thursday, August 27, 2020

New Release from Create A Smile Stamps!

 Welcome back!! Create A Smile Stamps recently came out with the August Release and it is SO amazing and cute!


This card combines 2 different stamps sets. The adorable mice are from the new Unmatched set and the strawberries and umbrella are from the Here's to Us set. These two sets are completely different but ended up working really well together!


For the colouring of these images, I used Derwent Inktense Pencils. The images were stamped on regular cardstock. With these pencils you don't have to use much water. The cardstock held up fairly well but what I loved the most was the texture. It's kind of a mottled effect and I think adds a lot to the image.

I used a wavy stencil to create the "sand" then added a textured embossing powder for the "surf". All the images were fussy cut and adhered with foam adhesive.

I used one of the Useful Banner Dies to cut out the sentiment and also popped that up. I added a few white gel pen details and called this card done!


I hope you have a chance to check out the new release! Thanks so much for stopping by and I'll see you soon!

Laurie


Thursday, August 20, 2020

Funny Get Well Card ft. Create A Smile Stamps!

 Get Well and sympathy cards are the two least made cards that come out of my craft room. So, today I decided to shake things up and make a Get Well Card!

I used stamps from Create A Smile Stamps. The Oh, Poo set was released at the height of the toilet paper crisis this spring. It was meant as a "feel better" set but came out at the perfect time, haha!  I combined this set with the adorable monster from the "seriously?!" set. Both these a mini sets which means the price point is awesome!


I started by creating a "floor" by masking just above the bottom of the card base. I lightly brushed on a brownish ink. I then placed the tape over that ink and worked on the "wallpaper". The cute design of the wall is brought to you by the Diamonds Stencil and a light blue ink.

I coloured up both images with Copics. I thought it would be kind of funny to have the monster peeking around the toilet!


I used a sentiment from the Shit Happens Stamp and stamped it directly onto the card base. I used the Small Sentiments along with a Speech Bubble die to have the monster saying "get well".

And that's my CAS card for this week! I hope you enjoyed!

Also, a reminder that there is a new release available!!

Thanks for stopping by!!

Laurie


Friday, August 7, 2020

Shake Up Summer Blog Hop (Scrap N Stamp Canada)!!!!

Welcome to the "Shake Up Summer" Blog Hop hosted by Scrap N Stamp Canada! Just like the theme implies, we've made shaker cards for you


We are featuring cute little shaker card kits from Tonic Studios that make life just a bit easier when you're making these. Although, I was a teeny bit confused so watching a YouTube video helps!!


For my card today, I've used the Coffee Mug Shaker Set. These sets include 2 dies and 5 refill pouches! I opted to use vellum instead of the shaker pouch. I wanted a softer, flatter version of a shaker. But the upside of the clear, plastic pouches is they can hold a ton of shaker bits!


I inked the back side of the vellum with a brown ink to look like coffee and added some gold sequins. It's very subtle but still gives that fun shaker sound.

The sentiment, heart and steam come from the Thanks A Latte set from Lawn Fawn...I love that sentiment!


I added a few doodles around the edges and popped the panel onto a kraft card base. Honestly, I don't make interactive cards but throwing together a shaker card every now and then is fun!

Thanks for hopping along with us, you can find the full hop list below as well as GIVEAWAY and SALE details!!

BLOG HOP LINEUP:

Laurie(that's me)


GIVEAWAY:

Scrap N Stamp is giving away a gift package to THREE lucky commenters! Just leave a comment on each stop of the hop. It's that easy!

SALE:

All Tonic Brand is 20% off until August 9th, 2020!! This includes all Nuvo items as well!


Thursday, August 6, 2020

AHOY!! with Create A Smile Stamps!

Hello friends and welcome back! I'm sharing a card with you featuring stamps and stencil from Create A Smile Stamps.


I've used the older stamp set called Underwater Love. This is a nautical/sea themed set and is just the cutest. I paired it up with the Bubble Rays stencil, which I used in a slightly different way.

I inked up the stencil as usual but instead of stopping there, I decided to fussy cut around the entire stencil! This gave almost a cover die appearance!  I knew I was going to place a circle in the middle so I only cut as far as necessary.

I coloured the cute submarine with Copics and foam mounted it onto the circle die cut, which I had lightly inked up in blue and heat embossed some "bubbles".


I added some sparkle pen, white gel pen and Nuvo Crystal Glaze details to finish this card off!

Thanks so much for stopping by! See you soon!

Laurie

Monday, July 27, 2020

Sweet Bee Card ft. Create A Smile Stamps!

Hello friends and welcome! Today, I'm sharing a cute, clean and simple card with you featuring stamps, dies and stencil from Create a Smile Stamps!


I created a couple of mini scenes using the Best Bugs Stamp Set and the Magical Frame Dies.  This was simple to do. The die cuts in 2 seperate pieces, the inner square and the frame portion. I did all the stamping on the square. The scene to the right did require some simple masking of the flowers because I did do a little ink blending.


I stamped the bees on a separate piece of cardstock and fussy cut them not leaving a white border. This gave the illusion of more masking!  After the colouring was done, I attached the frame to the inner square with scotch tape then added some foam tape.

On the card base, I masked off the centre portion (approx 2.5 inch strip) then applied the Narrow Stripes Stencil over top. I used a light grey ink to add the subtle stripes. This just gave it a little extra something.


To finish the card off, I stamped the sentiment onto one of the Useful Banner Dies and adhered it with foam adhesive. And to add even more cuteness, I used three of the new Chipboard Tiny Hearts as embellishments.

I hope you enjoyed todays look at Create A Smile products!

See you soon!

Laurie


Monday, July 20, 2020

Masking Stencils with Create A Smile Stamps!

Hello and welcome! I have this fun card to share with you today featuring stamps and stencils from Create A Smile Stamps.


I started by choosing the size of circle I wanted on the Basic Circles Stencil. With ink, a blending brush and a light hand, I added the colour. This layer needs to be a bit lighter. With the circle stencil still in place, I laid the Heart Rays Stencil over top and tried to centre the hearts the best I could. I used the same ink colour and a heavier hand when applying the ink. This creates a lovely two toned effect.


The cute little elf is actually from the Christmas set called Clumsy Santa. I did a bit of altering to the facial expression by fluffing up the eyebrows and adding a couple of eyelashes. By colouring the image using the same colour palette as the background, it doesn't look like a Christmas image at all!

To ground the elf, I used one of the Scalloped Rectangles Dies and trimmed off the top. The sentiment comes from the A Little Treat Stamp Set

I added a few white gel pen details to finish the panel off. I created a white card base to match the size of the panel. I inked the edges of the card base with the same blue ink I used before and adhered the stencilled panel on top.

And that's it! Thanks for joining me today! See you soon.

Laurie


Tuesday, July 14, 2020

Rainbow Thinking of You Card with Create A Smile Stamps!

Hello friends and welcome!  Today, I made a rainbow "thinking of you" card featuring stamps and dies from Create a Smile Stamps.


I started by taking one of the banner dies from the Useful Banner Die Set and cut rainbow strips of card stock. I adhered the banners one by one onto a scrap piece of cardstock so it became one piece and easy to move around.

To add a bit of texture and interest, I chose a few of the solid images from the Wildflowers Stamp Set and heat embossed them with clear embossing powder. I love this look. It lets the background show through yet it also darkens the cardstock where it's embossed!


After a dry run of panel placement, I decided to clear heat emboss directly onto the card base as well. Hard to see but the texture is awesome!!

I used fun foam to adhere the rainbow panel. The sentiment is a combination of the You Twice Die and the All About You Stamp Set. In retrospect, I wish I had white heat embossed the "thinking of" but I'm still happy with the way this turned out!

Thanks so much for dropping by! See you soon!

Laurie


Thursday, July 2, 2020

No Line Watercolour with Create A Smile Stamps

Hello and welcome! Today I'm sharing a card made with stamps from Create A Smile Stamps along with the no-line watercolour technique!


I'm no expert at this and tend to mess with things too much. I'm constantly trying to move the colour around and usually end up overworking it. The key to watercolouring is patience and I don't have a ton of that, haha!  

My go to ink for no line techniques is the No Line Ink from The Stamp Market. I love the foam pad and it usually only requires one impression, even on watercolour paper!  

I used the gorgeous Pure Poppies Stamp Set from Create A Smile. I went for a pinkish-purple flower. My medium of choice was Derwent Inktense Blocks which have been gathering a bit of dust. Every time I use them, I ask myself "why aren't you using these more!?". Of course, you can use the pencils! 


When the colouring was done, I placed the Petals Stencil (CAS) over the top and used a light blue colour to trace around each opening. Because the Inktense are waterproof when dry, you don't have to worry about reactivating the colour! It's very faint but still adds detail!  I trimmed the panel down and added some Black Soot Distress Ink around the edges.  

I did some partial die cutting of the second largest Scalloped Rectangles Die to fit the floral panel. I adhered the two together with tape adhesive then foam mounted it to an ivory card base.

The sentiment comes from the Favourite Everything Stamp Set and was white heat embossed onto black cardstock. The small banner comes from the Useful Banner Dies.


Thanks for stopping in today! Hope you enjoyed today's card and will come back to visit again!!

Laurie

Wednesday, July 1, 2020

Canada, Eh? Blog Hop for Scrap N Stamp Canada

 We're celebrating Canada Day today with a fun blog hop brought to you by Scrap N Stamp Canada!


I made a very simple, very quick card. I don't generally give or mail these types of cards, do you?
I also do not have many "patriotic" sets in my stash so I had to improvise!


I used one of the zebras from the Zippy Zebras set from MFT. I actually drew the flag myself, fussy cut it out and attached it to the zebra.

I foam mounted the zebra and added a bit of "grass" using one of the Grassy Hillside Borders Dies from Lawn Fawn. I added a couple of clouds from another set in my stash. Any cloud stamps would work here.


For a bit of interest and to break up some of the white space, I added some doodled borders in opposite sides of the card.

The sentiment comes from an older set from PhotoPlay called O Canada. This is an adorable set and worth checking out!


I love the simplicity of this card and it was so quick and easy to make.

PRIZES

This month there are 3 prize packs up for grabs! There will be one winner chosen from comments left on the hop, one winner from comments made on our Facebook Page and one winner from comments made on our respective Instagram posts.  Winners will be announced on the SNS Blog on July 15th, 2020.

BLOG HOP LINEUP


I hope you all have a fantastic day and thank you for hopping along with us!
Happy Canada Day!!


Featured Post

A Simple Thanks Card

Well, well, well. Look who decided to show up...me! It's been an awful long time yet again. I seriously thought I'd be well out of t...